
Finding healthy snacks for kids that are genuinely allergy-friendly can feel like a full-time job. Between nut-free classroom policies, birthday party restrictions, and the endless challenge of packing lunchboxes that kids will actually eat, the pressure on parents is real.
These Nut-Free Chocolate Coconut Bites solve all of that at once. They are made with just a handful of clean ingredients, require zero baking, and are completely free of nuts — making them one of the most practical healthy snacks easy enough to make on a weeknight and safe enough to send anywhere.
Why You’ll Love These Nut-Free Chocolate Coconut Bites
The first thing parents notice is how quickly these come together. There is no oven to preheat, no batter to mix, and no complicated techniques involved. From start to finish, you are looking at 20 minutes of active time, which makes this one of the most reliable healthy snacks to make when the week gets busy.
Kids love them because they genuinely taste like candy. The chewy coconut center paired with the snappy dark chocolate coating hits every craving a child has after school. Adults love them for the same reason — these are healthy snack ideas that do not taste like a compromise.
They are also one of the most flexible recipes in the healthy snacks category. Naturally gluten-free, dairy-free when made with the right chocolate, and completely nut-free from start to finish, they cover an impressive range of dietary needs without asking you to hunt down specialty ingredients.
Common Mistakes When Making Nut-Free Chocolate Coconut Bites (And How to Avoid Them)
Using sweetened shredded coconut. This is the single most common mistake and it throws off the entire balance of the recipe. Sweetened coconut makes the centers cloying and overly sugary, especially once the chocolate coating is added. Always reach for unsweetened shredded coconut and control the sweetness yourself with maple syrup or dates.
Not chilling the bites before dipping. Room-temperature coconut bites are too soft for chocolate dipping. They will fall apart on the fork, and the chocolate will pool unevenly around the base instead of coating cleanly. A 15-minute freeze is non-negotiable for a clean, professional finish.
Cross-contamination with nuts. If you are making these as genuinely nut-free healthy snacks for kids with allergies, clean your food processor and all utensils thoroughly before starting. Check every label — including your chocolate, coconut, and vanilla extract — for “may contain traces of nuts” warnings.
Skipping the coconut oil in the chocolate. A teaspoon of coconut oil stirred into the melted chocolate makes it significantly easier to work with and gives the finished coating a glossy, set finish rather than a dull, matte surface. It is a small addition that makes a noticeable visual difference.
Key Ingredients for Nut-Free Chocolate Coconut Bites
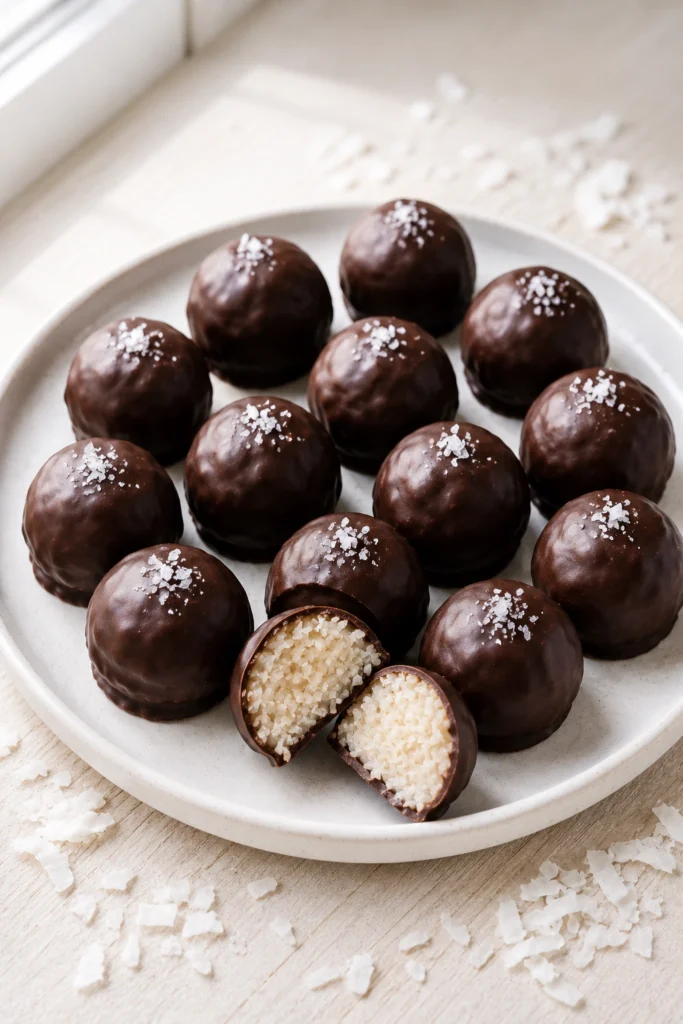
Unsweetened Shredded Coconut Coconut is the hero of this recipe and it does the heavy lifting on both texture and flavor. The natural oils in shredded coconut act as a binder, holding the centers together without needing any eggs, butter, or sticky binding agents. For a chewier bite, use medium shredded coconut. For a finer, more compact center, use desiccated coconut.
Maple Syrup Maple syrup is the preferred sweetener here for two reasons. First, it blends seamlessly into the coconut mixture without any additional processing. Second, its gentle sweetness complements coconut beautifully without overpowering it. It also keeps this recipe firmly in the category of healthy snacks for diabetics when used in moderate amounts, as it has a lower glycemic impact than refined white sugar.
Vanilla Extract A full teaspoon of good quality vanilla extract rounds out the flavor of the coconut centers and adds a warmth that makes these taste bakery-level rather than homemade. Do not skip it and do not substitute imitation vanilla — the difference is noticeable in a recipe with so few ingredients.
Dark Chocolate (70% or Higher) For a genuinely nut-free product, read your chocolate label carefully. Many chocolate bars are manufactured in facilities that also process tree nuts. Brands that specifically certify nut-free manufacturing are your safest choice when making these for children with allergies. A 70% or higher dark chocolate keeps the sugar content lower and adds genuine antioxidant value to what is already a clean snack.
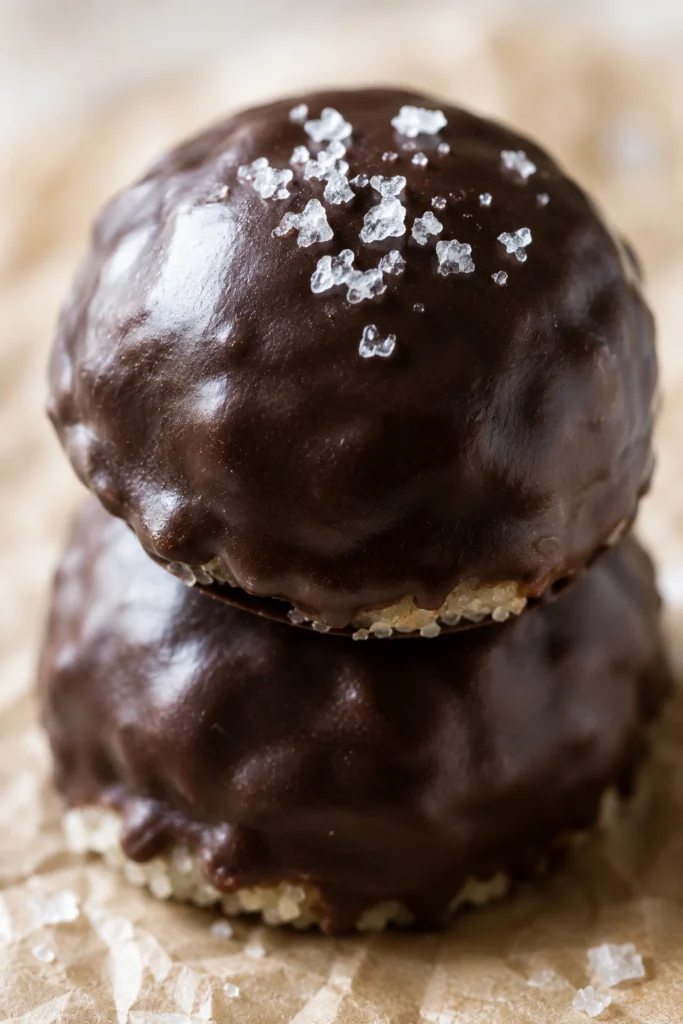
Sea Salt A pinch of flaky sea salt sprinkled over the freshly dipped chocolate coating before it sets is the detail that separates a good batch from a great one. Salt amplifies sweetness, enhances the coconut flavor, and makes the chocolate taste richer without adding any sugar.
How to Make Nut-Free Chocolate Coconut Bites
Ingredients:
- 2 cups unsweetened shredded coconut
- 3 tablespoons pure maple syrup
- 1 teaspoon vanilla extract
- Pinch of sea salt
- 1 cup dark chocolate (70% or higher), chopped or chips
- 1 teaspoon coconut oil
- Flaky sea salt for topping
Instructions:
- Add the shredded coconut, maple syrup, vanilla extract, and sea salt to a food processor.
- Pulse in 5-second bursts, scraping down the sides as needed, until the mixture starts to clump together and holds its shape when pressed. Stop before it becomes a paste.
- Taste and adjust sweetness with an extra teaspoon of maple syrup if needed.
- Line a baking sheet with parchment paper. Using a tablespoon or small cookie scoop, portion the mixture and roll each portion into a smooth ball between your palms.
- Place the shaped bites on the prepared baking sheet and transfer to the freezer for 15 to 20 minutes until completely firm.
- While the bites chill, combine the chopped dark chocolate and coconut oil in a heatproof bowl. Melt over a pot of simmering water, stirring until completely smooth. Alternatively, microwave in 30-second bursts, stirring between each.
- Remove the bites from the freezer. Working quickly, use a fork to dip each bite into the melted chocolate, turning to coat fully. Lift the bite and tap the fork gently against the bowl edge to let excess chocolate drip off.
- Return each coated bite to the parchment-lined sheet. Immediately sprinkle the top with a small pinch of flaky sea salt.
- Refrigerate for 10 to 15 minutes until the chocolate coating is fully set. Serve straight from the fridge.
Variations and Pro Tips
Make Them Dairy-Free: Use a certified dairy-free dark chocolate bar. Most 70% and above dark chocolates are naturally dairy-free, but always confirm on the label, especially when serving children with dairy allergies.
Add a Coconut Drizzle: Melt two tablespoons of coconut butter and drizzle it over the set chocolate coating for an extra layer of coconut flavor and a striking visual finish. This is especially popular for healthy snacks for party presentations.
Make Them Colourful for Kids: After the dark chocolate sets, drizzle melted white chocolate tinted with natural food colouring over the tops. Pink, blue, or yellow drizzles make these look festive and exciting for children’s parties without adding artificial ingredients to the base recipe.
Mini Version for Toddlers: Use a half-teaspoon scoop to make bite-sized portions that are perfectly sized as healthy snacks for toddlers. Smaller bites also mean the chocolate-to-coconut ratio leans more toward coconut, which is gentler for very young palates.
Pro Tip: If the coconut mixture crumbles when you try to roll it, add coconut milk one teaspoon at a time until it holds. Humidity and the dryness of your shredded coconut both affect how much liquid the mixture absorbs.
This recipe is part of a growing collection of no-bake coconut snack variations built around the original fan-favorite base. If you have not tried the original Healthy Chocolate Coconut Bites yet, that is the perfect place to start — it includes the classic recipe with a whole almond center and walks you through every technique you need. And if you want to explore another creative twist, the Matcha Coconut Bites variation adds earthy green tea flavor and a stunning jade color that makes them just as popular as healthy snacks for party tables as they are for everyday lunchboxes.

How to Meal Prep Nut-Free Chocolate Coconut Bites
This is one of the best healthy snacks to make in bulk because it stores beautifully and actually improves after a day in the fridge as the flavors settle together. Double or triple the recipe and spend 30 minutes on a Sunday afternoon to set yourself up for the entire week.
Once the chocolate is fully set, transfer the bites to an airtight container. Layer them between sheets of parchment paper to prevent sticking. They keep in the refrigerator for up to two weeks and in the freezer for up to three months with no loss of quality.
For school lunchboxes, portion three or four bites into a small reusable snack container the night before. They stay firm enough at room temperature for a full school day, making them one of the most dependable healthy snacks on the go options in your rotation. For healthy snacks for work, keep a container in the office fridge and grab a couple whenever the afternoon energy slump hits.
Frequently Asked Questions
Are these really safe for kids with nut allergies? The recipe itself contains no nuts, but safety depends entirely on the brands you use. Check every ingredient label — coconut, chocolate, vanilla extract, and maple syrup — for “manufactured in a facility with tree nuts” warnings. When in doubt, contact the manufacturer directly. For children with severe allergies, always consult with your allergist before introducing any new packaged food.
Can I use honey instead of maple syrup? Yes, honey works as a 1:1 substitute and adds a slightly floral sweetness that pairs well with coconut. However, honey should never be given to children under 12 months old due to the risk of botulism. For toddler-friendly healthy snacks, maple syrup is the safer choice for very young children.
How do I make these as healthy snacks for diabetics? Use the minimum amount of maple syrup needed to bind the mixture — often two tablespoons is enough. You can also substitute a few drops of liquid stevia or monk fruit sweetener for a lower-glycemic version. Pair with 70% or higher dark chocolate, which has significantly less sugar than milk chocolate. As always, individual responses to foods vary, so personal medical guidance applies.
What is the best way to pack these as healthy snacks on the go? A small hard-sided container with a secure lid is ideal, as the chocolate coating can crack under pressure in soft bags. A mini Tupperware or a reusable silicone snack bag both work well. Keep them cool if possible — they are shelf-stable for a few hours but taste best cold.
Cultural Context
Coconut has been a dietary cornerstone across tropical regions of the world for thousands of years — from the Pacific Islands to South Asia to the Caribbean — valued not just as food but as medicine, cooking fat, and a symbol of hospitality. In many cultures, coconut-based sweets are among the first foods children are introduced to, a tradition that speaks to just how naturally kid-friendly the ingredient has always been.
The modern movement toward nut-free, allergy-conscious cooking reflects a broader cultural shift in how we think about communal eating. School policies, birthday parties, and shared workplaces have made allergy awareness a collective responsibility rather than an individual one. Recipes like these Nut-Free Chocolate Coconut Bites sit at that intersection — honoring a global ingredient with deep roots while meeting the very practical demands of feeding children safely today.

Nut-Free Chocolate Coconut Bites
Equipment
- food processor
- mixing bowl
- baking sheet
- parchment paper
- heatproof bowl
- fork
Ingredients
- 2 cups unsweetened shredded coconut
- 3 tbsp pure maple syrup
- 1 tsp vanilla extract
- 1 pinch sea salt
- 1 cup dark chocolate (70% or higher), chopped or chips
- 1 tsp coconut oil
- 1 pinch flaky sea salt for topping
Instructions
- Add the shredded coconut, maple syrup, vanilla extract, and sea salt to a food processor.
- Pulse in 5-second bursts, scraping down the sides as needed, until the mixture starts to clump together and holds its shape when pressed. Stop before it becomes a paste.
- Taste and adjust sweetness with an extra teaspoon of maple syrup if needed.
- Line a baking sheet with parchment paper. Using a tablespoon or small cookie scoop, portion the mixture and roll each portion into a smooth ball between your palms.
- Place the shaped bites on the prepared baking sheet and transfer to the freezer for 15 to 20 minutes until completely firm.
- While the bites chill, combine the chopped dark chocolate and coconut oil in a heatproof bowl. Melt over a pot of simmering water, stirring until completely smooth. Alternatively, microwave in 30-second bursts, stirring between each.
- Remove the bites from the freezer. Working quickly, use a fork to dip each bite into the melted chocolate, turning to coat fully. Lift the bite and tap the fork gently against the bowl edge to let excess chocolate drip off.
- Return each coated bite to the parchment-lined sheet. Immediately sprinkle the top with a small pinch of flaky sea salt.
- Refrigerate for 10 to 15 minutes until the chocolate coating is fully set. Serve straight from the fridge.