
There’s something deeply satisfying about creating something beautiful, delicious, and impressive that requires almost no effort. Leprechaun Bark is exactly that kind of magic.
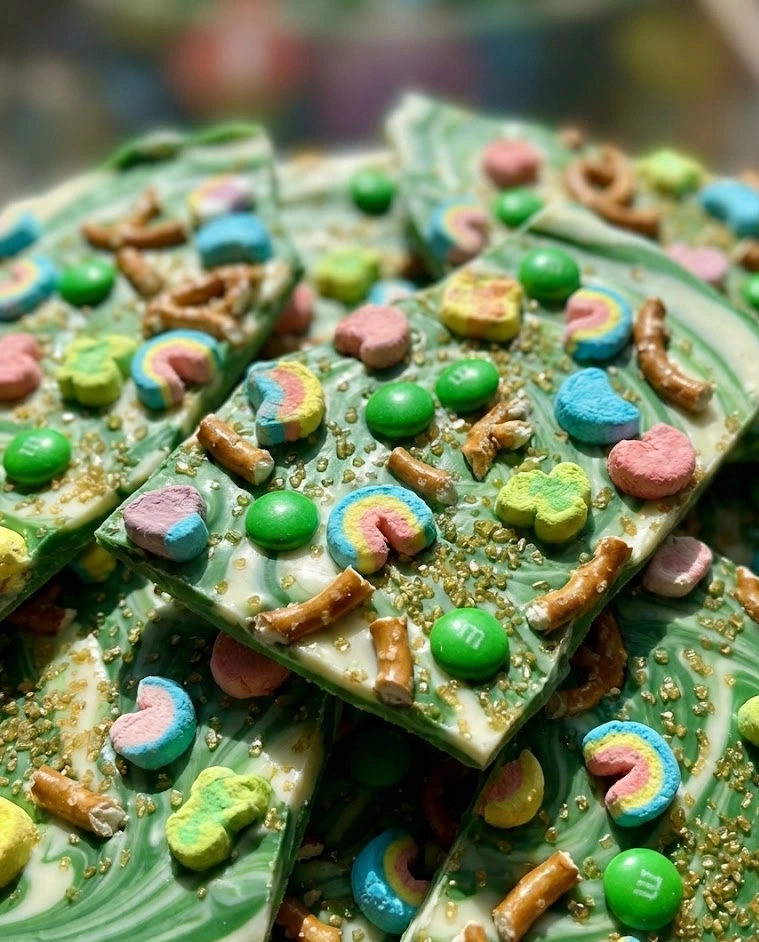
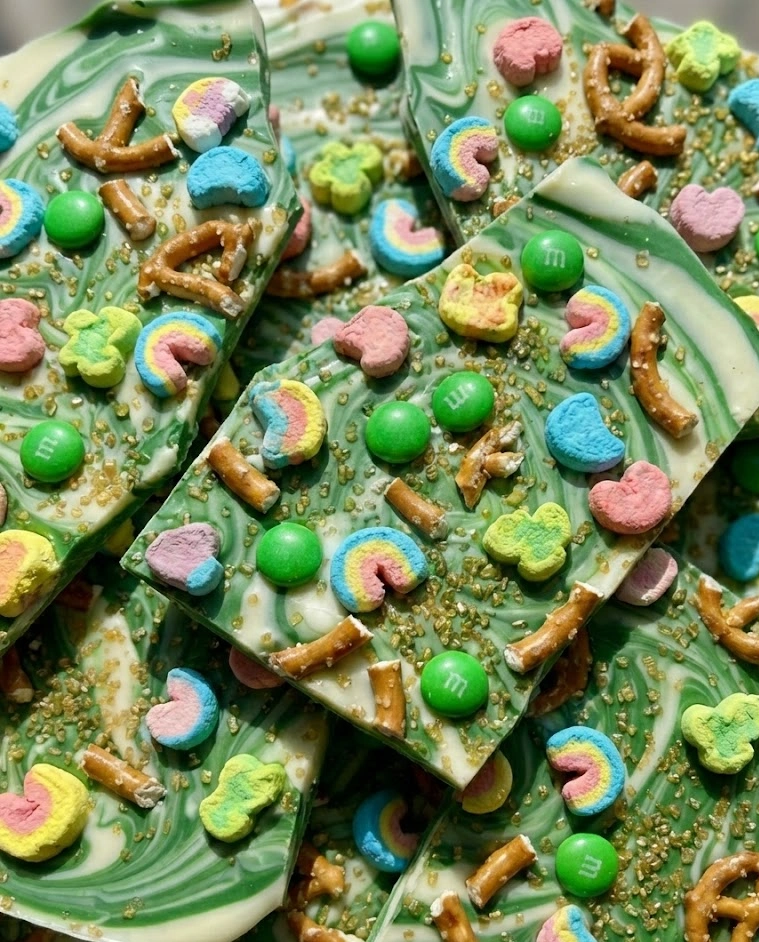
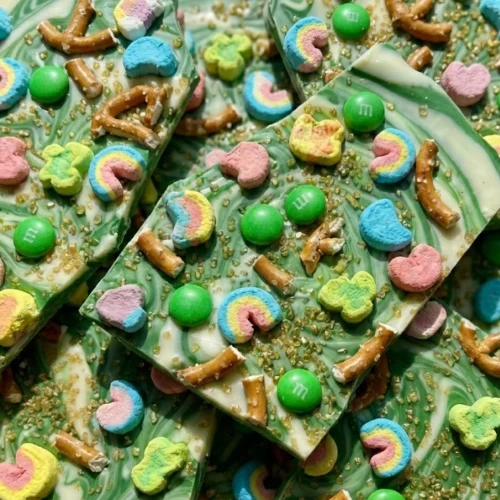
This is one of those St Patrick’s Day treats that looks like it took hours but actually comes together in about 20 minutes from start to finish. Smooth, creamy white chocolate swirled with vibrant green, studded with colorful Lucky Charms marshmallows, rainbow candies, and shimmering gold sprinkles—all broken into rustic, beautiful pieces that disappear the moment you set them out.
No baking. No complicated techniques. No special equipment. Just melt, swirl, sprinkle, and wait. That’s the entire process, and the results are absolutely stunning.
Why You’ll Love This Leprechaun Bark
Let’s start with the most compelling reason: this is ridiculously easy.
If you can melt chocolate in a microwave and sprinkle toppings, you can make this bark. There’s no temperature monitoring, no candy thermometer, no precise timing to worry about. This is genuinely foolproof in a way that very few desserts are. It’s the perfect St Patrick’s Day treat when you want maximum impact with minimum stress.
The visual appeal is immediate and undeniable. That swirled green and white chocolate base creates a marbled effect that’s inherently beautiful. Add the colorful marshmallows, rainbow candies, and gold sparkle, and you have something that looks like it came from a specialty candy shop. People will genuinely ask where you bought it, and telling them you made it yourself takes about thirty seconds feels incredibly satisfying.
The flavor is sweet, creamy, and surprisingly complex for such simple ingredients. White chocolate provides rich, vanilla-forward sweetness. The Lucky Charms marshmallows add that nostalgic, lightly fruity flavor everyone recognizes from childhood. The crunchy rainbow candies create textural contrast that makes every bite interesting.
It’s also infinitely customizable. Don’t like Lucky Charms? Use different cereals or candies. Want it less sweet? Use dark chocolate as the base. Prefer different colors? Swap the green for blue, pink, or any color that speaks to you. The technique remains identical, but the final product can be entirely your own.
Finally, this bark makes an excellent gift. Break it into pieces, package it in clear cellophane bags tied with festive ribbon, and you have thoughtful, homemade gifts that look professional and taste incredible.
Key Ingredients: Building Blocks of Beautiful Bark
Understanding what each component contributes helps you make this Leprechaun Bark perfectly every single time.
White Chocolate Chips or White Candy Melts: This forms your canvas—the base upon which everything else lives. Use high-quality white chocolate chips (not white baking chips, which are different and don’t melt as smoothly) or white candy melts specifically designed for melting. Candy melts are actually easier to work with because they’re formulated to melt smoothly and set quickly at room temperature without tempering. Ghirardelli, Guittard, or Wilton candy melts all work beautifully. You’ll need about 16-20 ounces for a standard batch.
Green Chocolate or Candy Melts: This creates the marbled swirl effect that gives the bark its signature leprechaun appearance. Green candy melts are the easiest option and melt identically to the white chocolate, ensuring they swirl together beautifully. You only need about 4-6 ounces—the green is an accent, not the primary base. If you can’t find green candy melts, you can tint white chocolate with oil-based green food coloring, though this is slightly trickier.
Lucky Charms Marshmallows: These colorful, dehydrated marshmallows are iconic and instantly recognizable. They add pops of color, a light crunch, and that nostalgic cereal flavor everyone loves. You can buy boxes of just the marshmallows online, or pick through regular Lucky Charms boxes to collect them. Alternatively, use the entire cereal for extra crunch—both approaches work wonderfully.
Rainbow Candies: M&Ms, Skittles, or Sixlets in rainbow colors add more color variety and additional textural contrast. The hard candy shell creates a satisfying crunch that contrasts beautifully with the smooth chocolate. Choose candies that won’t melt or bleed color into the chocolate—anything with a hard candy shell works perfectly.
Gold Sprinkles or Edible Gold Stars: This is what elevates the bark from cute to genuinely stunning. Gold sanding sugar, gold star sprinkles, or edible gold leaf all add that treasure-from-a-leprechaun’s-pot shimmer that makes the bark feel special and festive. Don’t skip this detail—it’s what makes the visual impact truly memorable.
Optional Add-Ins: Crushed pretzels add salty contrast. Mini chocolate chips create extra richness. Crushed graham crackers add honeyed sweetness and texture. Dried fruit adds chewiness. The beauty of bark is that almost any addition works as long as it doesn’t introduce moisture that would affect the chocolate setting.
Coconut Oil (Optional): A teaspoon stirred into melted chocolate makes it thinner and easier to spread smoothly. This is especially helpful if your chocolate seems thick or doesn’t want to spread evenly across the pan.
How to Make Leprechaun Bark
This process is remarkably straightforward, but a few key techniques ensure professional-looking results.
Step 1: Line a large baking sheet (approximately 9×13 inches or similar) with parchment paper or a silicone baking mat. Make sure the parchment extends slightly over the edges for easy removal later. Do not skip this step—bark will stick irreversibly to an unlined pan.
Step 2: Place your white chocolate chips or candy melts in a large, microwave-safe bowl. Microwave in 30-second intervals, stirring thoroughly between each interval. This gradual melting prevents scorching or seizing. After 2-3 intervals, reduce to 15-second bursts and stir more frequently. The chocolate is ready when it’s completely smooth, glossy, and fluid with no lumps remaining. If it seems slightly thick, stir in ½ teaspoon of coconut oil to thin it.
Step 3: Pour the melted white chocolate onto your prepared baking sheet. Use an offset spatula or the back of a spoon to spread it into an even layer, approximately ¼-inch thick. Work relatively quickly—chocolate begins to set as it cools, and you want to complete your spreading and decorating while it’s still fluid.
Step 4: While the white chocolate is still completely liquid, melt the green chocolate using the same technique—microwave in short intervals, stirring frequently until completely smooth.
Step 5: Drizzle the melted green chocolate over the white chocolate base in random patterns. Don’t overthink this—irregular drizzles and dollops look more organic and beautiful than perfectly uniform lines. You can pour it from a spoon, use a piping bag, or even drizzle directly from the measuring cup you melted it in.
Step 6: Immediately use a toothpick, skewer, or the tip of a butter knife to swirl the green chocolate into the white chocolate. Drag your tool through the chocolate in sweeping S-curves, zigzags, or circular motions. Don’t over-swirl—you want distinct areas of green and white, not a uniform muddy color. Three to five deliberate swirls across the entire surface is usually perfect.
Step 7: Working quickly while the chocolate is still wet, sprinkle your toppings generously over the entire surface. Start with the Lucky Charms marshmallows, distributing them relatively evenly across the bark. Add rainbow candies next, filling in gaps. Finally, shower the entire surface with gold sprinkles or sanding sugar.
Step 8: Gently press the toppings into the chocolate with your hand or the back of a spoon. This ensures they adhere properly as the chocolate sets rather than just sitting loosely on the surface. Press firmly enough to embed them slightly but not so hard that you disturb the swirl pattern underneath.
Step 9: Transfer the baking sheet to the refrigerator and chill for 15-20 minutes, or until the chocolate is completely firm and set. You’ll know it’s ready when the surface no longer looks shiny or wet and feels solid to gentle touch.
Step 10: Remove from the refrigerator and let it sit at room temperature for 5 minutes. This brief tempering prevents the cold chocolate from shattering into tiny pieces when you break it.
Step 11: Lift the entire bark out of the pan using the parchment paper overhang. Place it on a cutting board or clean work surface.
Step 12: Break the bark into rustic, irregular pieces. You can do this by hand—simply snap it into shards of varying sizes. For more uniform pieces, use a sharp knife to score the chocolate first, then break along the scored lines. The irregular, organic shapes are part of bark’s charm, so don’t stress about uniformity.
Step 13: Arrange the broken pieces on a serving platter or store for later use.
Variations & Creative Ideas for Every Preference
The base technique for chocolate bark is so versatile that you can adapt it to virtually any theme, flavor preference, or dietary need.
Mint Chocolate Version: Use white chocolate as the base and dark chocolate for the swirls. Add crushed Andes mints or candy canes as toppings along with green sprinkles. The mint-chocolate combination is refreshing and sophisticated while maintaining the festive green theme.
Cookies and Cream: Use white chocolate base with black candy melts for dramatic swirls. Top with crushed Oreos, mini chocolate chips, and white sprinkles. The black and white creates striking visual contrast that’s elegant and delicious.
Rainbow Explosion: Use white chocolate as the base but add multiple colors for the swirls—pink, orange, yellow, green, and blue. Top with rainbow sprinkles, Fruity Pebbles cereal, and colorful chocolate candies. This creates an even more vibrant, celebratory effect perfect for children’s parties.
Salted Caramel Pretzel: Use white chocolate base, caramel candy melts for swirls, and top with crushed pretzels, mini caramel bits, and a generous sprinkle of flaky sea salt. The sweet-salty combination is addictive and appeals to adult palates.
Dark Chocolate Base: Swap the white chocolate for dark or semi-sweet chocolate as your base. The darker chocolate provides richer flavor and is less sweet, which some people prefer. The green swirls and colorful toppings still create beautiful St. Patrick’s Day theming.
Dairy-Free Version: Use dairy-free white chocolate or vanilla candy melts (check labels—many candy melts are accidentally vegan) and ensure your toppings are also dairy-free. The technique works identically with plant-based chocolates.
Nut Lover’s Addition: Stir chopped pistachios (which are naturally green!) into the white chocolate before spreading, or sprinkle them as a topping. The nutty crunch and natural green color enhance both flavor and theme.
Pro Tip: Work in a cool kitchen if possible. Chocolate sets more slowly in warm environments, giving you more working time for spreading and decorating but also requiring longer refrigeration. If your kitchen is very warm, work quickly and don’t hesitate to pop the pan in the fridge between steps to firm things up.
Storage & Gifting Ideas
Leprechaun Bark stores beautifully, making it ideal for advance preparation and gifting.
Room Temperature Storage: Store bark in an airtight container at cool room temperature (65-70°F) for up to 2 weeks. Layer pieces with parchment or waxed paper between layers to prevent sticking. White chocolate is more temperature-sensitive than dark chocolate, so truly cool storage is important for maintaining that crisp snap.
Refrigerator Storage: In warmer climates or during summer months, refrigerate bark in an airtight container for up to 3 weeks. Let it come to room temperature for 10-15 minutes before serving for the best texture and flavor. Cold bark can be too hard and the flavors are muted when chilled.
Freezer Storage: Bark freezes exceptionally well for up to 3 months. Wrap pieces or stack them with parchment between layers in a freezer-safe container. Thaw at room temperature for 30 minutes before serving. The texture and appearance remain virtually unchanged.
Humidity Concerns: Chocolate absorbs moisture and can develop “bloom”—a whitish, dull appearance caused by sugar or fat crystals rising to the surface. While bloom doesn’t affect safety or flavor, it makes the bark look less appealing. In humid climates, store bark with a food-safe silica packet in the container to absorb excess moisture.
Gift Packaging: Break bark into generous pieces and arrange them in clear cellophane bags. Tie with green and gold curling ribbon and attach a tag that reads “Lucky to know you!” or “Leprechaun approved!” For more elaborate gifts, layer bark pieces in a decorative tin or small box lined with colorful tissue paper. Add a handwritten note for a personal touch.
Party Favors: Package 2-3 small pieces of bark in individual treat bags as party favors for St. Patrick’s Day celebrations. They’re shelf-stable, travel well, and look impressive without requiring special packaging or equipment.
Presentation Ideas That Maximize Visual Impact
How you present this Leprechaun Bark can elevate it from a simple treat to the centerpiece of your celebration.
Rustic Wooden Board: Arrange bark pieces on a wooden cutting board or serving board with gold chocolate coins scattered around the edges. The rustic presentation feels organic and artisanal while letting the colorful bark shine.
Tiered Display: Use a tiered serving stand and fill each level with bark pieces, creating height and visual drama. Intersperse pieces with fresh flowers, shamrock decorations, or gold coins for extra festive flair.
Treasure Pot Presentation: Fill a small black cauldron or pot with bark pieces, allowing some to spill out onto the table surface. Surround with rainbow candy, gold coins, and green tissue paper to create a complete leprechaun’s treasure scene.
Individual Servings: Place 2-3 pieces of bark on small dessert plates or in decorative paper cups lined with gold tissue paper. This works beautifully for plated desserts or more formal gatherings where you want individual portion control.
Dessert Grazing Board: Include Leprechaun Bark as part of a larger St. Patrick’s Day dessert board alongside cookies, cupcakes, and other treats. The variety creates visual interest and offers guests options while maintaining a cohesive green-and-gold color scheme.
Gift Tower: Stack clear boxes of bark pieces in a pyramid formation, tied with a large bow at the top. This creates an impressive gift presentation perfect for teachers, neighbors, or coworkers.
Why Bark Is the Perfect St. Patrick’s Day Treat
Among all the St Patrick’s Day treats you could make, chocolate bark occupies a special place because it checks so many boxes simultaneously.
It’s genuinely easy in a way that few impressive desserts are. The barrier to entry is almost nonexistent—if you can use a microwave and spread chocolate, you can make beautiful bark. That accessibility makes it perfect for first-time candy makers or anyone intimidated by more complex recipes.
The visual impact far exceeds the effort required. Something about the marbled swirls, the colorful toppings, and the irregular broken pieces creates an artisanal, handcrafted appearance that looks professional and special. People are genuinely impressed when they learn you made it yourself.
It’s infinitely scalable. Need treats for a small family gathering? Make one batch. Hosting a large party or creating teacher gifts for an entire school? Triple or quadruple the recipe. Bark scales effortlessly without changing technique or timing.
The shelf life is excellent. Unlike many baked goods that must be consumed within a day or two, bark keeps for weeks when properly stored. That flexibility reduces stress and allows you to prepare well in advance.
Most importantly, it brings joy. The colorful appearance, the nostalgic Lucky Charms flavor, the satisfying snap of good chocolate—every element contributes to creating smiles and sweet memories.
Make This Bark and Spread the Magic
These Leprechaun Bark pieces prove that the best St Patrick’s Day treats don’t require hours in the kitchen or complicated techniques. Sometimes the simplest recipes create the most memorable results.
Twenty minutes of your time transforms basic ingredients into something that looks stunning, tastes delicious, and brings genuine delight to everyone who tries it. That’s the kind of recipe that deserves a permanent place in your holiday repertoire.
So melt that chocolate, swirl those colors, and sprinkle those toppings with abandon. Your leprechaun-approved treasure is about to come to life, and trust me—it’s going to disappear faster than you can say “pot of gold.”
Happy St. Patrick’s Day, and may your bark be ever colorful, ever delicious, and ever lucky.
Leprechaun Bark
Equipment
- baking sheet (9×13-inch)
- parchment paper
- microwave-safe bowls
- spatula
- toothpick or knife for swirling
Ingredients
- 16 oz white chocolate chips or white candy melts
- 5 oz green candy melts
- 1 cup Lucky Charms marshmallows
- 1/2 cup rainbow candies (M&Ms or similar)
- 2 tbsp gold sprinkles or sanding sugar
- 1/2 tsp coconut oil (optional)
Instructions
- Line a 9×13-inch baking sheet with parchment paper, leaving an overhang for easy removal.
- Melt white chocolate in a microwave-safe bowl in 30-second intervals, stirring between each, until smooth. Stir in coconut oil if needed for thinning.
- Spread melted white chocolate evenly onto the prepared baking sheet in a 1/4-inch layer.
- Melt green candy melts in short microwave intervals, stirring until smooth.
- Drizzle melted green chocolate over the white chocolate base.
- Use a toothpick or knife to gently swirl the green into the white chocolate without overmixing.
- Sprinkle Lucky Charms marshmallows, rainbow candies, and gold sprinkles evenly over the surface. Gently press toppings into the chocolate.
- Refrigerate for 15–20 minutes until fully set.
- Lift bark from pan and break into rustic pieces. Serve or store in an airtight container.