
There’s a reason Rice Krispie treats have remained a beloved classic for generations. They’re ridiculously easy, universally loved, and infinitely adaptable to any theme or celebration.
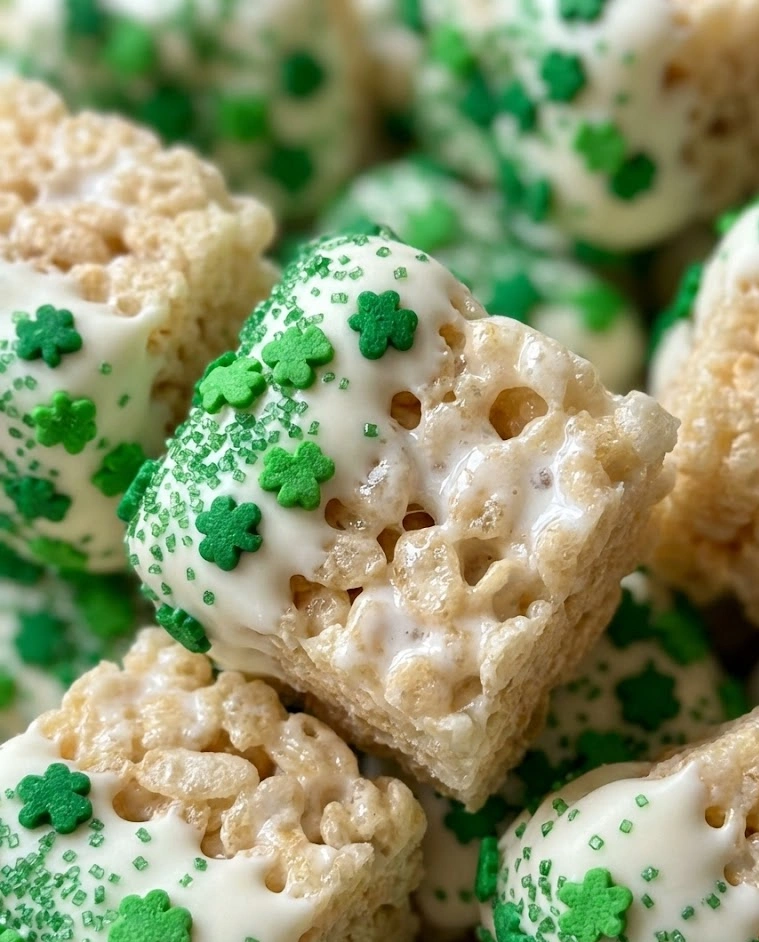
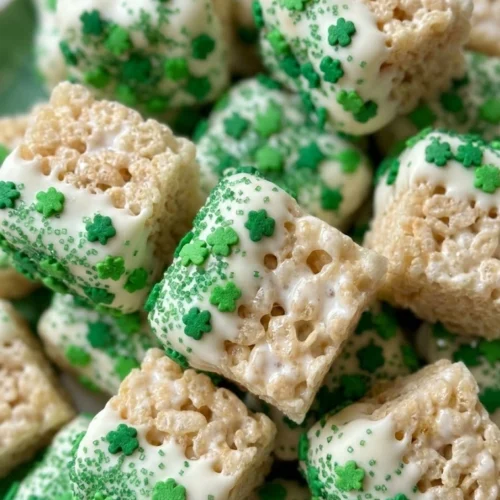
These St. Patrick’s Day Rice Krispie Bites take that classic formula and transform it into something festive, colorful, and absolutely perfect for your March celebrations. Vibrant green treats studded with colorful sprinkles, shaped into perfect bite-sized pieces, and ready in just 15 minutes from start to finish.
No baking. No complicated techniques. Just pure, simple, delicious fun that tastes exactly like childhood and celebration rolled into one.
Why You’ll Love These St. Patrick’s Day Rice Krispie Bites
Let’s start with the most compelling reason: speed.
Fifteen minutes. That’s all the active time you need from pulling ingredients from your pantry to having finished, festive treats ready to serve. When you’re racing against a deadline for a classroom party or suddenly hosting more people than expected, that kind of speed is genuinely life-saving.
The ingredient list is brilliantly minimal. Butter, marshmallows, Rice Krispies cereal, green food coloring, and optional decorations. That’s it. No specialty ingredients, no trips to multiple stores, no expensive purchases. These are true pantry-staple St Patrick’s Day treats that you can make on a whim.
Kids absolutely love making these. The stirring, the coloring, the shaping, the decorating—every step is hands-on and engaging without being messy or dangerous. Children as young as three can participate meaningfully with supervision, which makes this the perfect family activity for a rainy March afternoon.
The texture is irresistible. That combination of crispy cereal held together by sweet, chewy marshmallow creates a satisfying contrast in every bite. They’re substantial enough to feel like a real treat but light enough that you can easily eat three or four without feeling weighed down.
And finally, the customization possibilities are virtually endless. Change the color, add different mix-ins, adjust the decorations, cut them into different shapes—these treats adapt to your exact vision with zero resistance.
Key Ingredients: The Simple Science Behind the Magic
The beauty of Rice Krispie treats lies in their elegant simplicity. Understanding what each ingredient does helps you make them perfectly every single time.
Butter: Three tablespoons of butter creates the fat base that helps the marshmallows melt smoothly and prevents sticking. Butter also adds richness and a subtle flavor depth that makes these taste homemade rather than artificially sweet. Use real butter, not margarine—the flavor difference is noticeable and worth the minimal extra cost.
Marshmallows: One 10-ounce bag of regular-sized marshmallows or about 40 individual marshmallows. Fresh marshmallows are essential here. Stale marshmallows don’t melt properly and create a tough, chewy texture rather than the soft, binding quality you’re after. The marshmallows melt into a sweet, sticky glue that coats every piece of cereal and holds the entire treat together.
Rice Krispies Cereal: Six cups of the classic toasted rice cereal. The cereal provides structure and that signature crispy texture. Generic crispy rice cereal works perfectly fine and costs less—there’s no meaningful difference in final results. The key is the cereal-to-marshmallow ratio: too much cereal and the treats are dry and fall apart; too little and they’re dense and overly sweet.
Green Food Coloring: Gel food coloring is vastly superior to liquid for this application. Gel produces vibrant, saturated color without adding excess moisture that can make your treats sticky or soft. Start with just a few drops and add more until you achieve your desired shade of green. You can go pale mint, bright shamrock, or deep forest—it’s entirely up to you.
Salt: A tiny pinch of salt added to the melted marshmallow mixture enhances all the other flavors and prevents the treats from tasting one-dimensionally sweet. Salt is a flavor amplifier, and even in desserts, it makes everything taste more pronounced and balanced.
Vanilla Extract (Optional): A teaspoon of vanilla adds warmth and depth. It’s not traditional in classic Rice Krispie treats, but it elevates the flavor from good to genuinely special.
Decorations: This is where your creativity shines. Rainbow sprinkles, gold star sprinkles, green sanding sugar, white chocolate drizzle, gold edible glitter, mini chocolate chips, or even Lucky Charms marshmallows all make excellent decorative additions that enhance both appearance and flavor.
How to Make St. Patrick’s Day Rice Krispie Bites
The process is straightforward, but attention to timing and temperature makes the difference between good treats and exceptional ones.
Step 1: Prepare your workspace before you start cooking. Line a 9×13-inch baking pan with parchment paper, leaving an overhang on two sides for easy removal later. Lightly spray the parchment with non-stick cooking spray. Alternatively, grease the pan generously with butter. This preparation step is crucial—once you start cooking, everything moves quickly and you won’t have time to stop and prep your pan.
Step 2: Measure your Rice Krispies cereal into a large mixing bowl. Having this ready before you start melting anything ensures you can move quickly when the time comes.
Step 3: In a large, heavy-bottomed saucepan or Dutch oven, melt the butter over low heat. Low heat is essential here—high heat burns butter and creates a bitter flavor that ruins the entire batch.
Step 4: Once the butter is fully melted, add all the marshmallows at once. Stir constantly with a wooden spoon or heat-resistant silicone spatula over low heat. The marshmallows will begin to puff up and melt, slowly transforming from solid pillows into a smooth, glossy, stretchy mixture. This takes 3-5 minutes. Do not rush this step by raising the heat—burned marshmallows are irreversibly bitter and sticky.
Step 5: As soon as the marshmallows are completely melted and smooth with no lumps remaining, remove the pan from heat immediately. Add your green gel food coloring, starting with 4-5 drops for a pale green or 8-10 drops for a vibrant shamrock green. Stir thoroughly until the color is completely uniform with no streaks.
Step 6: Add the pinch of salt and vanilla extract if using. Stir to combine.
Step 7: Immediately pour the melted marshmallow mixture over the measured Rice Krispies cereal in your large bowl. Working quickly but carefully, use your spatula to fold and stir until every single piece of cereal is evenly coated with the green marshmallow mixture. Speed matters here—as the marshmallow cools, it becomes harder to work with.
Step 8: Transfer the coated cereal mixture to your prepared pan. Here’s the critical technique: do not press down hard. Use a piece of parchment paper or waxed paper lightly sprayed with cooking spray to gently press the mixture into an even layer. Heavy-handed pressing creates dense, tough treats. Light, gentle pressing maintains that airy, crispy texture everyone loves.
Step 9: While the mixture is still slightly warm and tacky, add your decorations. Sprinkle rainbow sprinkles, gold stars, or sanding sugar generously over the top. Press them in very gently so they adhere but don’t sink completely into the treats.
Step 10: Allow the treats to cool and set at room temperature for 30-45 minutes. Don’t refrigerate—cold temperatures make them overly firm and lose that perfect tender-chewy texture.
Step 11: Once set, use the parchment paper overhang to lift the entire slab out of the pan onto a cutting board. Use a sharp knife sprayed with cooking spray to cut into squares, rectangles, or use cookie cutters to create festive shapes like shamrocks, rainbows, or leprechaun hats.
Step 12: For extra decoration, drizzle melted white chocolate in a zigzag pattern over the cut pieces, or dip the bottom corner of each piece in melted green candy melts and then in gold sanding sugar for a more elaborate finish.
Step 13: Arrange on a festive platter and serve immediately, or store for later use.

Variations & Creative Ideas for Maximum Festivity
These St. Patrick’s Day Rice Krispie Bites are wonderfully adaptable to different flavors, decorations, and presentation styles.
Rainbow Layers: Divide your marshmallow mixture into three portions. Color one red, one orange or yellow, and one green. Layer them in the pan to create a rainbow effect when cut. This takes a bit more time but creates a stunning visual impact that guests absolutely love.
Lucky Charms Addition: Stir in 1 cup of Lucky Charms marshmallows along with the Rice Krispies cereal before adding the melted marshmallow mixture. The colorful dehydrated marshmallows add whimsy, extra sweetness, and instant St. Patrick’s Day recognition.
Chocolate Drizzle: Melt white chocolate or dark chocolate and use a fork or piping bag to drizzle it in decorative patterns over the cooled, cut treats. The chocolate adds richness and makes them look significantly more elegant.
Shaped Treats: Instead of cutting into squares, use large cookie cutters to cut shamrock, rainbow, pot, or hat shapes. Press the cookie cutter firmly through the cooled treats, then carefully remove the excess around each shape. The scraps can be crumbled and used as an ice cream topping or pressed into cake pops.
Cake Pop Version: Roll small portions of the Rice Krispie mixture into balls while still warm and pliable. Insert lollipop sticks and let them set. Dip in melted green candy melts and decorate with sprinkles. These handheld pops are perfect for children’s parties or as grab-and-go treats.
Adults-Only Version: Add 2 tablespoons of Irish cream liqueur to the melted marshmallow mixture before stirring in the cereal. The alcohol bakes off slightly during cooling, leaving behind a subtle, sophisticated flavor perfect for evening celebrations.
Gluten-Free: Rice Krispies are naturally gluten-free, making these treats inherently suitable for gluten-sensitive guests. Just verify your marshmallow brand is also gluten-free, which most mainstream brands are.
Pro Tip: Butter your hands lightly or spray them with cooking spray when pressing the mixture into the pan. This prevents the sticky marshmallow from adhering to your hands and allows you to shape and smooth the surface much more effectively. This single tip transforms the experience from frustrating to effortless.
Storage & Make-Ahead Strategy
Rice Krispie treats are famously excellent for making ahead, which makes them ideal for busy celebration schedules.
Room Temperature Storage: Store cut treats in an airtight container at room temperature for up to 3 days. Layer them with parchment or waxed paper between each layer to prevent sticking. Room temperature storage maintains the perfect texture—soft, chewy, and slightly crispy all at once.
Avoid Refrigeration: Do not refrigerate Rice Krispie treats. Cold temperatures make them hard, dense, and lose that characteristic tender-chewy quality. They also become difficult to bite through cleanly. Always store at room temperature unless your kitchen is extremely warm.
Freezer Storage: These freeze beautifully for up to 6 weeks. Wrap individual pieces or small stacks in plastic wrap, then place in a freezer-safe bag or container. Thaw at room temperature for 1-2 hours before serving. The texture returns almost completely to fresh-made quality.
Make-Ahead Timeline: You can make these up to 2 days ahead for optimal freshness and texture. Make them 3 days ahead if necessary, though they begin to lose a tiny bit of their crispy texture after day three. The flavor remains delicious, but the textural perfection is best within the first 48 hours.
Individual Wrapping: For party favors, classroom treats, or lunchbox additions, wrap individual pieces in plastic wrap or place in small cellophane bags tied with ribbon. This keeps them fresh and makes portioning effortless.
Humidity Concerns: In very humid climates, Rice Krispie treats can become soft and sticky. If you live in a humid area, add an extra ½ cup of cereal to the recipe to compensate for moisture absorption, and store with a food-safe silica packet in the container to absorb excess humidity.
Creative Presentation Ideas for Maximum Impact
How you present these St. Patrick’s Day Rice Krispie Bites can elevate them from simple treats to the centerpiece of your celebration.
Tiered Rainbow Display: Arrange the green Rice Krispie bites on a tiered stand alongside other colorful treats—orange candies, yellow cookies, or purple grapes—to create a rainbow effect. The visual variety makes the entire display more engaging and photo-worthy.
Pot of Gold Centerpiece: Stack the bites in and around a small black cauldron or pot. Surround the base with gold foil-wrapped chocolate coins and scatter green shamrock confetti across the table. This creates a complete St. Patrick’s Day scene that tells a story.
Shamrock Arrangement: Cut your treats into shamrock shapes using a cookie cutter and arrange them on a large platter in a circular pattern, stems pointing toward the center. Fill the center with a small bowl of frosting “dip” tinted green for an interactive dessert element.
Individual Party Favors: Place 2-3 bites in clear cellophane bags tied with green and gold curling ribbon. Attach a tag that reads “Feeling lucky!” or “You’re magically delicious!” These make perfect take-home treats for classroom parties or family gatherings.
Dessert Kabobs: Thread alternating Rice Krispie bites and fresh strawberries onto bamboo skewers. The red strawberries against the green treats create a beautiful color contrast, and the fresh fruit balances the sweetness perfectly.
Treasure Hunt Treats: Hide individually wrapped bites around your party space and create a treasure hunt for children to find them. Each discovered treat becomes part of their “pot of gold.” This adds an activity element that makes the treats even more memorable.
Why Rice Krispie Treats Are Perfect for St Patrick’s Day
Among all the St Patrick’s Day treats you could make, Rice Krispie bites offer a unique combination of advantages that make them especially well-suited to holiday celebrations.
The no-bake format removes all anxiety from the process. There’s no oven temperature to worry about, no baking time to monitor, no risk of underdone centers or burnt edges. You simply melt, mix, press, and you’re done. That simplicity is invaluable when you’re already juggling multiple party preparation tasks.
The nostalgia factor is powerful. Almost everyone has fond memories of making or eating Rice Krispie treats as a child. When you serve these at your celebration, you’re not just offering dessert—you’re offering a connection to happy memories and simpler times.
They’re one of the most affordable St Patrick’s Day treats you can make. The ingredient cost is minimal, especially when compared to elaborate cakes or specialty candies. That makes them ideal when you need to feed a crowd without overspending.
The texture appeals to virtually everyone. Even people who claim not to like sweets often make an exception for Rice Krispie treats because they’re light, crispy, and not overpoweringly sugary. That universal appeal means fewer leftovers and more satisfied guests.
The Joy of Simple, Festive Celebrations
These St. Patrick’s Day Rice Krispie Bites embody everything that makes holiday treats so special: they’re simple to make, beautiful to look at, delicious to eat, and fun to share.
They prove that you don’t need complicated recipes or professional skills to create something that brings joy. Sometimes the most memorable treats are the ones that embrace simplicity and focus on pure, uncomplicated deliciousness.
When you set out a platter of vibrant green Rice Krispie bites at your St. Patrick’s Day celebration, you’re offering more than just food. You’re offering a shared experience, a conversation starter, and a small moment of sweetness that people will remember long after the holiday has passed.
So melt that butter, stir those marshmallows, and get ready to create a batch of the easiest, most delicious St Patrick’s Day treats your celebration has ever seen. Your festive green bites are waiting, and they’re about to make someone’s day a whole lot sweeter.
St. Patrick’s Day Rice Krispie Bites
Equipment
- 9×13-inch baking pan
- large saucepan
- mixing bowl
- spatula
- parchment paper
Ingredients
- 3 tbsp unsalted butter
- 10 oz mini marshmallows
- 6 cups Rice Krispies cereal
- 1 tsp vanilla extract (optional)
- 1 pinch salt
- green gel food coloring
- rainbow sprinkles, gold stars, or green sanding sugar (optional)
Instructions
- Line a 9×13-inch baking pan with parchment paper and lightly grease it.
- Measure cereal into a large mixing bowl and set aside.
- Melt butter over low heat in a large saucepan. Add marshmallows and stir constantly until fully melted and smooth.
- Remove from heat and stir in green gel food coloring, vanilla extract, and salt until evenly combined.
- Pour melted marshmallow mixture over cereal. Stir quickly until evenly coated.
- Transfer mixture to prepared pan and gently press into an even layer without compacting too firmly.
- Add sprinkles or decorations while mixture is still warm so they adhere properly.
- Allow to cool at room temperature for 30 minutes. Lift from pan and cut into squares or bite-sized pieces before serving.