
Every St. Patrick’s Day celebration needs a dessert that earns a moment of silence when it hits the table. Not a polite nod of acknowledgment — an actual, genuine pause where people stop talking and start staring. These Easy St. Patrick’s Day Mint Oreo Brownies are that dessert. And the best part is that they take less than 45 minutes and require absolutely no special equipment or pastry school training to pull off.
This is a St. Patrick’s Day dessert built on one of the most beloved flavor combinations in the entire confectionery world: chocolate and mint. We have talked about this pairing before in the Baked Mint Chocolate Chip Doughnuts — the way peppermint’s activation of the TRPM8 cold receptor creates a sensory contrast that resets the palate and makes each bite of chocolate taste richer and more intense than the last. In brownie form, with a full layer of crushed mint Oreos baked into the center and a vivid green mint frosting blanketing the top, that contrast reaches its most indulgent and spectacular expression.
Green for St. Patrick’s Day. Chocolate for everyone who has ever loved a brownie. Mint for the season. This is the St. Patrick’s Day dessert that checks every single box — and then keeps going.
Why You’ll Love This St. Patrick’s Day Dessert
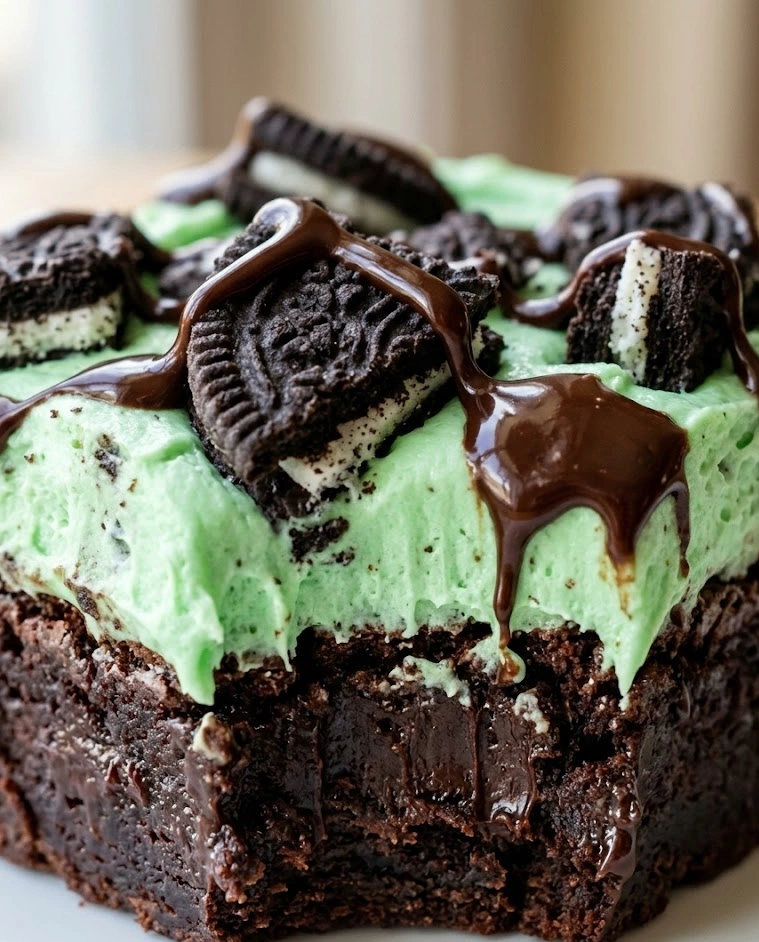
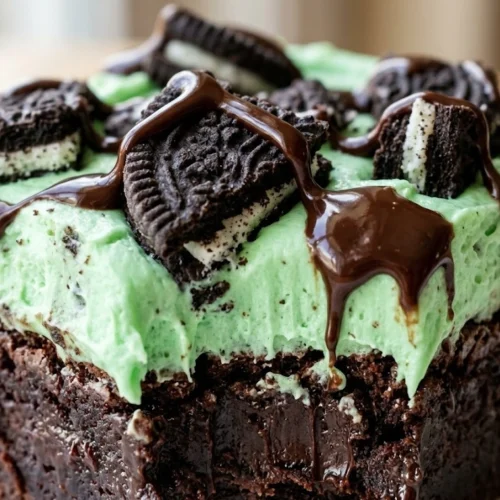
The first reason is the texture architecture. These brownies are engineered for contrast at every layer — a dense, fudgy chocolate base, a crunchy middle layer of crushed mint Oreos that softens slightly during baking into something almost cookie-butter-like, and a smooth, creamy mint frosting on top that sets just firm enough to slice cleanly. Every bite delivers all three layers simultaneously.
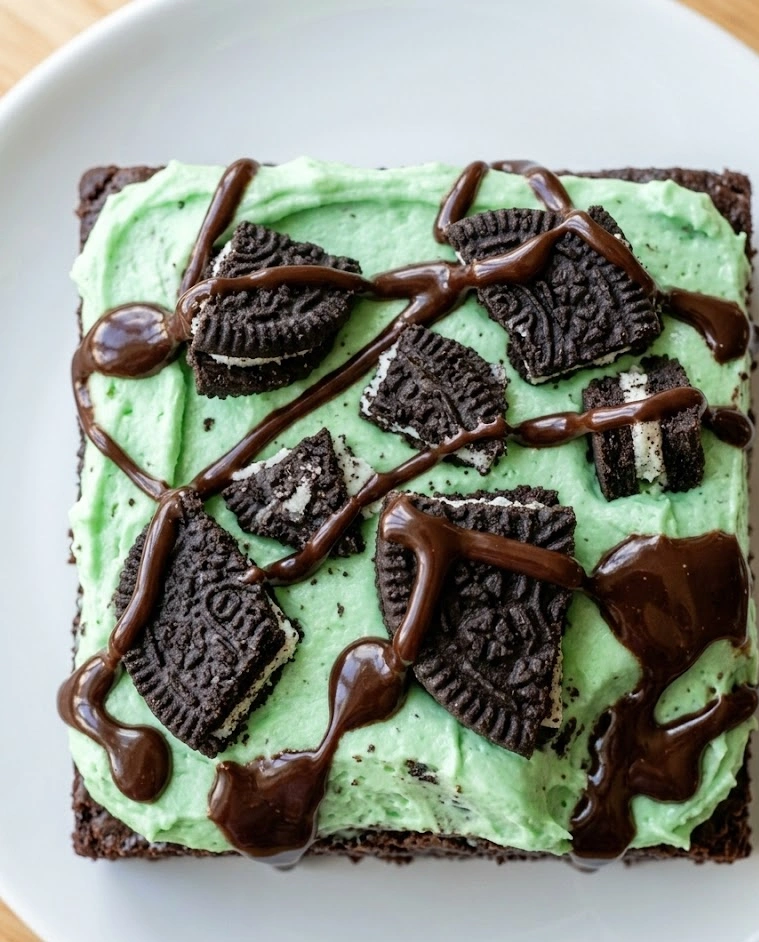
The second reason is the visual impact. A pan of these brownies — deeply chocolate on the sides, brilliant emerald green on top, with crushed Oreo pieces visible at the edges — looks like a professional bakery product. They photograph spectacularly, which matters enormously for St. Patrick’s Day entertaining, and they carry the holiday’s color identity with far more elegance than most green-dyed desserts manage.
The third reason is the crowd-pleasing certainty. Mint chocolate is one of the safest flavor bets in all of dessert — broadly loved, deeply familiar, and enhanced here by the specific nostalgia of Oreo cookies embedded in the middle. There is no guest at a St. Patrick’s Day party who will turn down one of these brownies. This is the St. Patrick’s Day dessert that makes you the most popular person in the room.
Common Mistakes — And How to Avoid Them
Mistake 1: Overbaking the Brownie Base
The single most common brownie mistake is overbaking, and it is particularly damaging here because the fudgy, dense base is the textural foundation the entire dessert is built on. A toothpick inserted into the center of a properly baked brownie should come out with moist, fudgy crumbs — not wet batter, but not clean either. Clean means overdone. Pull them the second you see moist crumbs and let residual heat finish the job.
Mistake 2: Adding the Frosting to a Warm Brownie
Warm brownies melt buttercream frosting instantly — it slides, pools, and soaks into the surface rather than sitting as a distinct, smooth layer on top. The brownies must be completely, thoroughly cooled before a single drop of frosting touches them. Room temperature cooled means the pan feels neutral to the touch on the bottom — not just the top. For best results, chill the baked, unfrosted brownies in the fridge for 20 minutes before frosting.
Mistake 3: Using Imitation Mint Extract in the Frosting
The frosting is where the mint flavor lives most prominently in this dessert — it is the first thing you taste and the thing that announces this as a St. Patrick’s Day dessert rather than a standard chocolate brownie. Imitation mint extract delivers an artificial, medicinal quality that undermines the entire effect. Pure peppermint extract is non-negotiable, and the quantity matters — start conservatively and add more drop by drop, tasting as you go, because mint intensity varies significantly by brand.
Mistake 4: Crushing the Oreos Too Fine
The Oreo layer inside these brownies should have texture — irregular pieces of varying sizes that create crunchy pockets throughout the baked brownie. A fine, uniform crumb behaves more like a flavoring agent than a distinct layer and loses the structural interest that makes these brownies unlike a standard chocolate bake. Crush with a rolling pin inside a zip-lock bag, stopping when you have a mix of small chunks and coarse crumbs. Resist the food processor entirely.
Mistake 5: Skimping on the Green Food Coloring
This is a St. Patrick’s Day dessert — the emerald green frosting is not decorative, it is definitional. A timid, pale green misses the point entirely and looks like an accident rather than a celebration. Use gel food coloring rather than liquid, and use enough of it to achieve a true, vivid emerald. Gel coloring is concentrated and does not water down the frosting the way liquid coloring does — a few extra drops cost nothing and make everything.
Chef’s Notes
Let’s talk about what makes a brownie fudgy versus cakey, because the distinction is entirely intentional and entirely controllable. The ratio of fat to flour is the primary lever. More fat — butter and chocolate — relative to flour produces a dense, fudgy result because fat interferes with gluten development and keeps the crumb tight and moist. More flour relative to fat produces a cakier, lighter result because the additional gluten structure creates a more open, airy crumb.
For this recipe, we want maximum fudginess as the base for the Oreo layer and the mint frosting — a cakey brownie would be overwhelmed by the richness of everything on top of it. The way to achieve this is to use melted butter and melted chocolate rather than creamed butter and cocoa powder, to keep the flour quantity modest, and to slightly under-bake relative to what feels comfortable. The result should be almost uncomfortably fudgy when it first comes out of the oven — it sets further as it cools.
The second technique worth understanding is the Oreo placement. Adding the crushed Oreos as a distinct middle layer — pressed into the partially poured batter before the rest of the batter goes on top — ensures they stay intact as a recognizable stratum rather than dispersing randomly through the brownie. This intentional layering is what gives every slice a clean, three-layer cross-section that looks as good as it tastes.
For the frosting, the ratio of butter to powdered sugar determines consistency. More butter relative to powdered sugar produces a softer, creamier frosting that spreads easily but may not hold a clean edge when sliced. More powdered sugar produces a stiffer frosting that slices cleanly but can taste overly sweet. The recipe below is calibrated for a frosting that spreads beautifully, sets slightly firm at room temperature, and slices without crumbling — the sweet spot for a brownie topping meant to be cut into squares.
Key Ingredients & Why They Matter
Unsalted Butter is the primary fat in both the brownie base and the frosting. In the brownie, melted butter contributes to the dense, fudgy texture by coating flour proteins and limiting gluten development. In the frosting, softened butter creates the emulsified, creamy base that powdered sugar and flavoring incorporate into. Unsalted gives you complete control over the salt level — an important consideration in a dessert where the sweetness balance is delicate.
Good Quality Dark Chocolate is the flavor backbone of the brownie base. Use chocolate with at least 60% cacao content — the bitterness and complexity of dark chocolate creates the deep, sophisticated chocolate flavor that makes these brownies taste adult and serious rather than cloyingly sweet. The cocoa butter in real chocolate also contributes significantly to the fudgy texture in a way that cocoa powder alone cannot replicate.
Unsweetened Cocoa Powder supplements the melted chocolate, deepening the chocolate intensity and contributing a drier element that balances the richness of the butter and melted chocolate. Dutch-process cocoa powder has been treated to reduce acidity and produces a darker color and smoother, more rounded chocolate flavor — preferable here over natural cocoa if you can find it.
Eggs provide structure, richness, and the emulsification that holds the brownie batter together. Two whole eggs plus one additional yolk is the formula that delivers maximum fudginess — the extra yolk adds fat and richness without the additional white, which would add structure and push the brownie toward a cakier texture.
Mint Oreos are doing double work in this recipe — they contribute chocolate flavor from their cookie component and mint flavor from their filling, and their distinctive crunch creates the textural middle layer that makes these brownies structurally interesting. Regular Oreos with a drop of peppermint extract in the batter can substitute, but Mint Oreos are the more elegant solution.
Pure Peppermint Extract appears in both the brownie batter in a small supporting quantity and more prominently in the frosting, where it is the dominant flavor note. The small amount in the batter ties the chocolate base to the mint Oreo layer and the frosting above it, creating flavor continuity from bottom to top rather than having the mint feel like it only exists on the surface.
Powdered Sugar forms the body of the mint frosting. Its fine grind dissolves instantly into the beaten butter, producing a smooth, lump-free frosting without the graininess that granulated sugar would create. The cornstarch already present in commercial powdered sugar helps the frosting hold its shape and develop a slight crust on the surface as it sets — which is precisely what you want for clean slicing.
Green Gel Food Coloring transforms the frosting from white to the vivid emerald that makes this a St. Patrick’s Day dessert rather than a generic mint brownie. Gel coloring is essential over liquid — it delivers intense, saturated color without adding the water content that liquid coloring introduces, which would thin the frosting and compromise its consistency.
Heavy Cream loosens the frosting to the perfect spreading consistency and adds a richness that makes it taste more like a professional bakery frosting than a simple powdered sugar glaze. Add it one teaspoon at a time — the difference between too thick and too thin is often just a teaspoon.
How to Make Easy St. Patrick’s Day Mint Oreo Brownies
Ingredients
For the Fudgy Brownie Base:
- ½ cup unsalted butter, cut into pieces
- 4 oz dark chocolate (60–70% cacao), roughly chopped
- 1 cup granulated sugar
- 2 large eggs plus 1 egg yolk, room temperature
- 1 tsp pure vanilla extract
- ¼ tsp pure peppermint extract
- ¾ cup all-purpose flour
- ¼ cup Dutch-process cocoa powder
- ½ tsp salt
- 16 Mint Oreo cookies, roughly crushed (not fine — you want chunks)
For the Emerald Mint Frosting:
- ½ cup unsalted butter, softened to room temperature
- 2½ cups powdered sugar, sifted
- 2–3 tbsp heavy cream
- 1 tsp pure peppermint extract (start with ¾ tsp and adjust)
- Green gel food coloring — enough for a vivid, true emerald
- Pinch of salt
For Finishing:
- 6–8 additional Mint Oreos, roughly crushed or halved
- Pinch of flaky sea salt over the frosting (optional but recommended)
- Green sprinkles or shamrock sugar decorations (optional)
- Preheat the oven to 350°F. Line an 8×8 inch baking pan with parchment paper, leaving an overhang on two sides to use as handles for lifting the brownies out cleanly. Grease the parchment lightly with butter or nonstick spray.
- Melt the butter and chocolate. Combine the chopped butter and dark chocolate in a heatproof bowl set over a saucepan of barely simmering water — a double boiler setup. Stir gently and continuously until both are fully melted and the mixture is smooth and glossy. Alternatively, microwave in 30-second bursts at 50% power, stirring between each. Remove from heat and allow to cool for 5 minutes until warm but not hot.
- Add the sugar. Whisk the granulated sugar into the warm chocolate mixture vigorously until fully incorporated. The mixture will look grainy and slightly separated at this stage — this is normal.
- Add the eggs. Add the eggs and extra yolk one at a time, whisking well after each addition. Add the vanilla extract and peppermint extract. Whisk for a full 60 seconds after the last egg — this brief but vigorous whisking creates a slight sheen on the batter that indicates proper emulsification and contributes to the characteristic crinkled, glossy top.
- Fold in the dry ingredients. Sift the flour, cocoa powder, and salt directly into the chocolate mixture. Fold with a spatula using as few strokes as possible — 15 to 20 deliberate folds maximum. Stop the moment no dry streaks remain. Overmixing develops gluten and pushes the brownie toward cakey territory. A few tiny flour pockets are preferable to an overmixed batter.
- Build the layers. Pour just over half the batter into the prepared pan and spread to an even layer. Press the roughly crushed Mint Oreos evenly over this first layer in a single, even coverage. Pour the remaining batter over the Oreo layer and spread gently to cover completely, making sure the batter reaches the edges and corners.
- Bake. Bake for 22–26 minutes. Begin checking at 22 minutes. Insert a toothpick into the center — it should come out with moist, fudgy crumbs attached, not wet batter and not clean. The edges will look set and the center will look slightly underdone. This is correct. Remove from the oven and place the pan on a wire rack.
- Cool completely. Allow the brownies to cool in the pan for at least 1 hour at room temperature, then transfer to the fridge for 20 minutes. The brownies must be completely cold before frosting — patience here is the difference between a clean, professional result and a melted, streaky disappointment.
- Make the mint frosting. Beat the softened butter with an electric hand mixer or stand mixer on medium-high speed for 2 full minutes until pale, fluffy, and noticeably increased in volume. Add the sifted powdered sugar in two additions, beating on low after each addition until incorporated, then increasing to medium-high for 30 seconds. Add the peppermint extract and a pinch of salt. Add heavy cream one teaspoon at a time until the frosting reaches a smooth, spreadable consistency — it should hold a peak but spread easily under a spatula. Add green gel food coloring drop by drop, beating after each addition, until you reach a vivid, true emerald green.
- Frost, decorate, and slice. Spread the emerald frosting over the completely cold brownies in an even, generous layer using an offset spatula or the back of a spoon. Scatter the additional crushed or halved Mint Oreos over the frosting, pressing them in very gently. Add a pinch of flaky sea salt if using. Refrigerate for 15 minutes to set the frosting slightly before lifting the brownies out using the parchment overhang and slicing into squares with a sharp knife wiped clean between each cut.
Variations & Tips
Double the Mint Layer: Add a thin layer of store-bought mint chocolate ganache — melted mint chocolate chips with a splash of warm cream — between the brownie base and the Oreo layer before baking. This creates a four-layer dessert with an additional molten mint chocolate stratum that is fully over the top in the best possible way.
Make It a Brownie Trifle: Crumble baked, cooled brownies into a trifle dish and layer with whipped cream, crushed Mint Oreos, and a drizzle of chocolate ganache. Repeat the layers, finishing with green-tinted whipped cream and whole Mint Oreos. A spectacular St. Patrick’s Day dessert for a crowd that requires zero slicing and serves itself.
Add White Chocolate Chips to the Batter: Fold ½ cup of white chocolate chips into the brownie batter before pouring for additional sweetness and a creamy contrast against the dark chocolate base. White chocolate and mint is a combination that reads particularly festive and works beautifully here.
Make It Gluten-Free: Replace the all-purpose flour with a 1:1 gluten-free baking flour blend. The brownie texture will be marginally denser but the fudginess is largely preserved because the primary structure comes from the eggs and chocolate rather than gluten development. Verify that your Oreo variety is gluten-free — many are, but check the specific product.
Pro Tip — The Hot Knife Slice: For the cleanest, most professional-looking brownie squares, run your knife under hot water, wipe it dry, and slice in one clean downward motion — do not saw back and forth. Wipe the blade clean and repeat the hot water step between every single cut. The result is clean-edged, bakery-quality squares with distinct visible layers rather than smeared, compressed edges.
How to Meal Prep These St. Patrick’s Day Mint Oreo Brownies
Brownies are among the most naturally meal-prep-friendly St. Patrick’s Day desserts in existence — they bake once, hold beautifully, and can be made days ahead without any meaningful sacrifice in quality. In fact, like many baked chocolate goods, they taste better on day two than day one as the flavors meld and the fudgy texture fully sets.
Bake Two Days Ahead: The ideal timeline for these brownies is to bake and cool them completely two days before serving, frost them the day before, and serve them on St. Patrick’s Day at room temperature after a 20-minute counter rest. This gives the frosting time to set fully, the layers time to meld, and you a completely stress-free dessert on the day itself.
Store Frosted Brownies: Frosted, sliced brownies store in an airtight container at room temperature for up to 3 days or in the refrigerator for up to 5 days. Bring refrigerated brownies to room temperature for at least 20 minutes before serving — cold brownies are significantly denser and less flavorful than room temperature ones, because the fats in the chocolate and butter are firmer when cold and mute the aromatics of the mint.
Freeze Unfrosted Brownies: The brownie base freezes exceptionally well for up to 3 months. Wrap the entire uncut slab tightly in plastic wrap followed by aluminum foil, or wrap individual slices separately for portioned convenience. Thaw overnight in the fridge, bring to room temperature, and frost fresh — the frosting takes 10 minutes and is best made the day of serving for maximum vibrancy of the green color.
Transport Without Disaster: These brownies travel well to St. Patrick’s Day parties if the frosting is fully set. Refrigerate for at least 30 minutes after frosting, then transport in the pan with a tight lid or plastic wrap pressed directly onto the frosting surface to prevent a skin from forming. Slice at the destination for the cleanest presentation.
Cultural Context: Green, Chocolate, Mint, and the Spirit of St. Patrick’s Day
St. Patrick’s Day on March 17th began as a religious feast day commemorating the death of Saint Patrick, the 5th-century missionary credited with bringing Christianity to Ireland. For centuries it was observed as a solemn holy day in Ireland — a quiet break in the Lenten fast, marked by prayer and modest celebration. It was Irish immigrants to America in the 18th and 19th centuries who transformed it into the exuberant, green-clad, food-and-drink celebration the world now recognizes.
The color green became the dominant symbol of Irish identity through a combination of the country’s lush landscape — the Emerald Isle is not a metaphor, it is a description — the green worn by Irish nationalist movements in the 18th century, and the enduring symbol of the shamrock, which Saint Patrick allegedly used to explain the concept of the Holy Trinity to the Irish people. Green became shorthand for Irishness, and it remains the most visible and universal expression of St. Patrick’s Day across cultures.
Chocolate arrived in Ireland via Britain in the late 17th century, and Irish chocolate culture developed significantly through the 19th and 20th centuries — Ireland is today home to some of Europe’s most beloved chocolate brands and has a deep popular affection for chocolate confectionery that makes a chocolate-centered St. Patrick’s Day dessert feel culturally appropriate as well as delicious.
Mint has grown wild across the Irish countryside for centuries and has been used in Irish folk medicine and cooking for generations. The pairing of mint and chocolate as a confectionery combination became popularized globally in the early 20th century, but its resonance as a St. Patrick’s Day flavor is specifically rooted in the visual association with green — mint is green, Ireland is green, and the combination of mint and chocolate in a vivid emerald-frosted St. Patrick’s Day dessert is one of those rare cases where color, flavor, and cultural symbolism align perfectly.
So when you cut into these Easy St. Patrick’s Day Mint Oreo Brownies and reveal those three distinct layers — dark chocolate, crushed Oreo, emerald frosting — you are serving something that carries the spirit of the holiday in every element. That is the best possible thing a St. Patrick’s Day dessert can do. And it happens to be absolutely, unapologetically delicious.
Easy St. Patrick’s Day Mint Oreo Brownies
Equipment
- 8×8-inch baking pan
- mixing bowls
- whisk
- spatula
- electric mixer for frosting
Ingredients
- 1/2 cup unsalted butter
- 4 oz dark chocolate (60–70% cacao), chopped
- 1 cup granulated sugar
- 2 large eggs
- 1 egg yolk
- 1 tsp pure vanilla extract
- 1/4 tsp pure peppermint extract
- 3/4 cup all-purpose flour
- 1/4 cup Dutch-process cocoa powder
- 1/2 tsp salt
- 16 Mint Oreo cookies, roughly crushed
- 1/2 cup unsalted butter, softened (for frosting)
- 2 1/2 cups powdered sugar, sifted
- 2–3 tbsp heavy cream
- 1 tsp pure peppermint extract (for frosting)
- green gel food coloring
- pinch salt (for frosting)
- 6–8 additional Mint Oreos for garnish (optional)
- flaky sea salt for finishing (optional)
Instructions
- Preheat oven to 350°F. Line an 8×8-inch baking pan with parchment paper and lightly grease.
- Melt butter and chopped dark chocolate together over a double boiler or in short microwave bursts until smooth. Cool slightly.
- Whisk sugar into chocolate mixture. Add eggs and yolk one at a time, whisking well after each. Stir in vanilla and peppermint extract.
- Fold in flour, cocoa powder, and salt just until combined. Do not overmix.
- Spread half the batter into pan. Press crushed Mint Oreos evenly over the layer. Cover with remaining batter and smooth top.
- Bake 22–26 minutes until a toothpick shows moist crumbs. Cool completely, then chill 20 minutes before frosting.
- Beat softened butter for frosting until fluffy. Add powdered sugar gradually. Mix in peppermint extract, salt, and heavy cream until smooth. Tint with green gel coloring until vivid emerald.
- Spread frosting over cold brownies. Garnish with additional crushed Oreos and flaky salt if desired. Chill 15 minutes before slicing into squares.