
The Flavor Profile
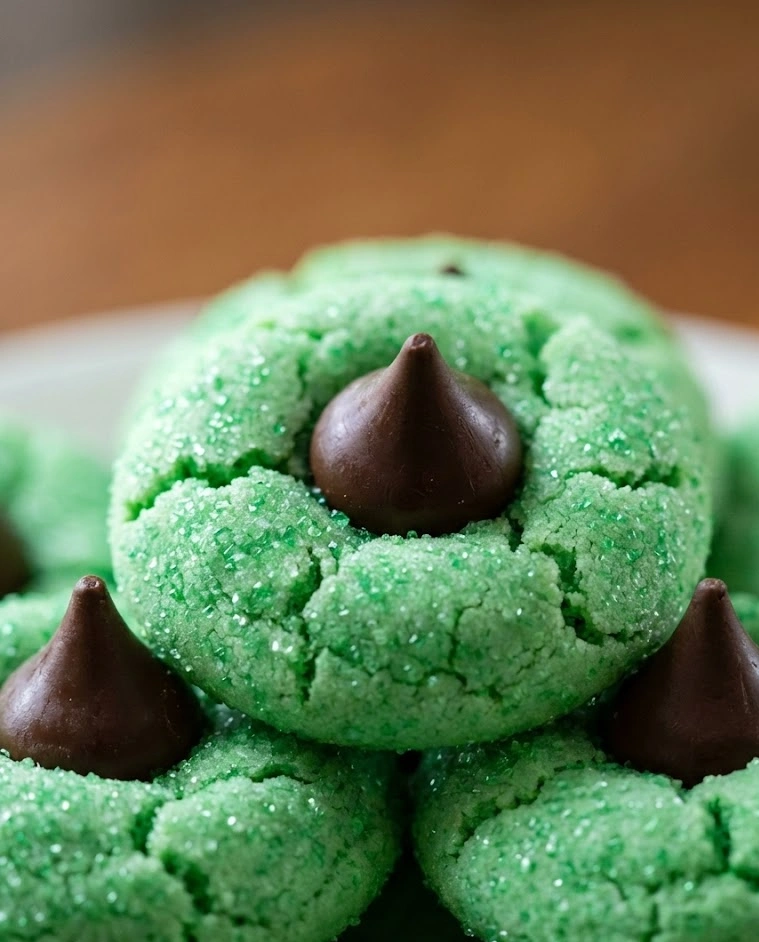
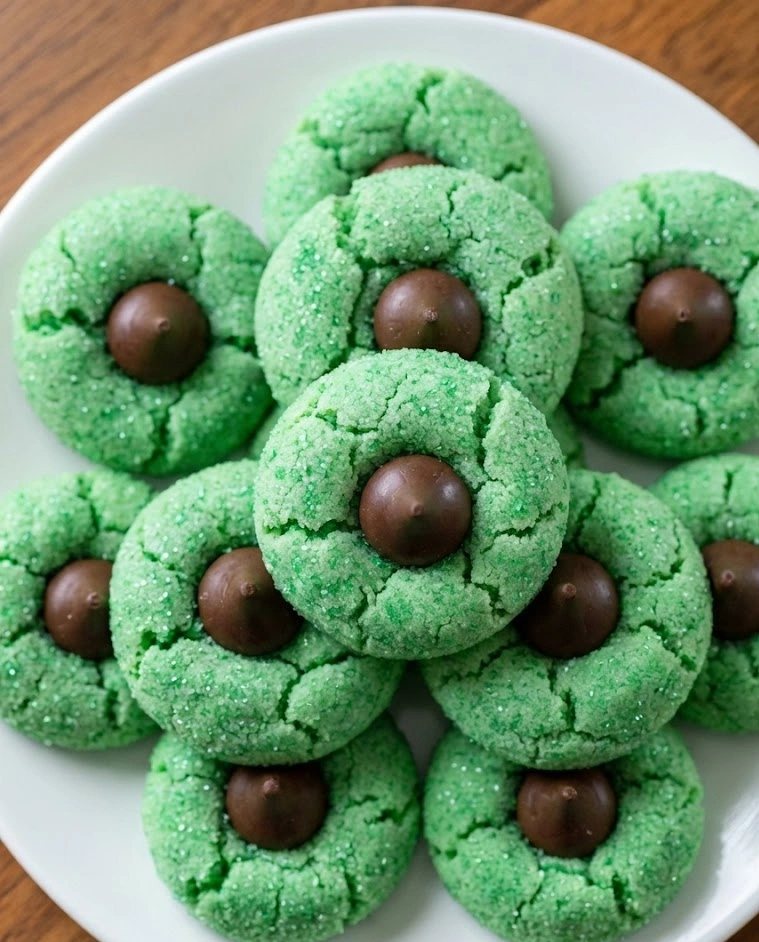
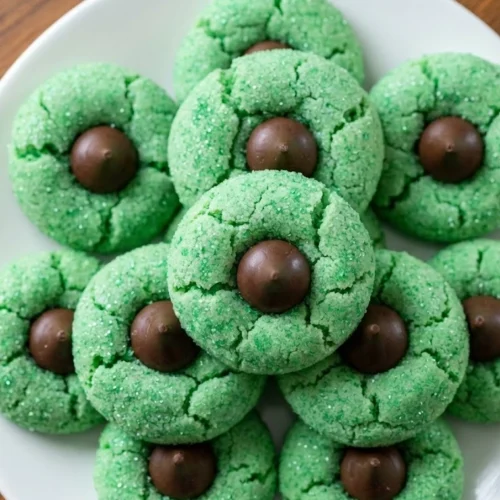
St. Patrick’s Day Mint Blossom Cookies are a festive adaptation of the classic peanut butter blossom, reimagining this beloved structure with refreshing mint as the star. These cookies deliver a sophisticated balance of cool peppermint brightness against buttery sweetness, finished with a dark chocolate centerpiece that provides bittersweet contrast. The peppermint isn’t aggressive or candy-cane forward—instead, it offers a refined, aromatic coolness that enhances rather than overwhelms. The chocolate “kiss” center creates textural drama: a firm, snappy exterior that melts into silky ganache against the cookie’s tender crumb. This combination evokes after-dinner mints elevated into cookie form—elegant, refreshing, and perfectly calibrated between indulgence and restraint.
Dominant Notes: Fresh peppermint, butter richness, dark chocolate complexity, subtle sweetness
Technique Focus: Peppermint extract calibration for balanced flavor; chocolate placement timing for optimal presentation
Common Mistakes (And How to Avoid Them)
Mistake #1: Using Mint Extract Instead of Peppermint Extract
“Mint extract” is often a blend of multiple mint varieties (spearmint, peppermint, wintergreen) that creates muddled, inconsistent flavor. Pure peppermint extract delivers clean, focused coolness without spearmint’s sweeter, softer character. Always specify peppermint extract—check the ingredient label to ensure it contains only peppermint oil, not “natural and artificial flavors.”
Mistake #2: Adding Too Much Peppermint Extract
Peppermint contains menthol, which activates cold-sensitive receptors on your tongue. In excess, this creates an unpleasant medicinal burn rather than refreshing coolness. Start with ½ teaspoon extract per batch, taste the raw dough (it’s egg-safe if concerned, though the extract flavor intensifies slightly during baking), and add more only if needed. More than 1 teaspoon risks toothpaste-like overwhelming mintiness.
Mistake #3: Pressing Chocolate Kisses Into Hot Cookies
If cookies emerge straight from a 350°F oven and you immediately press chocolate into them, the chocolate melts completely, losing its iconic shape and creating a messy puddle. The solution: let cookies cool on the baking sheet for exactly 2-3 minutes—long enough for structure to set, brief enough that dough remains warm enough to accept the chocolate without cracking. Press gently but firmly in one decisive motion.
Mistake #4: Using Milk Chocolate Instead of Dark Chocolate
Traditional blossom cookies use milk chocolate Hershey’s Kisses, but mint pairs far better with dark chocolate’s complexity and bitterness. Dark chocolate (60-70% cacao) provides sophisticated counterpoint to peppermint’s sweetness, while milk chocolate creates one-dimensional, overly sweet results. For St. Patrick’s Day, consider Andes mint chocolates or dark chocolate kisses.
Mistake #5: Skipping the Green Sugar Coating Step
The sugar coating serves three purposes: visual appeal (festive green sparkle), textural contrast (crispy exterior against tender interior), and practical function (prevents dough from sticking to your hands during rolling). Without it, cookies look plain and lack that characteristic crackled, crystalline surface that makes blossom cookies so recognizable.
Chef’s Notes: The Chemistry of Mint and Chocolate Pairing
Mint and chocolate represent one of gastronomy’s most celebrated flavor pairings, and the science explains why. Menthol (peppermint’s primary compound) activates TRPM8 receptors—the same cold-sensing receptors that respond to actual temperature drops. This creates a cooling sensation that persists even after swallowing. Meanwhile, chocolate contains theobromine and phenylethylamine, which stimulate mild euphoria and amplify flavor perception.
When you bite into a mint-chocolate cookie, the menthol’s cooling effect makes your palate more sensitive to chocolate’s complex bitter notes—quinones, pyrazines, and polyphenols become more noticeable. Conversely, chocolate’s fat content (cocoa butter) carries peppermint’s volatile oils across your palate, extending the mint flavor’s duration. This mutual enhancement is why mint-chocolate combinations feel more satisfying than the sum of their parts.
From a baking perspective, peppermint extract is alcohol-based (usually 35% alcohol), which affects dough hydration slightly. The alcohol evaporates during baking, concentrating the peppermint oil and intensifying flavor. This is why raw cookie dough tastes less minty than baked cookies—always account for this amplification when calibrating extract quantities.
The “blossom” technique—pressing chocolate into warm cookies—exploits residual heat for adhesion. The cookie’s surface temperature (around 180-200°F after a 2-3 minute rest) is perfect: warm enough to slightly soften chocolate’s base, creating mechanical bonding, but not hot enough to melt the entire piece. This temperature precision is what creates those picture-perfect cookies with intact chocolate shapes.
St. Patrick’s Day Mint Blossom Cookies Recipe
Yield: 48 cookies
Prep Time: 25 minutes (plus 30 minutes chilling)
Cook Time: 10 minutes per batch
Total Time: 1 hour 35 minutes
Ingredients
For the Cookie Dough:
- 2¾ cups (344g) all-purpose flour
- 1 teaspoon baking soda
- ½ teaspoon baking powder
- ½ teaspoon fine sea salt
- 1 cup (227g) unsalted butter, room temperature
- 1 cup (200g) granulated sugar
- ½ cup (110g) light brown sugar, packed
- 2 large eggs, room temperature
- ¾ teaspoon pure peppermint extract (adjust to taste—see notes)
- 1 teaspoon pure vanilla extract
- Green gel food coloring (optional, for subtle tint—6-8 drops)
For the Green Sugar Coating:
- ½ cup (100g) granulated sugar
- Green sanding sugar or coarse sugar (for rolling)
- OR: ½ cup granulated sugar mixed with 3-4 drops green gel food coloring (see instructions)
For the Chocolate Centers:
- 48 chocolate pieces (choose one):
- Dark chocolate Hershey’s Kisses
- Andes Crème de Menthe candies (unwrapped)
- Ghirardelli dark chocolate squares (cut into quarters)
- Dove dark chocolate promises
- Green-foil-wrapped chocolate kisses (for festive appearance)
Instructions
Step 1: Build Dry Foundation
Whisk together flour, baking soda, baking powder, and salt in a medium bowl. The combination of baking soda and baking powder creates optimal lift: baking soda provides spread and browning through alkalinity, while baking powder ensures consistent rise. Set aside.
Step 2: Cream Butter and Sugars
In the bowl of a stand mixer fitted with the paddle attachment, beat butter on medium speed for 1 minute until smooth and creamy. Add granulated sugar and brown sugar. Cream on medium-high speed for 3-4 minutes until light, fluffy, and pale in color. The mixture should noticeably increase in volume—this aeration creates tender texture.
The brown sugar contributes molasses notes that add complexity, preventing the cookies from tasting one-dimensionally sweet.
Step 3: Incorporate Eggs and Extracts
Add eggs one at a time, beating for 20 seconds after each addition. Scrape down bowl sides and bottom to ensure even incorporation. Add peppermint extract and vanilla extract. Beat for 15 seconds.
Peppermint Calibration: Start with ¾ teaspoon. If you prefer stronger mint flavor, add up to ¼ teaspoon more, but proceed cautiously. Taste a tiny amount of dough—the mint flavor should be pleasant and refreshing, not medicinal or burning. Remember that baking intensifies the flavor by 20-30%.
Step 4: Optional Color Addition
For subtle green tint, add 6-8 drops green gel food coloring at this stage. Mix on low speed for 20 seconds until color is evenly distributed. The goal is a pale, minty green—not vibrant emerald. Too much coloring creates artificial-looking cookies. If you prefer uncolored dough (relying on green sugar coating for color), skip this step entirely.
Step 5: Build Dough Structure
With mixer on low speed, gradually add flour mixture in three additions, mixing only until just combined after each addition (approximately 15 seconds per addition). Stop mixer as soon as flour streaks disappear. Overmixing develops gluten, creating tough, cake-like cookies instead of tender, chewy ones.
The dough should be soft, slightly sticky, and cohesive. If it seems dry or crumbly, add 1 tablespoon milk.
Step 6: Chill for Shape Retention
Cover bowl with plastic wrap and refrigerate for 30 minutes minimum, up to 24 hours. Chilling firms the butter, which prevents excessive spreading during baking and makes dough easier to handle. For advance preparation, refrigerate up to 3 days.
Step 7: Prepare Green Sugar Coating
While dough chills, prepare the coating. For vibrant green coating using regular granulated sugar, place ½ cup sugar in a zip-top bag or bowl. Add 3-4 drops green gel food coloring. Seal bag and massage vigorously for 2-3 minutes, or use a fork to work coloring into sugar until evenly tinted. The moisture from gel food coloring will initially clump the sugar—keep working it until sugar returns to free-flowing consistency.
Alternatively, use pre-made green sanding sugar or Irish-themed colored sugar (available seasonally).
Place prepared green sugar in a shallow bowl for rolling.
Step 8: Unwrap Chocolates
Unwrap all 48 chocolate pieces and place in a bowl near your workstation. This preparatory step is crucial—you won’t have time to unwrap chocolates when cookies emerge from the oven. The 2-3 minute window for chocolate placement is non-negotiable.
Step 9: Shape Cookie Dough Balls
Preheat oven to 350°F (175°C). Line two baking sheets with parchment paper or silicone baking mats.
Using a 1-tablespoon cookie scoop (or tablespoon measure), portion dough and roll into smooth balls between your palms. Roll each ball in green sugar coating, pressing gently so sugar adheres completely. The sugar should cover the entire surface—this creates that characteristic crackled appearance during baking.
Place coated dough balls 2 inches apart on prepared baking sheets. These cookies spread moderately—proper spacing prevents merging.
Step 10: Bake to Golden Edges
Bake for 9-11 minutes, rotating pans halfway through for even baking. Cookies are done when edges are set and showing light golden color, while centers appear slightly puffed and matte. They should still look slightly underdone—carryover heat during cooling completes the baking.
The sugar coating will develop attractive cracks, and you may see slight spreading. This is normal and desirable.
Step 11: Execute Chocolate Placement with Precision
Remove baking sheet from oven and let cookies rest for EXACTLY 2-3 minutes. Set a timer—this timing is critical. During this brief rest, cookies firm enough to support the chocolate without cracking, while remaining warm enough for adhesion.
After 2-3 minutes, working quickly but deliberately, press one chocolate piece firmly into the center of each cookie. Apply even, steady pressure—the chocolate should sink about halfway into the cookie, with the bottom half embedded and top half exposed. The warm dough will slightly puff around the chocolate base, creating a secure seat.
Important: Press straight down, not at an angle. A single confident motion works better than tentative, multiple presses which can crack the cookie.
Step 12: Cool and Set
Let cookies cool completely on the baking sheet for 10-15 minutes. During this time, the chocolate and cookie structure fully set. The chocolate will develop a slight sheen as it cools. Transfer cookies to wire racks only after they’re completely cool—warm cookies are fragile and the chocolate hasn’t fully adhered yet.
Full cooling takes approximately 30 minutes. Resist the temptation to eat them warm—the chocolate won’t have achieved optimal texture, and the cookie structure won’t have fully set.
Substitutions & Variations
Gluten-Free Adaptation:
Replace all-purpose flour with a 1:1 gluten-free baking flour blend containing xanthan gum (King Arthur Measure for Measure or Bob’s Red Mill 1-to-1). Increase chilling time to 1 hour—gluten-free dough benefits from extended hydration. The cookies will be slightly more delicate but taste excellent. Handle dough gently, as gluten-free dough is more prone to cracking.
Vegan Version:
Replace butter with vegan butter (Earth Balance or Miyoko’s, measured 1:1). Substitute eggs with flax eggs: 2 tablespoons ground flaxseed mixed with 6 tablespoons water, rested for 5 minutes until gel-like. Use vegan chocolate for centers (Enjoy Life dark chocolate morsels work well—melt 48 morsels slightly, then shape into kiss forms before baking, or use as-is). The texture will be slightly denser but remains delicious.
Refined Sugar-Free Option:
Replace granulated sugar with coconut sugar (use ¾ cup instead of 1 cup, as coconut sugar is sweeter and more moisture-dense). Use brown sugar substitute or additional coconut sugar for the brown sugar component. For coating, use coconut sugar pulsed in a food processor to create finer texture. Note that coconut sugar creates darker-colored cookies that may obscure green coloring.
Double Chocolate Mint:
Add ¼ cup (20g) unsweetened cocoa powder to the flour mixture (reduce flour to 2½ cups). This creates chocolate-mint cookies with chocolate centers—a more decadent variation. The cookies will be darker brown with less visible green tint.
White Chocolate Mint Variation:
Use white chocolate kisses or white chocolate Hershey’s Hugs (which have alternating white and milk chocolate stripes). The white chocolate provides sweeter, creamier contrast to peppermint rather than dark chocolate’s bitterness. This variation appeals more to children and those who prefer less intense chocolate flavor.
Candy Cane Crunch Addition:
Fold ½ cup crushed candy canes (pulsed in food processor to pea-sized pieces) into the dough after adding flour. This amplifies peppermint flavor and adds crunchy texture. The candy canes will partially dissolve during baking, creating pockets of concentrated mint sweetness.
Irish Cream Mint Variation:
Replace 2 tablespoons butter with 2 tablespoons Bailey’s Irish Cream liqueur, and reduce peppermint extract to ½ teaspoon. This creates adult-oriented mint cookies with subtle whiskey undertones. The cookies will spread slightly more due to added liquid.
Pairing Suggestions
Beverage Complement:
Serve with Irish coffee (hot coffee, Irish whiskey, brown sugar, topped with cream) for an adult St. Patrick’s Day pairing—the mint cookies refresh the palate between sips of rich coffee. For non-alcoholic options, pair with peppermint hot chocolate or vanilla chai tea. Cold milk is classic and ideal for children’s parties. For sophisticated entertaining, serve with crème de menthe liqueur or mint juleps (adjusting for season).
Dessert Spread Integration:
These cookies provide refreshing contrast on a dessert table heavy with rich, cream-based items. The mint flavor acts as a palate cleanser between sweeter desserts. Arrange on a tiered stand alternating with chocolate brownies or vanilla cupcakes for visual variety. The green sugar coating creates festive visual appeal without requiring elaborate decoration.
Ice Cream Pairing:
Crumble mint blossom cookies over mint chocolate chip ice cream for a textural experience—creamy ice cream, crunchy cookie pieces, and smooth chocolate chunks. Alternatively, make ice cream sandwiches using two cookies (remove chocolate centers first or embrace the extra chocolate) with vanilla or chocolate ice cream. The peppermint provides cooling sensation that complements frozen desserts naturally.
Storage & Make-Ahead Tips
Room Temperature: Store cookies in an airtight container at room temperature for up to 1 week. Place parchment paper between layers to prevent chocolate centers from sticking together. The peppermint flavor actually intensifies slightly over the first 24 hours as it mellows and integrates with the butter.
Avoiding Moisture Issues: In humid climates, the sugar coating may absorb moisture and become slightly sticky. Store cookies with a food-safe silica gel packet in the container, or add a piece of bread to the container (changed daily) to absorb excess moisture.
Freezing Dough: Portion dough into balls, roll in green sugar, and freeze on a baking sheet until solid (2 hours). Transfer to freezer bags for up to 3 months. Bake directly from frozen, adding 2 minutes to baking time. Press chocolate into cookies immediately after baking as usual.
Freezing Baked Cookies: Freeze completely cooled cookies (without chocolate centers) in airtight containers for up to 3 months. Thaw at room temperature for 1 hour, warm in a 300°F oven for 2-3 minutes, then press fresh chocolate into warm cookies. This method ensures optimal chocolate appearance and adhesion.
Make-Ahead Assembly Strategy: Bake cookies up to 1 week ahead and store airtight. The day before serving, warm cookies on a baking sheet at 300°F for 2-3 minutes, then press fresh chocolate centers into warm cookies. This creates the freshest possible presentation with perfect chocolate adhesion.
Green Sugar Coating Storage: Homemade colored sugar can be made weeks in advance. Store in an airtight container at room temperature. The moisture from gel coloring evaporates completely within 24 hours, returning sugar to free-flowing consistency.
Chocolate Center Alternatives and Creative Variations
While traditional Hershey’s Kisses are classic, consider these alternatives for elevated or personalized cookies:
Andes Crème de Menthe Candies:
These rectangular mint chocolates provide double mint impact—mint cookies with mint-filled chocolate. Excellent for mint enthusiasts. Cut each candy in half for two cookie centers, or use whole candies for larger, more dramatic presentation.
Rolo Candies (Caramel-Filled):
For sweet-salty complexity, use Rolos instead of plain chocolate. The caramel center provides gooey contrast to the crisp cookie exterior. The combination of mint and caramel is unexpected but sophisticated.
Peanut Butter Cups (Mini):
Mini Reese’s Peanut Butter Cups create a mint-peanut butter-chocolate trinity. This variation bridges traditional peanut butter blossoms and mint cookies—perfect for those who can’t choose between classics.
Dove Promises or Ghirardelli Squares:
Premium chocolate brands create more sophisticated flavor. Dark chocolate Dove Promises with sea salt are particularly excellent—the salt amplifies both mint and chocolate while adding textural surprise.
Homemade Ganache Centers:
For ultimate control, pipe dark chocolate ganache onto cooled cookies instead of pressing solid chocolate into warm ones. Make ganache: heat ½ cup heavy cream until simmering, pour over 8 oz chopped dark chocolate, let stand 1 minute, whisk smooth, cool until pipeable. Pipe rosettes onto cookie centers for bakery-quality presentation.
Troubleshooting Common Issues
Problem: Cookies spread too much, becoming flat.
Solution: Dough wasn’t chilled long enough, or butter was too soft. Refrigerate dough for full 30 minutes minimum. Ensure butter is room temperature (65-68°F), not warm or greasy.
Problem: Chocolate melts completely into cookies.
Solution: Cookies were too hot when chocolate was added. Wait the full 2-3 minutes after removing from oven. If kitchen is very warm, let cookies cool 4 minutes instead.
Problem: Cookies crack when chocolate is pressed in.
Solution: Cookies cooled too long before chocolate placement. Work within the 2-3 minute window. If necessary, warm cooled cookies in the oven for 1 minute at 300°F, then press chocolate.
Problem: Peppermint flavor is too strong/weak.
Solution: Extract potency varies by brand. McCormick and Frontier are reliable. Start with ½ teaspoon, taste dough, adjust. Remember that flavor intensifies 20-30% during baking.
Problem: Green sugar coating looks streaky or uneven.
Solution: Gel food coloring wasn’t mixed thoroughly enough. Continue massaging/stirring until sugar returns to uniform free-flowing consistency. Alternatively, purchase pre-colored sanding sugar.
St. Patrick’s Day Mint Blossom Cookies
Equipment
- stand mixer or hand mixer
- mixing bowls
- baking sheets
- parchment paper
- cookie scoop
Ingredients
- 2 3/4 cups all-purpose flour
- 1 tsp baking soda
- 1/2 tsp baking powder
- 1/2 tsp fine sea salt
- 1 cup unsalted butter, room temperature
- 1 cup granulated sugar
- 1/2 cup light brown sugar, packed
- 2 large eggs, room temperature
- 3/4 tsp pure peppermint extract
- 1 tsp pure vanilla extract
- green gel food coloring (optional)
- 1/2 cup granulated sugar (for rolling)
- green sanding sugar or colored sugar
- 48 pieces dark chocolate kisses or chocolate candies
Instructions
- Whisk together flour, baking soda, baking powder, and salt in a medium bowl. Set aside.
- Cream butter until smooth, then add granulated sugar and brown sugar. Beat until light and fluffy.
- Add eggs one at a time, mixing well after each. Add peppermint extract and vanilla extract and mix briefly.
- If using, mix in green gel food coloring until evenly tinted.
- Gradually add dry ingredients to wet ingredients, mixing just until combined.
- Cover dough and refrigerate for at least 30 minutes to prevent spreading.
- Roll dough into 1-tablespoon balls and roll in green sugar until fully coated.
- Bake at 350°F (175°C) for 9–11 minutes until edges are set and lightly golden.
- Let cookies cool on the baking sheet for 2–3 minutes, then press one chocolate piece into the center of each cookie.
- Allow cookies to cool completely before transferring or storing.