
There’s something deeply satisfying about transforming simple ingredients into something that looks like pure magic. These Pot O’ Gold Cake Balls are exactly that transformation.
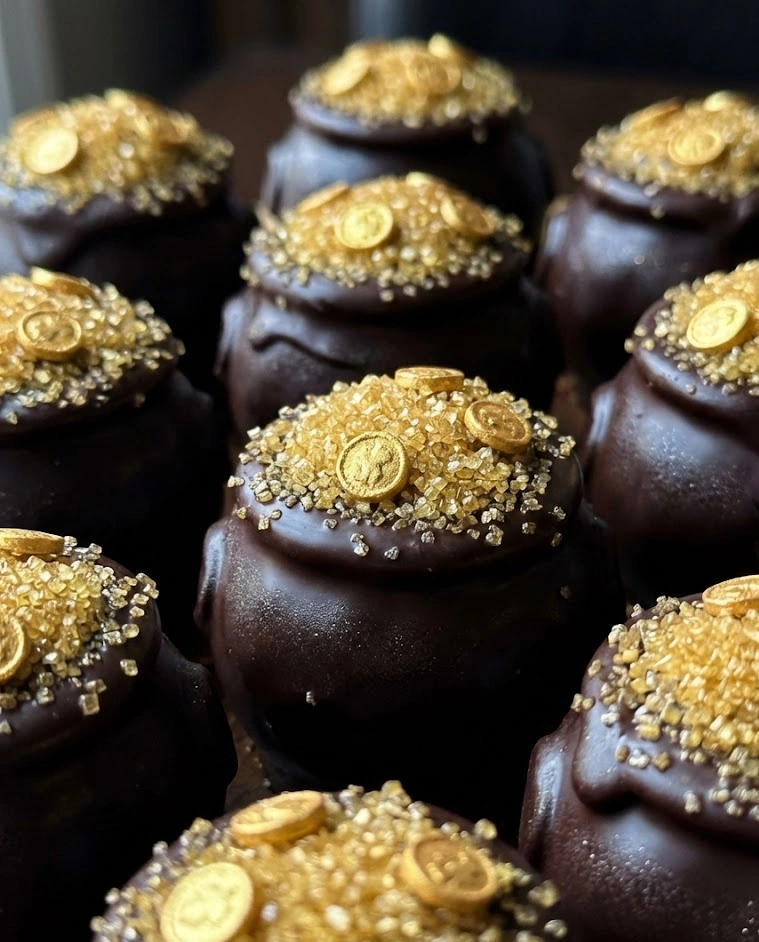
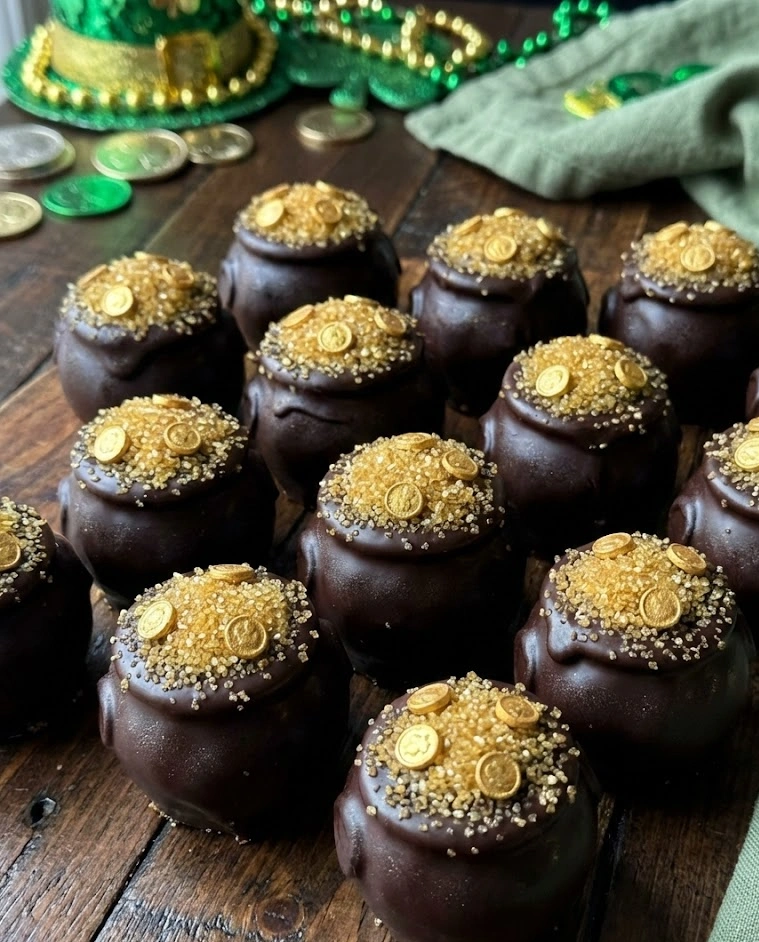
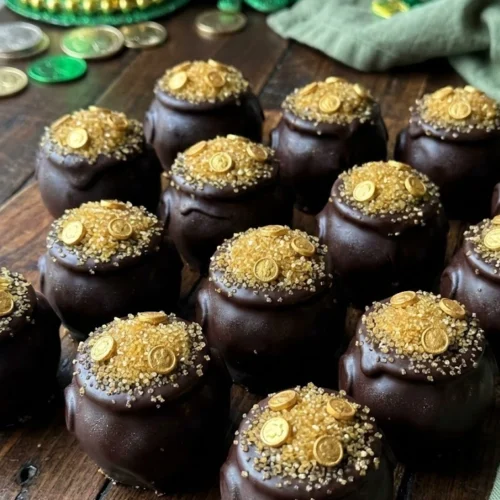
They’re one of those St Patrick’s Day treats that stops people mid-conversation. Golden, shimmering spheres that look like they were pulled straight from a leprechaun’s hidden treasure chest, each one rich, decadent, and almost too beautiful to eat.
Almost. Because once you taste the dense, moist, perfectly sweet interior coated in smooth chocolate, all hesitation disappears.
Why You’ll Love These Pot O’ Gold Cake Balls
Let’s start with the undeniable visual impact these treats deliver.
When you arrange these shimmering golden spheres in a decorative bowl or small black cauldron, the effect is genuinely stunning. They catch the light, they sparkle, and they immediately communicate celebration and festivity. These are the St Patrick’s Day treats that become the centerpiece of your dessert table without even trying.
The flavor is rich and indulgent in a way that feels special. Cake balls—a mixture of crumbled cake and frosting rolled into spheres and coated in chocolate—deliver an incredibly moist, fudgy texture that’s completely different from regular cake. Every bite is dense, sweet, and satisfying in the most luxurious way.
They’re also remarkably forgiving for beginners. Unlike traditional cakes that require precise measurements and careful timing, cake balls are nearly impossible to mess up. The mixing is intuitive, the rolling is straightforward, and the dipping becomes easier with each one you make.
These treats are perfect for making ahead. In fact, they’re often better when made a day or two in advance, as the flavors meld and deepen over time. That makes them ideal for stress-free party preparation when you need one less thing to worry about on the actual day.
Finally, they’re incredibly versatile in presentation. Serve them in a pot of gold, arrange them on lollipop sticks as cake pops, package them individually as party favors, or stack them in a pyramid on a cake stand. The golden coating works beautifully in any presentation format you choose.
Key Ingredients: Building Your Golden Treasure
Understanding what goes into these Pot O’ Gold Cake Balls helps you execute them flawlessly and customize them to your preferences.
Cake Base: You need one box of cake mix (baked according to package directions) or one homemade 9×13-inch cake. Yellow cake or vanilla cake creates the lightest, most neutral base that allows the golden coating to shine. Chocolate cake creates a richer, more decadent interior that some people prefer. The cake should be completely cooled before you begin—warm cake creates a sticky, unworkable mixture.
Frosting: One container (16 ounces) of frosting acts as the binder that holds your crumbled cake together. Vanilla buttercream is the classic choice and creates the sweetest, richest flavor. Cream cheese frosting adds a subtle tang that balances the sweetness beautifully. The ratio of cake to frosting is crucial—too much frosting and the balls become overly sweet and soft; too little and they’re dry and crumbly.
Gold Chocolate Melting Wafers: These are the secret to that stunning metallic gold exterior. Gold candy melts or gold coating chocolate are specifically formulated to melt smoothly and set with a beautiful sheen at room temperature. They’re far superior to regular chocolate for dipping projects because they don’t require tempering. You can find them in the baking aisle or online in various shades from pale champagne gold to deep metallic gold.
Edible Gold Luster Dust: This optional ingredient takes the visual impact from impressive to absolutely showstopping. Luster dust is a fine, shimmering powder that you brush onto the dried chocolate coating to create an intensified metallic shine. A small container goes a long way and can be found wherever cake decorating supplies are sold.
Gold Sanding Sugar or Gold Sprinkles: These add textural interest and extra sparkle. A light dusting while the chocolate is still wet creates a sugared, glittering effect that catches light beautifully.
Vegetable Oil or Coconut Oil: A teaspoon or two added to melted chocolate thins it to the perfect dipping consistency. This is especially helpful if your chocolate seems thick or doesn’t coat smoothly. The oil doesn’t affect flavor but dramatically improves workability.
How to Make Pot O’ Gold Cake Balls
These treats come together through a series of simple, satisfying steps. Take your time and enjoy the process—there’s something genuinely meditative about rolling cake balls.
Step 1: Bake your cake according to package or recipe directions and allow it to cool completely. This is non-negotiable. Even slightly warm cake will cause problems in the next steps. Once cooled, use your hands or a fork to crumble the entire cake into fine crumbs in a large mixing bowl. Break up any large pieces—you want a uniform, almost sand-like texture with no chunks remaining.
Step 2: Add approximately three-quarters of the frosting container to the cake crumbs. Start with less rather than more—you can always add more frosting, but you can’t take it out once it’s mixed in. Use your hands or a sturdy spatula to mix the frosting thoroughly into the cake crumbs. The mixture should hold together when squeezed but not feel overly wet or sticky. The texture should resemble cookie dough—moldable and cohesive without being greasy.
Step 3: Test your mixture by rolling a small ball. If it holds together perfectly, you’re ready to proceed. If it crumbles and falls apart, add a little more frosting and mix again. If it’s too wet and sticky, add a small amount of extra cake crumbs to balance it.
Step 4: Line a baking sheet with parchment paper. Using a small cookie scoop or tablespoon, portion out approximately 1 to 1½ tablespoons of the cake mixture at a time. Roll each portion between your palms to create smooth, round balls. Uniformity in size is important—it ensures even coating and professional appearance. Aim for balls roughly the size of a large walnut or small golf ball.
Step 5: Place each rolled ball on the prepared baking sheet. Once all your mixture is rolled, transfer the entire sheet to the refrigerator and chill for at least 1 hour, or up to overnight. This chilling step is absolutely essential. It firms up the balls so they hold their shape during dipping and prevents them from falling apart in the warm chocolate.
Step 6: About 15 minutes before you’re ready to dip, remove the cake balls from the refrigerator. You want them cold but not frozen solid—cold enough to maintain structure, but not so cold that the chocolate seizes or cracks when it makes contact.
Step 7: Melt your gold chocolate melting wafers according to package directions. Microwave in 30-second intervals, stirring thoroughly between each one, until completely smooth. If the chocolate seems thick, stir in ½ to 1 teaspoon of vegetable oil until it reaches a thin, pourable consistency perfect for dipping.
Step 8: Working with one cake ball at a time, drop it into the melted gold chocolate. Use a fork to roll it around, ensuring complete coverage. Lift the ball out on the fork, allowing excess chocolate to drip back into the bowl. Gently tap the fork against the side of the bowl to remove even more excess—this prevents heavy drips and creates a smooth, thin coating.
Step 9: Use a toothpick to carefully slide the coated cake ball off the fork onto a parchment-lined baking sheet. If you notice a small mark where the toothpick touched, you can smooth it with a fingertip or add a tiny dot of melted chocolate to cover it.
Step 10: While the chocolate coating is still wet and tacky, sprinkle with gold sanding sugar if using. Work quickly—you have about 30 seconds before the chocolate begins to set.
Step 11: Allow the coated cake balls to set completely at room temperature for 30-45 minutes. Do not refrigerate during this setting time—rapid cooling causes condensation that dulls the beautiful gold shine.
Step 12: Once fully set, use a small, clean, dry paintbrush to dust edible gold luster dust over the surface of each ball. This enhances the metallic shimmer dramatically and creates that truly treasure-like appearance. Brush gently in one direction for the most even coverage.
Step 13: Store finished Pot O’ Gold Cake Balls at room temperature until ready to serve. They’re now ready to dazzle your guests.
Variations & Tips to Customize Your Treasure
These St Patrick’s Day treats adapt beautifully to different flavors, preferences, and presentation styles.
Flavor Variations: Chocolate cake with chocolate frosting creates an intensely rich, truffle-like interior. Red velvet cake with cream cheese frosting offers gorgeous color contrast when you bite through the gold exterior. Lemon cake with lemon frosting creates a bright, citrusy option that balances the sweetness of the coating. Irish cream-flavored cake or a tablespoon of Bailey’s mixed into the frosting adds an adults-only twist perfect for evening celebrations.
Rainbow Interior: Use funfetti cake mix for a festive surprise—when guests bite through the gold exterior, they’re greeted with colorful sprinkles throughout the interior. It’s the rainbow treasure at the end of the leprechaun hunt.
Cake Pop Version: Insert lollipop sticks into the chilled cake balls before dipping. This transforms them into handheld cake pops that are easier to serve and eat, especially for children or standing receptions. Stand them upright in a piece of styrofoam covered with decorative paper for an impressive display.
Different Gold Shades: Mix gold and champagne-colored candy melts to create variation in your treasure pile. Some balls in deep gold, others in pale champagne gold, creates a more realistic treasure chest effect with depth and variety.
Coinlike Appearance: Instead of rolling into balls, press each portion of cake mixture into silicone molds shaped like coins. Chill, pop out, and dip in gold chocolate. These look even more authentically like gold coins from a leprechaun’s treasure.
Simplified Version: Skip the luster dust and extra decorations entirely. The gold coating alone is beautiful and impressive. This is perfect when making large batches or when working with children who just want the fun of dipping without fussy finishing touches.
Pro Tip: Keep a damp paper towel nearby while rolling cake balls. Occasionally wipe your hands clean—this prevents buildup of sticky cake mixture on your palms that makes rolling progressively more difficult. Clean hands create the smoothest, most perfectly round balls every single time.
Storage & Make-Ahead Strategy
One of the greatest advantages of these Pot O’ Gold Cake Balls is how well they store and how far in advance you can prepare them.
Room Temperature Storage: Store completed cake balls in an airtight container at room temperature for up to 5 days. Layer them carefully with parchment paper between each layer to prevent the gold coating from scratching or the balls from sticking together. Room temperature storage maintains the chocolate’s beautiful sheen and the interior’s perfect moist texture.
Refrigerator Storage: If your kitchen is very warm or if your frosting contains cream cheese, refrigerate the finished cake balls for up to 1 week. Bring them to room temperature 30 minutes before serving for the best flavor and texture. Cold cake balls are too firm and don’t have the luxurious melt-in-your-mouth quality that makes them special.
Freezer Storage: Both uncoated cake balls and fully finished ones freeze beautifully for up to 3 months. For uncoated balls, freeze them on a baking sheet until solid, then transfer to a freezer bag. When ready to use, thaw completely at room temperature before dipping. Fully coated balls should be frozen individually, then stored in an airtight container with parchment between layers.
Make-Ahead Timeline: You can bake the cake up to 2 days ahead and store it wrapped tightly at room temperature. Form the cake balls up to 3 days ahead and refrigerate. Dip and decorate up to 3 days ahead and store at room temperature. This flexible timeline lets you break the project into manageable steps rather than doing everything at once.
Transporting: These travel remarkably well. Place them in a sturdy container with parchment between layers. Keep them in a cool, dry place during transport. Avoid leaving them in a hot car—chocolate melts quickly in heat. If traveling in summer, transport them in a cooler with ice packs, but keep them in an airtight container so they don’t get wet from condensation.
Creative Presentation Ideas That Maximize Impact
How you present these Pot O’ Gold Cake Balls can transform them from impressive treats to the absolute star of your St Patrick’s Day celebration.
Treasure Pot Display: Arrange the golden cake balls in a small black cauldron or pot, allowing them to overflow slightly onto the table surface. Scatter gold foil-wrapped chocolate coins around the base. Add a small sign that reads “Leprechaun’s Treasure” or “Lucky Gold.” The effect is immediately recognizable and deeply festive.
Rainbow Connection: Create a rainbow arc on your dessert table using colored candies, treats, or even cut construction paper. Position your pot of gold cake balls at one end as the treasure at the end of the rainbow. This creates a complete St Patrick’s Day narrative that guests of all ages appreciate.
Individual Treasure Bags: Place 2-3 cake balls in small clear cellophane bags tied with green and gold curling ribbon. Attach a tag that says “You’re worth your weight in gold!” or “Thanks for being golden!” These make perfect party favors or teacher gifts that feel special and personal.
Tiered Display: Arrange cake balls on a tiered serving stand or cupcake tower. The height creates visual drama and makes them easy for guests to access. Line each tier with gold tissue paper or scatter shamrock confetti for extra festive flair.
Treasure Chest: Purchase or craft a small decorative treasure chest from a craft store. Line it with gold fabric or tissue paper and fill it with cake balls. Prop the lid open dramatically so guests can see the “treasure” inside. This presentation is especially impressive for themed parties where you really want to commit to the St Patrick’s Day aesthetic.
Place Setting Gifts: Position one gold cake ball at each place setting as both decoration and dessert. Tie a small ribbon around it or place it in a gold foil cupcake liner with the guest’s name written on a small card beside it. It’s an elegant touch that makes each guest feel special.
Why Cake Balls Work So Beautifully for St Patrick’s Day Treats
Among all the St Patrick’s Day treats you could make, cake balls offer a unique combination of advantages that make them particularly well-suited to holiday celebrations.
The format is inherently special. Unlike a slice of cake or a regular cookie, a cake ball feels like a luxury item—a small, precious confection that demands attention. The spherical shape is unusual enough to feel special without being so unusual that people don’t know how to eat it.
The coating possibilities are virtually limitless. While we’re using gold for St Patrick’s Day, you could adapt the same base recipe to any holiday by simply changing the coating color. That versatility means once you master this technique, you have a go-to dessert solution for every celebration on your calendar.
They’re portion-controlled without feeling restrictive. Each ball is a perfect one or two-bite serving that satisfies sweet cravings without overwhelming. Guests can easily have one—or three—without feeling like they’ve overindulged.
The make-ahead nature reduces stress dramatically. You can complete these days before your celebration and simply arrange them on your serving pieces the day of the event. That kind of flexibility is invaluable when you’re juggling multiple dishes and decorating responsibilities.
The Gold Standard for St Patrick’s Day Celebrations
These Pot O’ Gold Cake Balls represent everything that makes great St Patrick’s Day treats so memorable: visual impact, delicious flavor, festive theming, and genuine fun in both the making and the eating.
They prove that you don’t need professional pastry training or expensive equipment to create something genuinely stunning. The techniques are simple enough for beginners but yield results impressive enough to fool people into thinking you spent hours on each one.
When you set out your pot of shimmering golden treasures at your next St Patrick’s Day gathering, watch what happens. Guests will gather around, phones will come out for pictures, and someone will definitely ask if they can really eat something that looks that beautiful.
The answer, of course, is yes. Because these aren’t just decorations—they’re delicious, decadent treats that taste every bit as good as they look.
So grab your cake mix, roll up your sleeves, and get ready to create a batch of edible gold that would make any leprechaun jealous. Your treasure awaits, and it’s absolutely delicious.
Pot O’ Gold Cake Balls
Equipment
- 9×13-inch baking pan
- mixing bowl
- baking sheet
- parchment paper
- microwave-safe bowl
Ingredients
- 1 box yellow or chocolate cake mix (plus ingredients listed on box)
- 16 oz vanilla or cream cheese frosting
- 16 oz gold chocolate melting wafers
- 1 tsp vegetable oil (optional, for thinning chocolate)
- gold sanding sugar (optional)
- edible gold luster dust (optional)
Instructions
- Bake cake according to package directions in a 9×13-inch pan. Cool completely.
- Crumble cooled cake into fine crumbs in a large bowl. Add about 3/4 of the frosting and mix until the texture resembles moldable cookie dough. Adjust frosting as needed.
- Roll mixture into 1 to 1 1/2 tablespoon-sized balls. Place on a parchment-lined baking sheet.
- Refrigerate cake balls for at least 1 hour until firm.
- Melt gold chocolate wafers in 30-second intervals, stirring between each. Stir in vegetable oil if needed for smoother consistency.
- Dip each chilled cake ball into melted chocolate, ensuring full coverage. Tap off excess and place back onto parchment.
- Sprinkle with gold sanding sugar while chocolate is still wet, if using.
- Allow chocolate to set completely at room temperature, about 30–45 minutes. Brush lightly with edible gold luster dust for extra shine if desired.