
Need an incredibly easy, festive, and delicious treat for a last-minute party? These Peppermint Crunch Oreos are the no-bake holiday heroes you’ve been looking for!
Picture this: the satisfying snap of a crisp Oreo cookie, coated in silky white chocolate that melts on your tongue, finished with the bright, refreshing crunch of crushed candy canes. Each bite is a perfect balance of rich chocolate, creamy sweetness, and cool peppermint—everything you love about the holidays in one irresistible package.
The best part? With just 4 ingredients and no oven required, this is the easiest recipe you’ll make all season. Whether you’re hosting a holiday gathering, need a last-minute homemade gift, or simply want to treat yourself to something festive, these Peppermint Crunch Oreos deliver maximum wow-factor with minimal effort.
Why These No-Bake Peppermint Crunch Oreos Are a Holiday Must-Have
Let me tell you why these treats have become my absolute go-to every December!
They’re ridiculously fast and easy. This is hands-down the #1 reason I make these Peppermint Crunch Oreos year after year. From start to finish, you can have a gorgeous platter ready in under 30 minutes. No complicated techniques, no fancy equipment, and definitely no stress. Just dip, sprinkle, and let them set while you tackle the rest of your holiday to-do list.
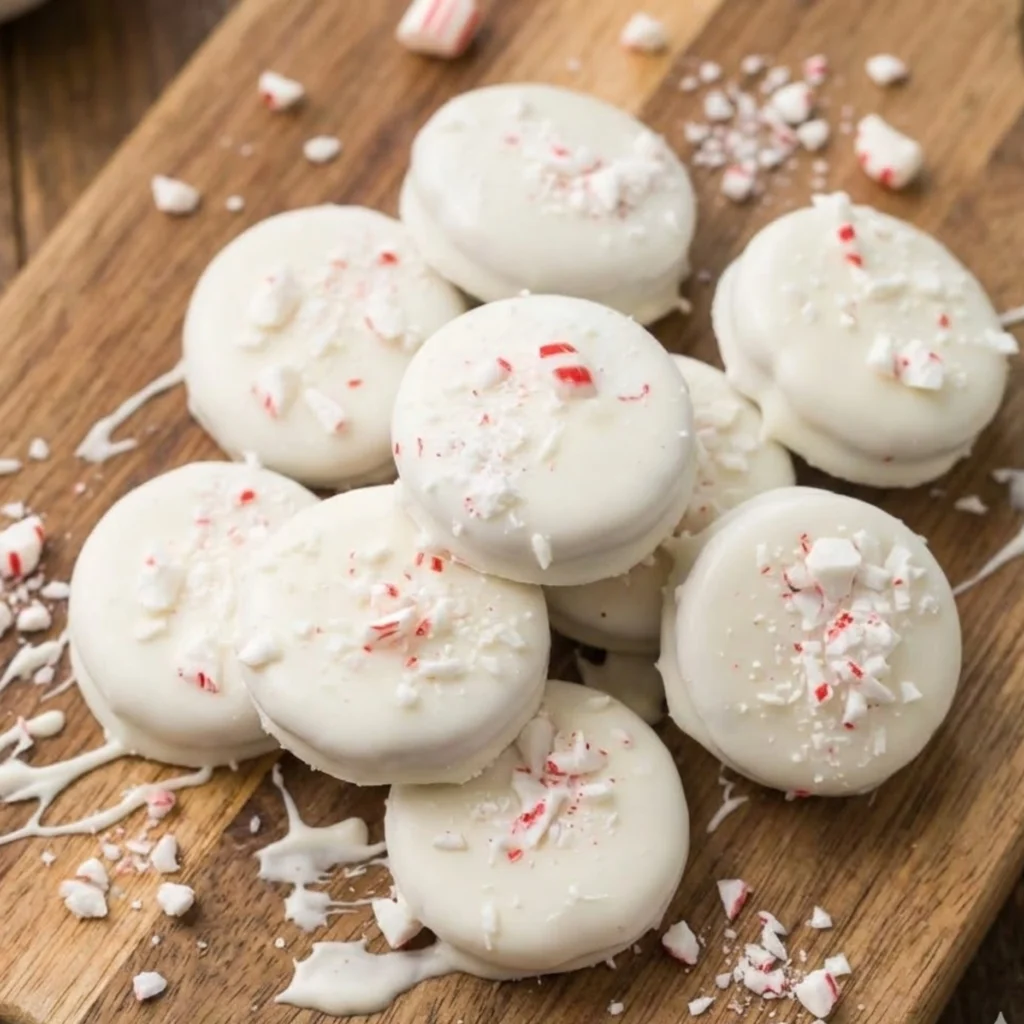
They look absolutely stunning on a cookie platter. The contrast of dark Oreo cookies against snowy white chocolate, topped with festive red-and-white candy cane pieces, is simply gorgeous. Your guests will think you spent hours in the kitchen! These beauties photograph like a dream, making them perfect for holiday parties, cookie exchanges, or sharing on social media.
The flavor combo is unbeatable. There’s something magical about the combination of rich chocolate Oreos, smooth white chocolate, and refreshing peppermint. It’s the classic holiday flavor profile that everyone craves this time of year, and each element complements the others perfectly without being overwhelming.
They’re a great recipe to make with kids. My little helpers absolutely love getting involved with these! The dipping and sprinkling steps are perfect for small hands, and there’s very little that can go wrong. Plus, it’s a wonderful way to create holiday memories together in the kitchen (just expect a few candy canes to mysteriously disappear along the way!).
Only 4 Ingredients for This Easy Treat
You probably have most of these ingredients in your pantry already! Here’s everything you need to make these festive Peppermint Crunch Oreos:
Oreos: I use classic chocolate Oreos, but Double Stuf or even the limited-edition holiday flavors work beautifully too. You’ll need about 24-30 cookies, depending on how many you want to make (or how many don’t get eaten during the process!).
High-quality white chocolate: This is where quality really matters! I prefer using white chocolate melting wafers or good-quality white chocolate chips like Ghirardelli. They melt more smoothly and create that gorgeous, glossy coating. Avoid generic brands that contain too many additives—they can seize up or taste waxy.
Peppermint candy canes: Standard candy canes work perfectly! You’ll need about 6-8 candy canes for a full batch. Choose the classic red-and-white striped ones for the most festive look.
Coconut oil: This is my secret weapon for smooth, perfectly dippable chocolate! Just 1-2 teaspoons mixed into your melted white chocolate will give you a thinner, more workable consistency that creates a beautiful coating without being too thick or clumpy.
How to Make Peppermint Crunch Oreos (Step-by-Step)

Let me walk you through this super-simple process!
Step 1: Crushing the Candy Canes
This is easier (and less messy) than you might think! Unwrap your candy canes and place them inside a sturdy zip-top bag. Seal it completely, then use a rolling pin or the back of a heavy spoon to crush them into small pieces. I like to aim for a mix of fine powder and small chunks—this gives you the best texture and makes the pieces stick to the chocolate better. Pro tip: Do this step first so your crushed peppermint is ready to go the moment you start dipping!
Step 2: Melting the White Chocolate
Place your white chocolate in a microwave-safe bowl and add about 1-2 teaspoons of coconut oil. Microwave in 30-second intervals, stirring well after each one. This prevents the chocolate from overheating and seizing up (which would turn it into a grainy, unusable mess). Once it’s completely smooth and melted, you’re ready to dip! The chocolate should flow easily off your spoon—if it’s too thick, add just a touch more coconut oil.
Step 3: The Dipping Process
Line a baking sheet with parchment paper. Using a fork, carefully dip each Oreo into the melted white chocolate. You can do a half-dip for an elegant look that shows off part of the original cookie, or go for a full dip if you want complete coverage. I usually do half-dips because they’re easier to handle and look more professional! Gently tap the fork against the side of the bowl to let excess chocolate drip off—this prevents thick, uneven coatings and those little “feet” of chocolate that can form around the base.
Step 4: Sprinkling and Setting
While the chocolate is still wet, immediately sprinkle your crushed candy canes over the top. Don’t wait—the chocolate sets quickly! Place the dipped Oreos on your prepared parchment paper and let them sit at room temperature until the chocolate hardens completely, about 15-20 minutes. If you’re in a hurry, pop them in the fridge for 10 minutes to speed things up.
Looking for another easy, festive recipe? Try these Red Velvet Crinkle Cookies—they’re made from a box mix and always disappear fast!
Pro-Tips for Perfect Dipped Oreos
Want bakery-quality results? Here are my best tricks:
Master the tap technique. After dipping each Oreo, gently tap the fork against the rim of the bowl 2-3 times. This releases excess chocolate and gives you a thinner, more even coating. Don’t skip this step—it’s the difference between clunky, thick cookies and professional-looking treats!
Parchment paper is absolutely essential. Never use wax paper (the chocolate can stick) or try to set them directly on a plate. Parchment paper ensures your Peppermint Crunch Oreos release cleanly every single time without any chocolate left behind.
Add a fancy drizzle for extra wow-factor. Once your dipped Oreos are completely set, melt a small amount of dark or milk chocolate and transfer it to a small zip-top bag. Snip off a tiny corner and drizzle back and forth across the cookies for a gorgeous, professional finish. It takes just 2 extra minutes but looks incredibly impressive!
Work in small batches. Melt about half your chocolate at a time. This prevents it from hardening in the bowl while you’re working, and you can always remelt if needed.

How to Store & Gift Your Festive Oreos
These treats are surprisingly sturdy and keep beautifully!
Storing them: Once your Peppermint Crunch Oreos are completely set, layer them in an airtight container with parchment paper between each layer to prevent sticking. They’ll stay fresh at room temperature for up to 2 weeks—though I guarantee they won’t last that long! Avoid refrigerating them unless it’s extremely warm in your kitchen, as this can cause condensation and make the chocolate sweat.
Packaging for gifts: These make absolutely wonderful homemade gifts! Place them in clear cellophane bags tied with festive ribbon, arrange them in decorative holiday tins, or pack them in small bakery boxes lined with tissue paper. If you’re stacking them, put a small piece of parchment paper between layers to prevent any sticking or smudging. For extra protection during transport, you can wrap each cookie individually in plastic wrap before placing them in your gift container.
How long they last: Properly stored, these will stay delicious for 10-14 days at room temperature. The Oreos stay crisp, the chocolate remains snappy, and the peppermint keeps its fresh crunch. Just keep them away from heat sources and direct sunlight!
FAQs
Can I use milk or dark chocolate instead of white?
Absolutely! While white chocolate gives you that classic holiday look and lets the red peppermint really pop, milk chocolate or dark chocolate work beautifully too. Dark chocolate pairs especially well with peppermint if you prefer a less sweet treat. You can even do a combination—dip half in white chocolate and half in dark for a gorgeous variety platter!
What’s the best way to crush candy canes without a mess?
The zip-top bag method is your friend! Place unwrapped candy canes in a sturdy freezer bag, seal it completely, and wrap the bag in a kitchen towel for extra protection. Then use a rolling pin or meat mallet to crush them. The bag contains all the mess, and the towel prevents any tears. You can also pulse them in a food processor for super-quick results, but I find the bag method gives you better control over the size of the pieces.
My white chocolate is too thick! How do I fix it?
Don’t panic—this is an easy fix! Stir in coconut oil, one teaspoon at a time, until the chocolate reaches a smooth, dippable consistency. You can also use vegetable shortening if you don’t have coconut oil. Never add water or milk—this will cause the chocolate to seize and become unusable. If your chocolate has already seized (turned grainy and clumpy), unfortunately there’s no way to save it, so start fresh with a new batch and remember to add that coconut oil from the beginning!
Conclusion
It doesn’t get easier or more festive than these Peppermint Crunch Oreos! They’re always the first to disappear from our holiday table, and once you make them, you’ll understand why. The combination of crunchy Oreos, silky white chocolate, and refreshing peppermint creates the perfect no-bake Christmas treat that everyone absolutely loves.
Whether you’re a busy parent looking for a quick activity with the kids, need something impressive for a cookie exchange, or just want to enjoy some holiday baking without turning on the oven, these Peppermint Crunch Oreos are your answer. They’re foolproof, festive, and guaranteed to spread holiday cheer!
Have fun making these (and try not to eat them all as you go!). Don’t forget to save this easy no-bake recipe to your “Christmas Treats” board on Pinterest so you can find it again next year. I’d love to hear how yours turn out—leave a comment below and let me know if you tried any fun variations!
Happy holidays, and happy dipping!

Peppermint Crunch Oreos
Equipment
- parchment paper
- silicone spatula
- dipping fork
- baking sheet
- cooling rack
Ingredients
- 13.29 ounce Oreo cookies or 1 (13.29-ounce) package
- 24 ounce vanilla almond bark or 1 (24-ounce) package
- 1/3 cup crushed peppermints or candy canes
Instructions
- Line a baking sheet with parchment paper and set aside.
- Break the vanilla almond bark into smaller pieces and place in a microwave-safe bowl. Microwave in 30-second increments, stirring well between each interval, until completely melted and smooth.
- Using a fork, dip each Oreo cookie into the melted almond bark, turning to coat completely. Lift the cookie with the fork and let the excess almond bark drip off. Gently tap the fork on the edge of the bowl to remove extra coating.
- Place the dipped Oreo onto the prepared baking sheet. While the coating is still wet, sprinkle crushed peppermint or candy canes over the top.
- Repeat with the remaining cookies. Allow the cookies to sit at room temperature for about 1 hour until the almond bark is completely set, or refrigerate for 20 minutes to speed up the process.
- Store in an airtight container or package for gifting.