
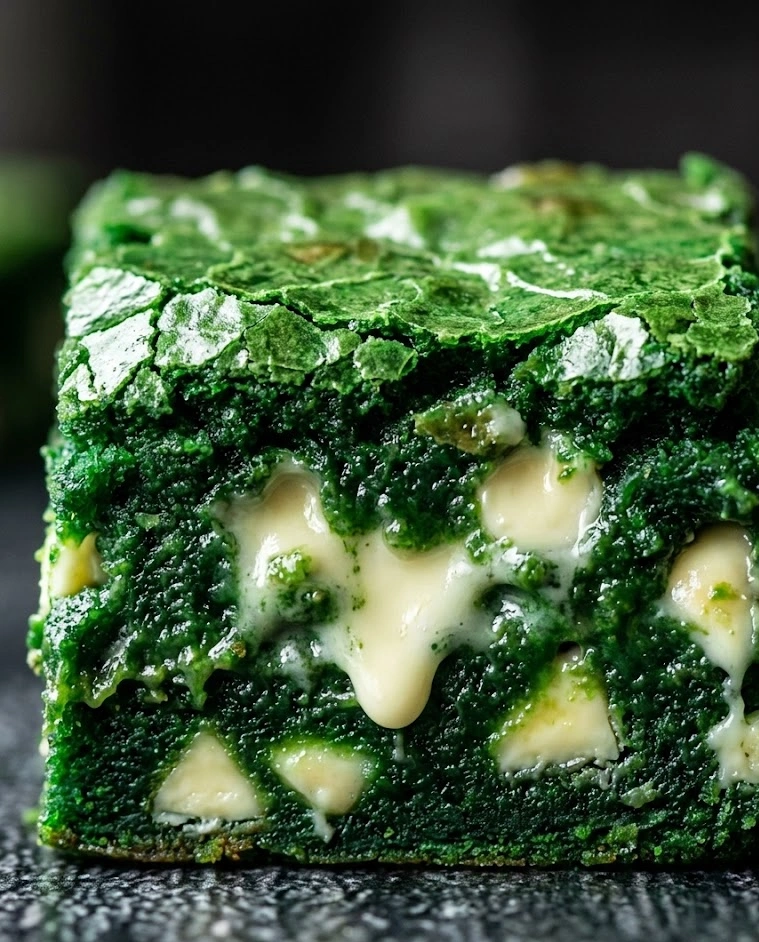
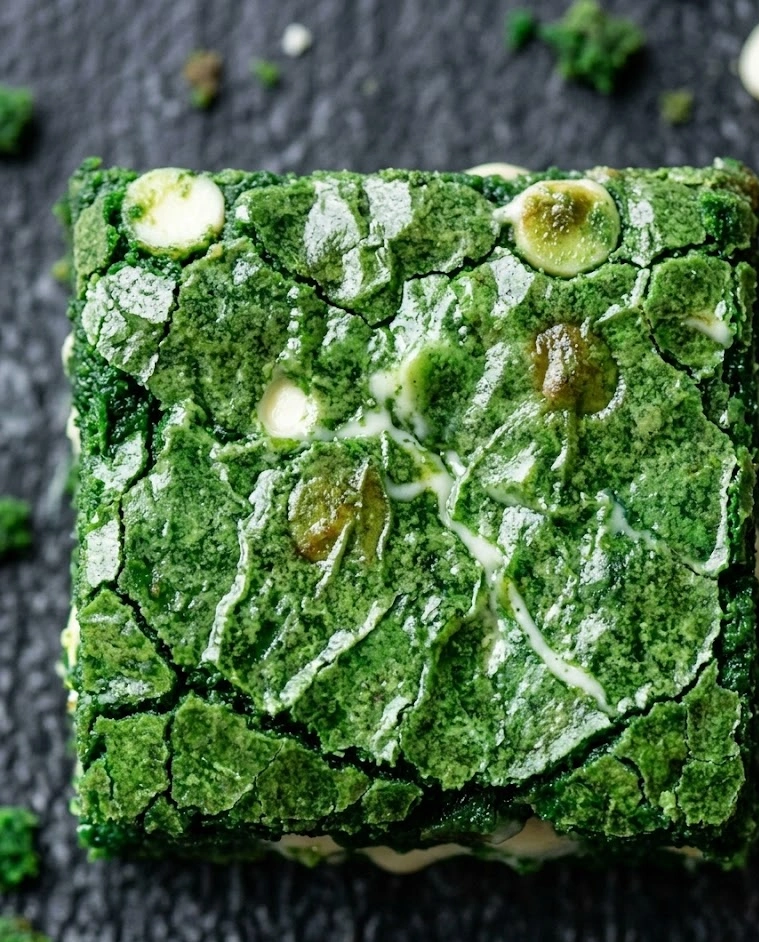
There are St. Patrick’s Day desserts, and then there are St. Patrick’s Day desserts that make people put down their drinks and walk across the room to get a closer look. These Fudgy Green Velvet Brownies are firmly in the second category. The moment you lift the foil on this pan — that vivid, jewel-toned emerald crumb, that cloud of cream cheese frosting, those clean-sliced squares with their distinct green interior — the room reacts. Every single time.
The green velvet concept is a direct descendant of the red velvet tradition, which uses a combination of cocoa, acid, and food coloring to create a cake or brownie with a distinctive colored crumb and a characteristic mild tang. Where red velvet gets its drama from crimson dye, green velvet swaps the palette entirely for St. Patrick’s Day — and the effect is if anything more spectacular, because vivid green in a baked good is genuinely unexpected in a way that red no longer is.
The flavor profile here leans on white chocolate rather than dark, which is a deliberate and important choice. White chocolate’s buttery, vanilla-forward sweetness allows the green color to read as visually clean and vivid without the competition of a dark chocolate crumb fighting the dye. The result is a brownie that is rich, dense, and fudgy with a subtly complex flavor — white chocolate warmth, a gentle cream cheese tang in the frosting, and that iconic velvet texture that makes every bite feel like something genuinely special. This is the St. Patrick’s Day dessert that earns the occasion.
Why You’ll Love This St. Patrick’s Day Dessert
The first reason is the visual impact, which is frankly unmatched in the St. Patrick’s Day dessert landscape. A standard chocolate brownie with green frosting is festive. A brownie that is green all the way through — a deep, saturated emerald from the very first bite to the very last — is something else entirely. It looks intentional, sophisticated, and like considerably more work than it actually is.
The second reason is the flavor combination. White chocolate and cream cheese frosting is a pairing that operates on the same principle as classic red velvet cake — the slight tang of the cream cheese cuts through the sweetness of the white chocolate base and creates a balance that keeps the dessert from feeling cloying. Every bite delivers richness without heaviness, sweetness without excess, and a complexity that standard brownies simply do not have.
The third reason is the crowd reaction. Bring these to a St. Patrick’s Day party once and you will be asked to make them every year for the rest of your life. They are the kind of dessert that becomes a tradition — the green brownie that everyone remembers, requests by name, and associates permanently with the holiday. For a St. Patrick’s Day dessert, that kind of staying power is the ultimate compliment.
Common Mistakes — And How to Avoid Them
Mistake 1: Not Using Enough Green Food Coloring
This is the most consequential mistake you can make with a green velvet recipe, and it is almost always made in the direction of too little rather than too much. The batter will look startlingly, almost alarmingly green before it goes into the oven — this is correct. Baking mutes color significantly as heat interacts with the dye. What looks excessive in the bowl will look vivid and perfect in the finished brownie. If the batter looks like a reasonable, modest green, you do not have enough dye. Use gel coloring and be genuinely generous with it.
Mistake 2: Using Low-Quality White Chocolate
White chocolate quality varies more dramatically than any other baking chocolate, and the difference between good and poor white chocolate is fully perceptible in the finished brownie. Poor quality white chocolate — most notably chips that contain vegetable oil instead of cocoa butter — produces a greasy, cloyingly sweet result without the buttery, vanilla complexity that makes white chocolate worth using. Use a baking bar of genuine white chocolate with cocoa butter listed in the ingredients. Lindt, Ghirardelli baking bars, or Valrhona are reliable choices.
Mistake 3: Overbeating the Batter After Adding Flour
Velvet-style baked goods owe their characteristic tender, close crumb to minimal gluten development. Every stroke of the spatula after the flour goes in develops gluten further and pushes the texture away from fudgy and toward tough. Fold the flour in with absolute minimum strokes — no more than 15 to 20 deliberate folds. Stop at the first moment no dry streaks remain. This restraint is the single technique most responsible for the velvet texture in the finished brownie.
Mistake 4: Skipping the Vinegar
The small amount of white vinegar in this recipe is not an accident and cannot be omitted. It serves two critical functions: it reacts with the baking powder to create a very gentle lift that keeps the brownie from being too dense, and its acidity interacts with the green food coloring to stabilize and brighten the color throughout baking. Without the vinegar, the green can shift toward a dull, olive-tinged hue in the oven. With it, the emerald stays vivid and clean.
Mistake 5: Frosting Before Fully Cold
Cream cheese frosting is considerably less stable than buttercream at room temperature — it softens quickly and slides off a warm surface almost immediately. The brownies must be not just room temperature but actively cold — a full refrigerator chill of at least 30 minutes after reaching room temperature — before the frosting goes on. A cold surface gives the cream cheese frosting the best possible environment to set into a clean, stable layer that slices without smearing.
Chef’s Notes
The velvet texture that gives this brownie its name deserves a proper explanation, because it is not accidental and it is not just a marketing description. In classic red and green velvet baking, the combination of cocoa or white chocolate, an acid component, and a fat-to-flour ratio weighted heavily toward fat produces a crumb structure with very short, fine gluten strands — the baking term for this is a “short” crumb — that feels tender, close, and almost plush under the tooth. It is genuinely different from a standard brownie crumb, and the difference is most perceptible in the way it melts rather than chews.
The acid in this recipe comes from two sources — a small amount of white vinegar and the natural acidity of the cream cheese in the frosting. Both contribute to the characteristic velvet tang that distinguishes this dessert from a simple green-dyed brownie. If you have ever bitten into a red velvet cake and noticed a subtle, almost indescribable complexity beneath the sweetness and cocoa, that is the acid at work. Here it plays the same role against the white chocolate base.
For the cream cheese frosting, temperature control is everything. The butter and cream cheese must both be at true room temperature — soft enough to leave a clean indent when pressed but not so warm that they are greasy or separated. Cold cream cheese produces lumpy frosting that no amount of beating will fully smooth. Warm cream cheese produces a soup. The 30-second test: press your finger into both the butter and cream cheese. They should yield immediately and cleanly without resistance. If they do, you are ready to frost.
One more note on the white chocolate: melt it gently and allow it to cool to room temperature before adding it to the batter. Hot melted chocolate added to eggs will cook them — a process called tempering that is useful in candy-making but catastrophically wrong in brownie batter. Cool the chocolate until it is fluid but comfortable to the touch on the inside of your wrist before it goes anywhere near the eggs.
Key Ingredients & Why They Matter
Good Quality White Chocolate Baking Bar is the flavor and fat foundation of the entire brownie. It provides the buttery, vanilla-forward richness that distinguishes these from a standard brownie and creates the clean, pale base that allows the green color to shine without the interference of dark cocoa. The cocoa butter in genuine white chocolate also contributes to the fudgy, dense texture in a way that white chocolate chips with vegetable oil substitutes cannot replicate.
Unsalted Butter works alongside the white chocolate to maximize the fat-to-flour ratio that produces fudginess. Melted butter, like melted chocolate, coats flour proteins and limits gluten development — the foundational technique behind every great fudgy brownie regardless of flavor profile.
Cream Cheese appears in a small quantity directly in the brownie batter — not just in the frosting — where it contributes the subtle tang and additional fat that give green velvet its characteristic flavor complexity. A small amount of cream cheese in the batter also contributes to the tight, fine crumb structure by adding protein and moisture that interact with the other ingredients to produce a close, almost silky texture.
Eggs provide structure, richness, and emulsification. As in the Mint Oreo Brownies, the formula here uses two whole eggs plus an additional yolk for maximum fudginess — the extra yolk adds fat and richness without the structural protein of an additional white, which would push the texture toward cakey.
Green Gel Food Coloring is the visual soul of this St. Patrick’s Day dessert. Gel coloring is mandatory rather than optional here — liquid food coloring cannot achieve the deep, saturated emerald this recipe requires without adding so much water that it disrupts the batter’s consistency. Use a quality gel such as AmeriColor or Wilton, and use considerably more than feels comfortable. The oven will take a percentage of that vibrancy — plan for it.
White Vinegar is the acid that stabilizes the green color through baking, reacts with the leavening for a subtle lift, and contributes to the characteristic velvet tang. One teaspoon seems trivial and its flavor is completely undetectable in the finished brownie — but its absence is noticeable in the color and texture.
All-Purpose Flour is kept to a deliberate minimum relative to the fat content, which is what produces the fudgy, short crumb. The flour provides just enough structure to hold the brownie together while allowing the fat from the white chocolate and butter to dominate the texture — the precise balance that separates a fudgy brownie from a dense cake.
Pure Vanilla Extract amplifies the white chocolate’s vanilla character and adds aromatic depth to the batter. Use pure extract rather than imitation — in a dessert where the flavor profile is relatively subtle and delicate compared to a dark chocolate brownie, the quality of the vanilla is more perceptible than it would be against bolder flavors.
Full-Fat Cream Cheese in the frosting provides the characteristic tang, creaminess, and body that makes cream cheese frosting the ideal companion for velvet-style baked goods. Full-fat is essential — reduced-fat cream cheese has higher water content and produces a frosting that is looser, less stable, and less flavorful. This is not the place to reduce calories.
Powdered Sugar builds the body and sweetness of the frosting. Sifting it before use is not optional in a cream cheese frosting — unsifted powdered sugar produces lumps that beating alone cannot always fully eliminate, and a smooth, lump-free frosting is the visual standard this St. Patrick’s Day dessert demands.
How to Make Fudgy Green Velvet Brownies
Ingredients
For the Green Velvet Brownie Base:
- 6 oz good quality white chocolate baking bar, roughly chopped
- ½ cup unsalted butter, cut into pieces
- 3 oz full-fat cream cheese, softened
- 1 cup granulated sugar
- 2 large eggs plus 1 egg yolk, room temperature
- 1½ tsp pure vanilla extract
- 1 tsp white vinegar
- Green gel food coloring — start with 1½ tsp and adjust for vivid emerald
- 1 cup all-purpose flour
- ¼ tsp baking powder
- ½ tsp salt
For the Cream Cheese Frosting:
- 6 oz full-fat cream cheese, at true room temperature
- ¼ cup unsalted butter, at true room temperature
- 2½ cups powdered sugar, sifted
- 1 tsp pure vanilla extract
- Pinch of salt
- 1–2 tbsp heavy cream if needed for consistency
For Finishing:
- Green sprinkles, shamrock sugar decorations, or gold leaf
- White chocolate shavings or curls
- Flaky sea salt (optional — the contrast with the sweet frosting is exceptional)
- Preheat the oven to 350°F. Line an 8×8 inch baking pan with parchment paper, leaving an overhang on two sides. Grease lightly. Set aside.
- Melt the white chocolate and butter. Combine the chopped white chocolate and butter pieces in a heatproof bowl set over a pan of barely simmering water. Stir gently until both are fully melted and the mixture is completely smooth. Remove from heat immediately — white chocolate scorches easily and bitterness is irreversible. Allow to cool for 8–10 minutes until fluid but no longer warm to the inside of your wrist.
- Beat in the cream cheese. Add the softened cream cheese to the cooled white chocolate mixture and whisk vigorously until completely smooth and no cream cheese lumps remain. This step is easier if the cream cheese is genuinely at room temperature — cold cream cheese will leave streaks that are difficult to fully incorporate.
- Add the sugar. Whisk the granulated sugar into the white chocolate and cream cheese mixture until fully combined. The mixture will look dense and slightly grainy — this is correct at this stage.
- Add the eggs and flavorings. Add the eggs and extra yolk one at a time, whisking well after each. Add the vanilla extract and white vinegar and whisk until the batter is smooth, glossy, and slightly thickened — about 60 seconds of vigorous whisking after the last addition. This whisking step matters for the characteristic slight sheen on the finished brownie surface.
- Add the green gel coloring. Add the green gel food coloring to the batter and stir thoroughly until the color is completely uniform throughout with no streaks. The batter should look intensely, almost shockingly green — a deep, saturated emerald that seems excessive. This is correct. Add more gel if needed to reach this level of saturation. What looks like too much now will look perfect after baking.
- Fold in the dry ingredients. Whisk together the flour, baking powder, and salt in a separate bowl, then sift directly into the green batter. Fold with a spatula using no more than 15–20 deliberate strokes. Stop at the very first moment no dry streaks remain. Do not mix further under any circumstances — this restraint is the technique most responsible for the velvet texture.
- Bake. Pour and spread the vivid green batter evenly into the prepared pan. Bake for 23–27 minutes, checking at 23 minutes. A toothpick inserted into the center should come out with moist, fudgy crumbs — not wet batter, not clean. The edges should look fully set and the surface should have a slight, papery sheen. Remove from the oven and cool completely on a wire rack — at least 1 hour — then refrigerate for 30 minutes before frosting.
- Make the cream cheese frosting. Beat the room temperature cream cheese and butter together with an electric mixer on medium-high speed for 3 full minutes until completely smooth, pale, and noticeably fluffy. Add the sifted powdered sugar in three additions, beating on low after each until incorporated, then increasing to medium-high for 20 seconds. Add the vanilla and pinch of salt. If the frosting is stiffer than spreadable, add heavy cream one teaspoon at a time until it reaches a smooth, billowy consistency that holds its shape but spreads easily.
- Frost, decorate, and slice. Spread the cream cheese frosting over the cold brownies in a generous, even layer. Smooth the top with an offset spatula. Decorate immediately with sprinkles, shamrock sugars, white chocolate shavings, or flaky sea salt. Refrigerate for 20 minutes to set the frosting before lifting the slab out using the parchment overhang and slicing into squares with a sharp knife wiped clean and run under hot water between every cut.
Variations & Tips
Add a Mint Layer: Spread a thin layer of mint buttercream — powdered sugar, butter, peppermint extract, and a drop of green gel — directly onto the cooled brownie base before applying the cream cheese frosting. This creates a three-layer cross-section of green brownie, mint buttercream, and cream cheese frosting that is both visually spectacular and deeply, unapologetically minty — a direct flavor nod to the Mint Oreo Brownies in this collection.
Make It a Green Velvet Cheesecake Brownie: Reserve 4 oz of the cream cheese frosting mixture and swirl it raw into the top of the green batter before baking — a technique borrowed from cheesecake brownies. The cream cheese swirl bakes into the surface, creating a marbled white-and-green top that looks intentionally artistic and adds a baked cheesecake quality to the texture.
Add White Chocolate Chunks to the Batter: Fold ½ cup of roughly chopped good quality white chocolate directly into the green batter before baking. The chunks melt partially during baking into creamy, molten pockets throughout the brownie — adding flavor intensity and a textural surprise that makes each square feel slightly different and luxurious.
Make It Gluten-Free: Replace the all-purpose flour with a quality 1:1 gluten-free baking flour blend. The fudgy texture is largely preserved because the primary structure comes from the eggs and white chocolate rather than gluten. The velvet crumb will be marginally more delicate but the visual impact and flavor remain fully intact.
Pro Tip — The Scoring Technique for Perfect Squares: Before slicing, use a ruler and a toothpick to score light guide marks across the top of the frosted brownies at even intervals. Then use your hot, clean knife to cut confidently along these guides in single downward strokes. The result is uniform, professional-looking squares with clean edges, visible green crumb, and frosting that sits straight and even — the visual standard that makes these worth the effort of a ruler.
How to Meal Prep Fudgy Green Velvet Brownies
Like the Mint Oreo Brownies, these green velvet brownies are an ideal make-ahead St. Patrick’s Day dessert — the flavor deepens and the texture fully sets overnight, making the two-days-ahead baking schedule not just convenient but genuinely preferable to day-of baking.
The Ideal Timeline: Bake the brownie base two days before St. Patrick’s Day and refrigerate unfrosted. Make and apply the cream cheese frosting the day before. Slice on the day of serving after a 20-minute counter rest. This three-stage approach produces brownies at their absolute peak — fully set, deeply flavored, and with frosting that has had time to firm up into the perfect sliceable consistency.
Store Frosted Brownies Correctly: Cream cheese frosting requires refrigeration, which means these brownies must be stored in the fridge — airtight, with a layer of plastic wrap pressed gently onto the frosting surface to prevent it from drying out or absorbing refrigerator odors. They keep at peak quality for up to 4 days refrigerated. Bring to room temperature for 20–25 minutes before serving — cold cream cheese frosting is firmer and less flavorful than frosting at room temperature.
Freeze the Unfrosted Base: The green velvet brownie base freezes exceptionally well for up to 3 months, which means you can bake them weeks ahead of St. Patrick’s Day and frost fresh on the day. Wrap the entire uncut, unfrosted slab tightly in two layers of plastic wrap followed by foil, or slice into individual squares and freeze separately for even more flexibility. Thaw overnight in the refrigerator, bring to room temperature, frost, and serve.
Transport to a Party: These brownies travel better than most cream cheese frosted desserts because the frosting is relatively stable once properly chilled. Refrigerate for at least an hour after frosting, transport in the pan with a fitted lid or tightly applied plastic wrap, and slice at the destination for the cleanest, most impressive presentation. A pan of uncut green velvet brownies arriving at a St. Patrick’s Day party creates considerably more anticipation than pre-sliced squares — the reveal of that emerald crumb when the first cut is made is genuinely worth saving for the room.
Cultural Context: Velvet Cakes, Green Dye, and the American Art of Festive Baking
The velvet cake tradition has roots that are both culinary and chemical. Before the advent of modern Dutch-process cocoa, natural cocoa powder reacted with acidic ingredients in cake batter — buttermilk, vinegar — to produce a reddish-brown hue in the crumb through a chemical reaction involving the anthocyanin pigments in raw cocoa. This natural reaction was the origin of the “red velvet” effect, and bakers in the American South in the early 20th century noticed and emphasized it, eventually deepening it with red food dye into the vivid crimson dessert that became a regional icon.
The Waldorf-Astoria Hotel in New York City is frequently credited with popularizing red velvet cake nationally during the 1930s, though the full history is considerably more complicated and contested. What is clear is that red velvet became one of America’s most beloved cake traditions — and the concept of velvet baking, with its characteristic colored crumb, tangy flavor, and cream cheese frosting, became a template that creative bakers have been riffing on ever since.
Green velvet as a St. Patrick’s Day specific application is a product of the American tradition of color-coded festive baking — the same creative impulse that produces pink velvet for Valentine’s Day, orange velvet for Halloween, and red and green velvet for Christmas. It takes the technical and flavor framework of the velvet tradition and redirects its visual identity entirely toward the holiday’s most iconic color.
This tradition of festive, color-forward baking is particularly American in character — rooted in the extraordinary abundance of food coloring, specialty baking supplies, and the cultural permission to make food as visually dramatic as the occasion demands. St. Patrick’s Day, with its already deeply established color identity and its evolution from a solemn Irish religious feast into a globally celebrated party, is the perfect holiday for this kind of joyful, unabashedly festive baking.
So when you slice into these Fudgy Green Velvet Brownies and reveal that saturated emerald crumb beneath its cloud of cream cheese frosting, you are participating in a specifically American baking tradition — one that takes genuine technique, quality ingredients, and a little bit of well-placed drama and turns them into the kind of St. Patrick’s Day dessert that people remember. That is a tradition worth continuing.

Fudgy Green Velvet Brownies
Equipment
- 8×8-inch baking pan
- mixing bowls
- whisk
- electric mixer for frosting
- spatula
Ingredients
- 6 oz white chocolate baking bar, chopped
- 1/2 cup unsalted butter
- 3 oz full-fat cream cheese, softened
- 1 cup granulated sugar
- 2 large eggs
- 1 egg yolk
- 1 1/2 tsp pure vanilla extract
- 1 tsp white vinegar
- 1 1/2+ tsp green gel food coloring (adjust for vivid emerald)
- 1 cup all-purpose flour
- 1/4 tsp baking powder
- 1/2 tsp salt
- 6 oz full-fat cream cheese (for frosting), room temperature
- 1/4 cup unsalted butter (for frosting), room temperature
- 2 1/2 cups powdered sugar, sifted
- 1 tsp pure vanilla extract (for frosting)
- pinch salt (for frosting)
- 1–2 tbsp heavy cream (if needed for frosting consistency)
- green sprinkles or shamrock decorations (optional)
- white chocolate shavings (optional)
- flaky sea salt (optional)
Instructions
- Preheat oven to 350°F. Line an 8×8-inch pan with parchment paper and lightly grease.
- Melt white chocolate and butter gently over a double boiler until smooth. Cool 8–10 minutes.
- Whisk in softened cream cheese until completely smooth.
- Whisk in sugar, then eggs and yolk one at a time. Add vanilla and vinegar and whisk until glossy.
- Stir in green gel coloring until batter is deeply saturated emerald green.
- Sift flour, baking powder, and salt into batter. Fold gently just until combined.
- Spread evenly into prepared pan and bake 23–27 minutes until toothpick shows moist crumbs. Cool completely, then chill 30 minutes.
- Beat cream cheese and butter until fluffy. Add powdered sugar gradually, then vanilla and salt. Adjust with heavy cream if needed.
- Spread frosting over cold brownies. Decorate as desired. Chill 20 minutes before slicing into squares with a hot knife.