
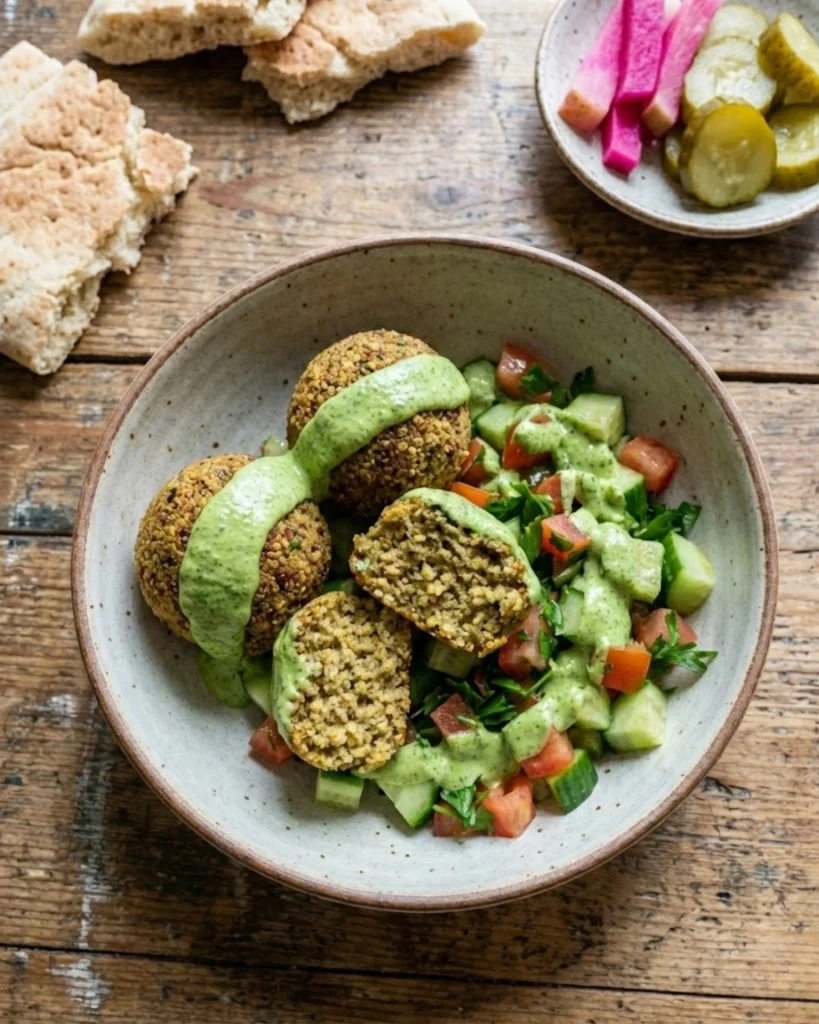
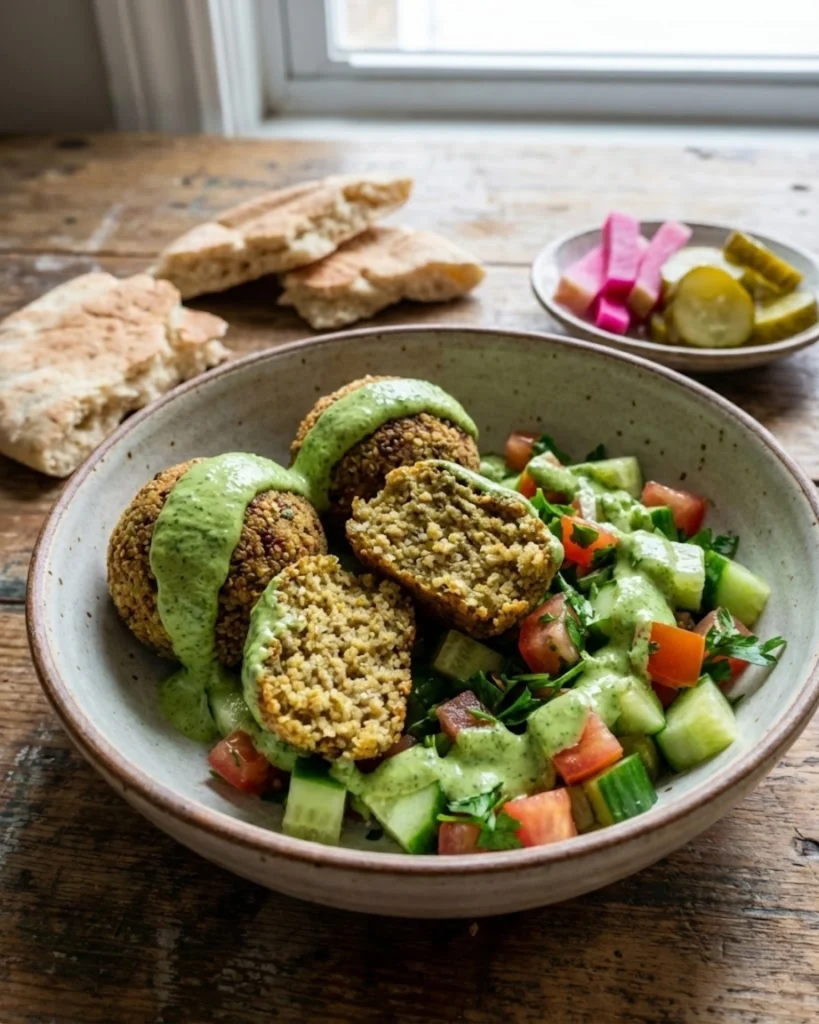
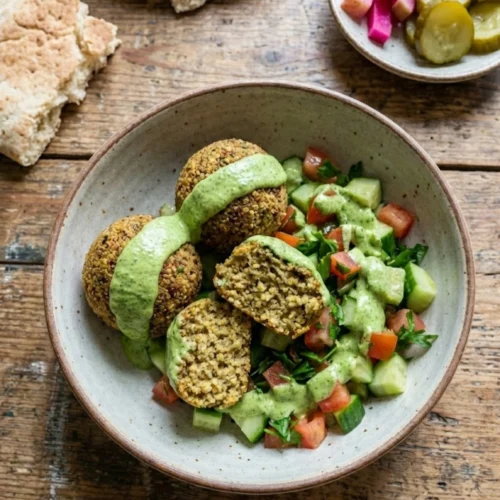
Love falafel but want a protein boost without the deep fryer? This Quinoa Falafel with Green Tahini is the healthy upgrade you’ve been waiting for. Picture this: golden, crispy bites packed with nutty quinoa, chickpeas, and fresh herbs, dipped in a vibrant, garlicky green tahini sauce that’s so good you’ll want to drink it straight from the bowl. They’re baked (or air fried) to perfection, naturally gluten-free, and absolutely perfect for stuffing into pitas or topping salad bowls. This is plant-based eating at its most delicious!
Why Add Quinoa to Falafel?
You might be wondering why we’re adding quinoa to a perfectly good falafel recipe. Let me tell you—it’s a total game-changer for this Quinoa Falafel with Green Tahini!
Texture: Quinoa adds this wonderful nutty bite and slightly fluffy texture that makes these falafel unique. But here’s the genius part—it also acts as a natural binder, helping hold everything together without needing heavy amounts of flour or breadcrumbs. Those tiny quinoa grains work like little edible glue, creating structure while keeping the falafel light and tender inside with a crispy exterior.
Nutrition: This is where things get really exciting from a health perspective. Chickpeas are fantastic, but they’re missing a few essential amino acids. Quinoa, on the other hand, is a complete protein containing all nine essential amino acids. When you combine quinoa with chickpeas, you create a “complete protein” vegetarian meal that rivals any animal-based protein. You’re getting around 6-7 grams of protein per serving, plus fiber, iron, magnesium, and B vitamins. It’s basically a nutritional powerhouse disguised as comfort food!
Lighter Feel: Traditional all-chickpea falafel can sometimes feel quite dense and heavy, especially when deep-fried. Adding quinoa lightens the texture significantly, making these feel more like little flavor-packed clouds rather than heavy balls. They’re satisfying without that overly stuffed feeling, which means you can actually enjoy a full meal without needing an immediate nap afterward!
The Secret to Crispy Baked Falafel
Getting crispy, golden falafel without deep-frying requires a few key techniques. Here’s how to nail it every time with your Quinoa Falafel with Green Tahini!
The Oil Brush: This step is absolutely non-negotiable if you want that gorgeous golden color and crispy exterior. Before baking, generously brush the outside of each falafel ball or patty with olive oil. Don’t spray—actually brush! The oil creates a barrier that crisps up beautifully in the oven, mimicking that fried texture we all crave. It also helps with browning, giving you that appetizing color instead of pale, sad-looking falafel.
High Heat: Temperature matters tremendously here. Bake your falafel at 400°F, which is hot enough to crisp the outside quickly before the inside has a chance to dry out. Lower temperatures will result in dried-out falafel that never achieve that coveted crunch. If you have a convection setting on your oven, use it! The circulating air promotes even more browning and crisping. Flip the falafel halfway through baking to ensure both sides get equally golden.
Don’t Over-Process: This is perhaps the most common mistake people make! When you’re pulsing the chickpea mixture in the food processor, you want a coarse, textured mixture—not smooth hummus puree. You should still see distinct pieces of chickpeas and herbs. Over-processing creates a paste that becomes gummy when cooked and won’t hold its shape properly. Aim for a consistency similar to coarse breadcrumbs where the mixture holds together when squeezed but still has visible texture. Pulse in short bursts, stopping to scrape down the sides, until you achieve that perfect grainy texture.
How to Make the Vibrant Green Tahini Sauce
This green tahini sauce is absolute liquid gold, and honestly, it might just steal the show from the falafel itself! It’s that good.
The ingredients are simple but powerful: start with good quality tahini (the paste made from ground sesame seeds), fresh lemon juice for brightness, raw garlic for that pungent kick, water to thin it out, and—here’s what makes it green and gorgeous—a huge handful each of fresh parsley and cilantro. The herbs don’t just add color; they bring freshness and a vibrant, garden-fresh flavor that makes this Quinoa Falafel with Green Tahini truly special.
To make it, add everything to your blender or food processor: about ½ cup tahini, juice from one large lemon, 2-3 cloves of garlic (adjust based on your garlic tolerance!), and big handfuls of both parsley and cilantro—stems and all! The stems actually have tons of flavor, so don’t waste time picking leaves. Add a pinch of salt and start with just a few tablespoons of cold water.
Now, blitz everything together until it transforms into this gorgeous, bright green, creamy sauce. The color should be vibrant—almost neon green—which tells you those herbs are fully incorporated. Here’s the adjustment part: tahini can vary in thickness, so you’ll need to find the perfect drizzle consistency. Add ice-cold water one tablespoon at a time, blending between additions, until the sauce flows smoothly off a spoon but isn’t watery. You want it pourable but still coating consistency—think slightly thicker than ranch dressing.
Pro tip: this sauce thickens in the fridge, so make it slightly thinner than you think you need. It’ll be perfect after chilling!
Step-by-Step Instructions
Let’s walk through making these incredible falafel from start to finish. Don’t worry—it’s easier than you think!
Step 1: Cook your quinoa according to package directions (usually 1 part quinoa to 2 parts water, simmered for about 15 minutes). This is crucial—let it cool completely before using it! Warm quinoa will make your mixture too wet and difficult to shape. I often cook quinoa the night before and refrigerate it, which actually works even better.
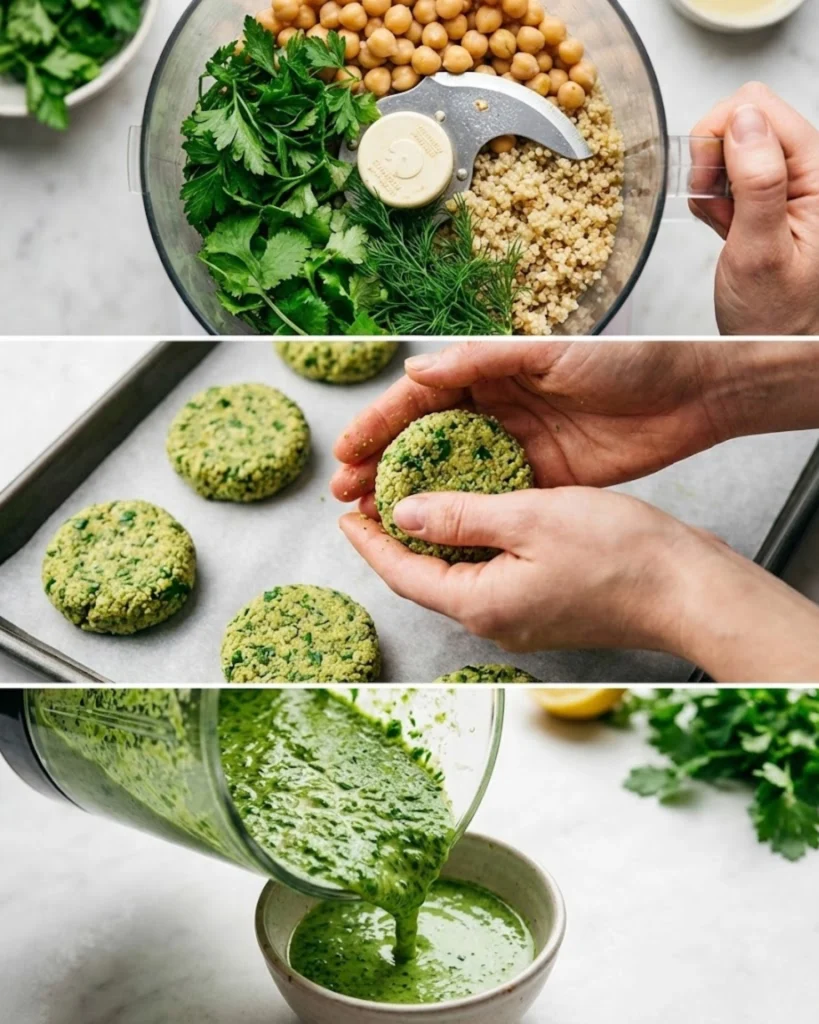
Step 2: Drain and rinse your canned chickpeas thoroughly, then pat them very dry with paper towels. Add them to your food processor along with a generous handful each of fresh parsley and cilantro, half a diced onion, 3-4 garlic cloves, and your spices—I love a combination of cumin and coriander (about 2 teaspoons each), plus salt and pepper. Pulse in short bursts until you have a coarse, textured mixture. Remember: don’t over-process!
Step 3: Transfer the chickpea mixture to a large bowl and mix in your cooled quinoa. Now add your binder—either oat flour (which keeps things gluten-free) or chickpea flour works beautifully. Start with about ¼ cup and add more if needed. The mixture should hold together when squeezed but not feel sticky. Here’s the patience part: cover the bowl and refrigerate the dough for at least 20 minutes, or up to overnight. This chilling time is essential—it lets the flour absorb excess moisture and makes shaping so much easier.
Step 4: Preheat your oven to 400°F and line a baking sheet with parchment paper. Using damp hands (this prevents sticking!), scoop about 2 tablespoons of the mixture and shape into balls or slightly flattened patties—your choice! Patties get more surface area for crisping, while balls are more traditional. Arrange them on your baking sheet, brush generously with olive oil, and bake for 25-30 minutes, flipping halfway through, until deeply golden and crispy.
Serving Suggestions (Bowls vs. Pitas)
The beauty of Quinoa Falafel with Green Tahini is how versatile it is! Here are my favorite ways to serve these little gems.
The Falafel Bowl: This is my go-to for meal prep and weeknight dinners. Start with a base of mixed greens or baby spinach, then arrange your warm falafel on top. Add diced cucumber and juicy tomato wedges for freshness, some thinly sliced red onions (quick-pickle them in vinegar for 10 minutes if you want to tame the bite!), and maybe some shredded carrots or red cabbage for color. Drizzle that gorgeous green tahini sauce generously over everything. You can also add other Middle Eastern favorites like hummus, baba ganoush, or tabbouleh. This bowl approach gives you tons of vegetables and makes the meal feel really substantial.
The Pita Pocket: For a more traditional presentation, warm up some whole wheat or white pita bread (gluten-free pita works too!). Cut the pita in half to create pockets, then spread a layer of hummus inside. Stuff with 3-4 falafel, shredded lettuce, diced tomatoes, cucumber, and a generous drizzle of the green tahini. Add some pickled turnips or pickled jalapeños if you want extra tang and heat. Wrap it in foil on the bottom half so it doesn’t fall apart while you eat—this is the messy-but-worth-it option!
Meal Prep Magic: These falafel are absolute stars for meal prep! Store the cooked falafel and the green tahini sauce in separate airtight containers in the fridge for up to 5 days. When you’re ready to eat, reheat the falafel in a toaster oven at 350°F for about 10 minutes—they’ll crisp back up beautifully. You can also reheat them in an air fryer at 375°F for 5-7 minutes. The sauce stays fresh in the fridge and might just need a quick stir if it separates.
FAQs
Can I fry these?
Absolutely! While baking is healthier and easier, pan-frying gives you that extra crunch and richness that’s closer to traditional falafel. Heat about ¼ inch of neutral oil (like avocado or vegetable oil) in a large skillet over medium-high heat. Once the oil is shimmering, carefully add your falafel balls without crowding the pan. Fry for about 3-4 minutes per side until deeply golden and crispy. Transfer to a paper towel-lined plate to drain excess oil. The outside will be extra crunchy while the inside stays tender and fluffy. Just be aware you’re adding extra calories with the frying method, but for special occasions, it’s absolutely worth it!
Why did my falafel fall apart?
This is frustrating but fixable! There are two main culprits. First, your mixture might be too wet. This happens if you didn’t dry the chickpeas well enough, if you added the quinoa while it was still warm (releasing steam and moisture), or if you didn’t add enough flour/binder. The fix: add more oat flour or chickpea flour, one tablespoon at a time, until the mixture holds together when squeezed. Second, you might not have chilled the dough. That 20-minute chill time isn’t optional—it allows the flour to absorb moisture and makes the mixture firm enough to hold its shape. When in doubt, chill longer!
Can I freeze the uncooked balls?
Yes, and this is a fantastic make-ahead strategy for your Quinoa Falafel with Green Tahini! After shaping the falafel, place them on a parchment-lined baking sheet and freeze until solid (about 2 hours). Then transfer them to a freezer bag or container where they’ll keep for up to 3 months. The best part? You can bake them straight from frozen—no thawing required! Just add 5-10 minutes to the baking time and brush with oil as usual. This means you can have fresh, hot falafel any night of the week with minimal effort.
Conclusion
This Quinoa Falafel with Green Tahini is fresh, vibrant, and packed with plant-based power that’ll keep you energized for hours. It’s become a weekly staple in our house because it checks every box: nutritious, delicious, meal-prep friendly, and satisfying enough that even non-vegetarians request it regularly. The combination of nutty quinoa, herby chickpeas, and that bright green tahini sauce is simply irresistible.
Ditch the takeout and bake these instead! You’ll be amazed at how easy it is to create restaurant-quality falafel right in your own kitchen. Let me know in the comments if you try the green tahini sauce—I have a feeling it’s going to become your new favorite condiment for everything! And be sure to save this vegan recipe to Pinterest so you can come back to it whenever those falafel cravings hit. Happy cooking!
Crispy Baked Quinoa Falafel with Green Tahini
Equipment
- food processor
- mixing bowl
- baking sheet
- parchment paper
- blender (for tahini)
Ingredients
- 1 cup cooked quinoa, cooled
- 1 can (15 oz) chickpeas, drained and dried
- 1/2 cup fresh parsley
- 1/2 cup fresh cilantro
- 1/2 medium onion, diced
- 3-4 cloves garlic
- 2 teaspoons ground cumin
- 2 teaspoons ground coriander
- 1/2 teaspoon salt
- 1/4 teaspoon black pepper
- 1/4 cup oat flour or chickpea flour
- 3 tablespoons olive oil, for brushing
- 1/2 cup tahini
- 1 lemon, juiced
- 2-3 cloves garlic
- 1 cup fresh parsley
- 1 cup fresh cilantro
- 1/4 teaspoon salt
- 4-6 tablespoons ice water (to thin)
Instructions
- Cook quinoa according to package directions and allow to fully cool.
- In a food processor, blend chickpeas, parsley, cilantro, onion, garlic, cumin, coriander, salt, and pepper until coarse but combined.
- Transfer mixture to a bowl. Mix in cooled quinoa and oat flour. Add more flour if mixture is too wet.
- Refrigerate the mixture for at least 20 minutes to firm.
- Preheat oven to 400°F and line a baking sheet with parchment. Shape into balls or patties and arrange on the baking sheet.
- Brush generously with olive oil and bake 25–30 minutes, flipping halfway, until golden and crisp.
- For the green tahini sauce, blend tahini, lemon juice, garlic, parsley, cilantro, and salt until smooth. Add ice water gradually to thin.
- Serve warm falafel with green tahini sauce, in pita, or over bowls with vegetables.