
If you crave that rich, velvety combination of creamy cheese, dense chocolate, and satisfying crunch, but need a zero-carb, sugar-free dessert that fits your keto lifestyle, you’ve found your holy grail. This recipe for Keto Chocolate Layered Delight is the ultimate showstopper—it’s decadent, requires no baking for the filling, and is unbelievably easy to make ahead of time.
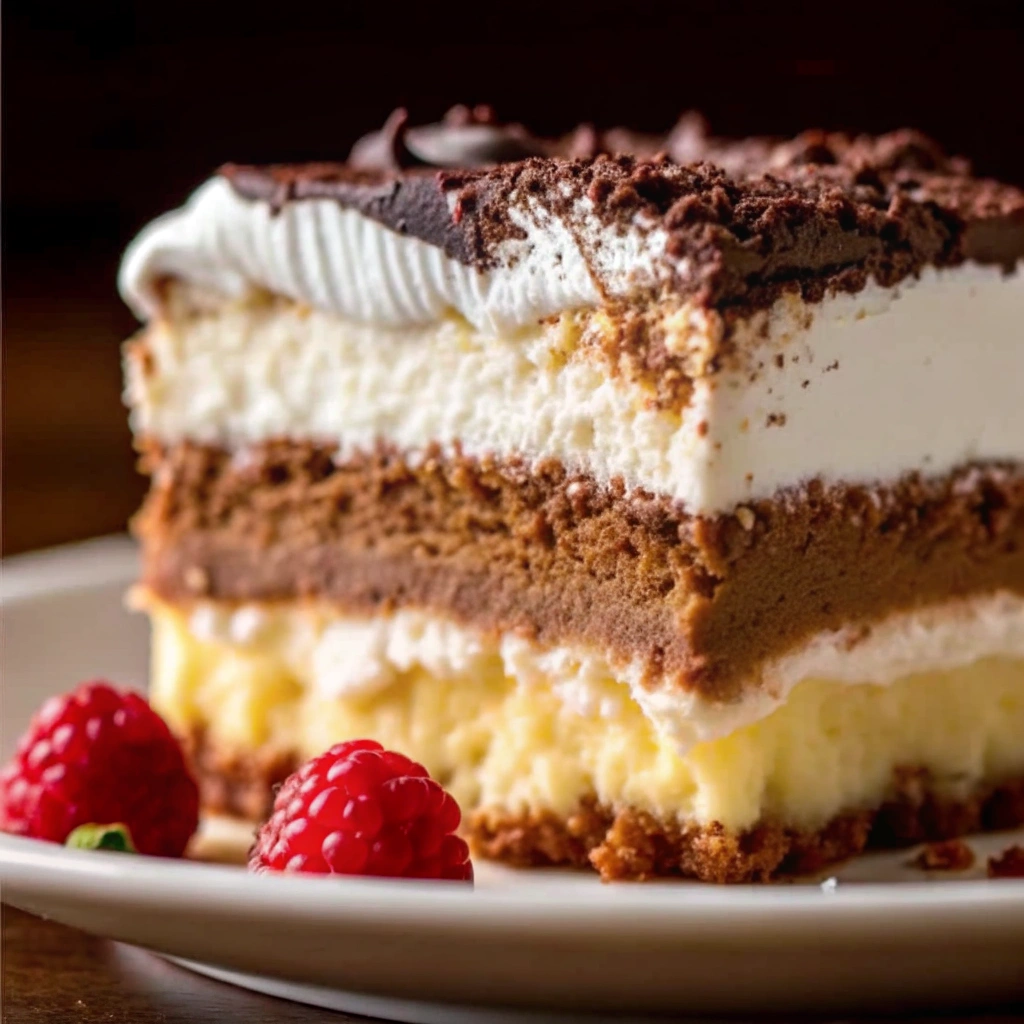
This dessert is often called a “Lush” or “Better-Than-Sex” dessert for good reason: it’s built in four magnificent layers that deliver a perfect textural and flavor balance:
- A Buttery Crust: Made from almond flour and butter, not carby graham crackers.
- A Tangy Cream Layer: An airy, smooth mix of cream cheese and sweetener.
- A Rich Chocolate Pudding: Achieved using sugar-free instant mix.
- A Whipped Topping: Crowned with a sprinkle of chocolate or cocoa powder.
The result is a stunning, sliceable dessert that tastes far more complex and indulgent than the simple ingredients suggest. The best part? This entire no-bake keto dessert must be fully chilled, making it the perfect stress-free make-ahead option for holidays, gatherings, or just satisfying a serious chocolate craving without the guilt. Get ready to master this viral favorite!
Why This Keto Dessert Works Every Time
The success of a sugar-free, no-bake layered dessert depends on a few critical structural and ingredient adjustments. Here is the baking science behind the perfect keto texture:
- The Powdered Sweetener Rule (Crucial): For any creamy, cold filling, you must use powdered keto sweetener (like erythritol or monk fruit). Granulated sweeteners do not dissolve fully in cold dairy and will leave a gritty or crunchy texture in your cream cheese and whipped topping layers. Always buy or blend your sweetener into a fine powder.
- The Nutty Crust Base: Traditional crusts use refined flours or graham crackers. We swap these for almond flour (or a blend of almond and coconut flour) which is high in healthy fats and low in carbs. The quick bake of the crust is essential as it sets the butter, preventing the wet cream layer from making the base soggy.
- Stabilized Dairy Layers: The cream cheese layer is intentionally thick and creamy, and the final chocolate layer uses instant pudding mix which provides a rapid, stable set with minimal liquid. This combination ensures the final dessert holds its shape beautifully when sliced.
- The Chilling Process: This dessert must be chilled for a minimum of 4 hours, and ideally overnight. The chill time allows the fat and gelatin agents to set fully, ensuring the layers are perfectly defined and you can cut clean, elegant slices.
Ingredients
This recipe is structured by its four delicious, simple layers. Using full-fat dairy is essential for the best texture and flavor on a keto diet.
Layer 1: The Buttery Nut Crust
- 1 ½ cups finely ground almond flour
- ½ cup (1 stick) unsalted butter, melted
- 3 tablespoons powdered keto sweetener (e.g., Swerve or Lakanto Monk Fruit)
- ½ teaspoon vanilla extract
Layer 2: The Cream Cheese Layer (White Layer)
- 8 ounces full-fat cream cheese, softened to room temperature
- ½ cup powdered keto sweetener, sifted (essential!)
- 1 teaspoon vanilla extract
- 1 cup heavy whipping cream, whipped OR 4 ounces sugar-free whipped topping (Cool Whip)
Layer 3: The Chocolate Pudding Layer
- 1 package (3.9 ounces) sugar-free instant chocolate pudding mix (Jello brand is widely available)
- 2 cups cold unsweetened almond milk (or coconut milk)
Layer 4: The Topping and Garnish
- 1 cup heavy whipping cream, whipped OR 8 ounces sugar-free whipped topping (Cool Whip)
- ¼ cup grated sugar-free dark chocolate (or unsweetened cocoa powder)
Step-by-Step Instructions: Mix, Set, and Chill
The process is fast, but patience during the chilling steps is crucial for clean layers and the perfect slice.
Part 1: Preparing and Setting the Crust (15 Minutes)
- Prep Oven and Pan: Preheat your oven to $350^\circ F$ ($175^\circ C$). Line a $9 \times 13$ inch baking dish with parchment paper (leaving an overhang for easy removal).
- Mix Crust: In a medium bowl, combine the almond flour, melted butter, 3 tablespoons of powdered sweetener, and vanilla extract. Mix until the crumbs are evenly moistened.
- Press and Bake: Press the mixture firmly and evenly into the bottom of the prepared pan. Bake for 8–10 minutes until the edges are lightly set. This crucial, short bake prevents a soggy bottom.
- Cool Completely: Remove from oven and allow the crust to cool completely to room temperature before adding the next layer.
Part 2: Assembling the Cream Cheese and Pudding Layers (15 Minutes)
- Make Cream Cheese Layer (Layer 2): In a large bowl, beat the softened cream cheese, ½ cup of sifted powdered sweetener, and vanilla extract until perfectly smooth and lump-free. Gently fold in the 1 cup of whipped heavy cream (or 4 ounces of Cool Whip).
- Spread Layer 2: Carefully spread the cream cheese mixture evenly over the cooled crust. Place the pan in the refrigerator while you prepare the pudding.
- Make Pudding Layer (Layer 3): In a separate medium bowl, whisk the sugar-free instant chocolate pudding mix with 2 cups of cold almond milk for 2 minutes. The mixture will thicken quickly.
- Pro Tip: Always use cold liquid for instant pudding to ensure a quick, proper set.
- Spread Layer 3: Carefully pour or spoon the thickened chocolate pudding over the cream cheese layer. Use an offset spatula to smooth the surface.
Part 3: The Essential Chill and Finish (4 Hours Minimum)
- The Main Chill (Crucial): Cover the pan tightly with plastic wrap and refrigerate for a minimum of 4 hours, or until the pudding layer is completely firm and set. Do not cut the dessert before this point.
- Add Topping (Layer 4): Once the layers are set, gently spread the final 8 ounces of whipped topping evenly over the pudding layer.
- Garnish: Sprinkle the top with grated sugar-free dark chocolate or dust lightly with unsweetened cocoa powder.
- Serve: For the cleanest slices, refrigerate for another 30 minutes after topping. Slice with a hot knife (see Pro Tips) and serve cold.
Pro Tips for Zero-Carb Dessert Perfection
The keys to successful keto baking are precise measurements and attention to texture:
- Sift Your Sweetener: Granular keto sweeteners are notorious for being grainy. Always use the powdered, sifted version for the smoothest possible cream cheese layer and topping.
- Preventing a Watery Pudding: Ensure your almond milk is straight from the refrigerator and is very cold. Cold liquid is necessary for the starches in the instant pudding mix to set up properly. If the pudding seems thin, let it sit for 5 minutes before spreading.
- The Clean Slice Technique: For perfectly neat, clean slices, fill a tall glass with hot water. Dip your knife into the hot water, wipe the blade dry, and make the first cut. Repeat the hot water-wipe step before every subsequent slice. This prevents the filling from dragging across the layers.
- The Coconut Flour Boost (Expert Tip): If you are worried about the cream cheese layer being too soft, fold in 1 teaspoon of coconut flour or xanthan gum into the dry powdered sweetener before mixing it into the cream cheese. This acts as a powerful binder and helps stabilize the layer.
- Avoid Over-Whipping the Cream Cheese: Beat the cream cheese only until it’s smooth, not for long periods. Over-whipping can incorporate too much air, sometimes making the final layer slightly unstable when the acidic chocolate pudding layer is added on top.
Serving Suggestions and Creative Variations
This No-Bake Layered Delight is rich and satisfying on its own, but its perfect flavor profile makes it easy to customize.
Serving Suggestions
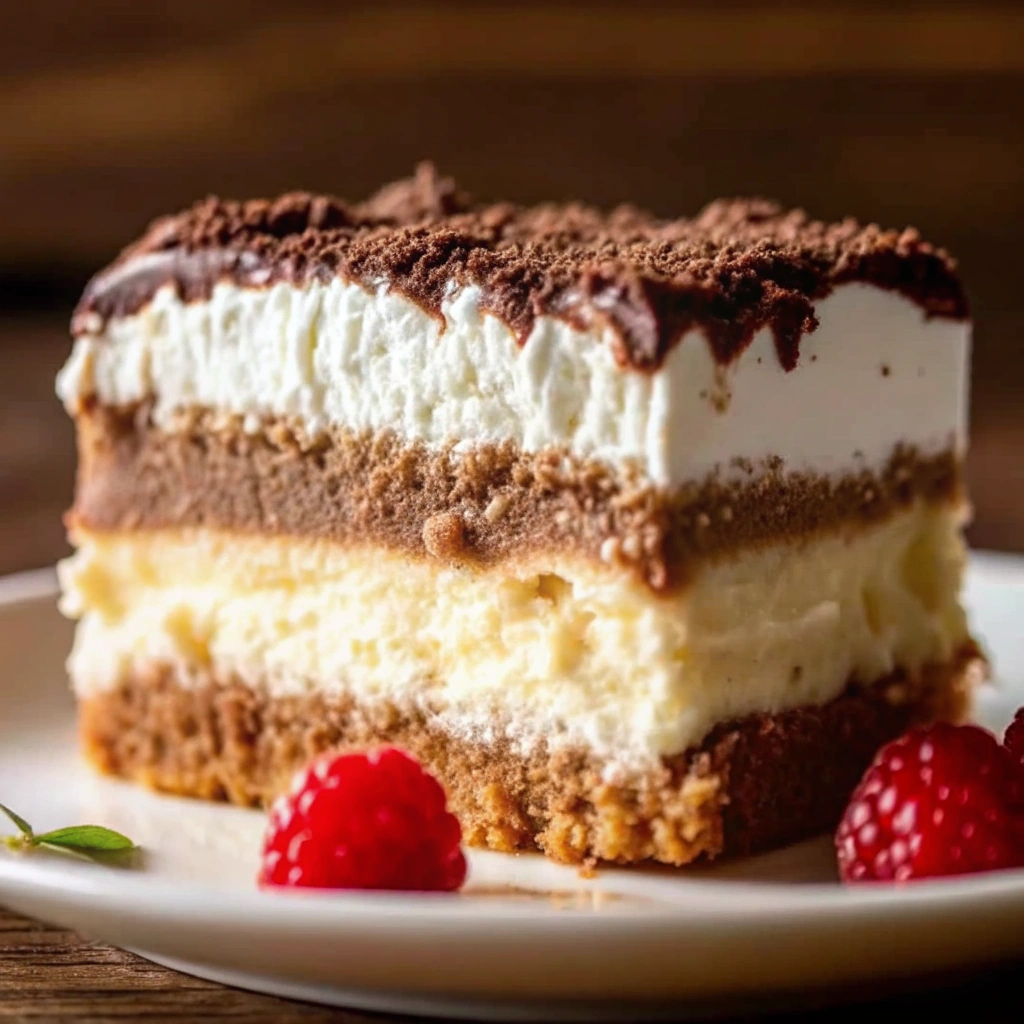
- Berries and Cream: Serve cold slices alongside a few fresh, low-carb berries (like raspberries or strawberries) to cut through the richness.
- Coffee Pairing: The dense, rich chocolate pairs beautifully with a strong, hot black coffee or a cozy sugar-free mocha.
- Nutty Crunch: Add a small sprinkle of chopped toasted pecans or walnuts to the top of individual slices for an extra layer of crunch.
- Small Servings: Instead of a $9 \times 13$ pan, layer the ingredients in small, clear glass jars or parfait cups for beautiful, portion-controlled individual desserts.
Creative Flavor Variations
- Peanut Butter Layer: Substitute ½ cup of the cream cheese with ½ cup of creamy, natural sugar-free peanut butter before beating in the powdered sweetener. This creates a decadent, nutty layer.
- Mint Chocolate Delight: Add ¼ teaspoon of peppermint extract (start small!) to the cream cheese layer for a refreshing mint twist. Top with a few sugar-free chocolate shavings.
- Caramel Swirl: Use a sugar-free caramel sauce (check carb count!) and swirl it gently over the chocolate pudding layer before letting the dessert chill.
- Mocha Boost: Dissolve 1 teaspoon of instant espresso powder in 1 tablespoon of the almond milk before adding it to the cream cheese layer. This intensifies the chocolate flavor, giving it a mocha depth.
Frequently Asked Questions (FAQ)
- Can I substitute a different sugar-free pudding flavor? Yes! This recipe works perfectly with any sugar-free instant pudding mix. Vanilla, cheesecake, or butterscotch flavors are excellent substitutions for the chocolate, offering a completely different but equally delicious dessert.
- Is this dessert freezer-friendly? Yes! This is one of the best freezer-friendly keto desserts. Assemble the entire dessert completely and freeze it (un-sliced) for up to 3 months. When ready to serve, thaw it in the refrigerator overnight. The texture remains excellent, though the topping may be slightly less airy after thawing.
- Why did my cream cheese layer taste grainy? This is the number one issue with keto desserts, and it means you used granular sweetener instead of powdered sweetener. The granules didn’t dissolve into the cold dairy. You can try blending the mixture in a food processor with a splash of milk to try and smooth it out, but prevention (using powdered sugar) is best.
- What if my pudding layer is runny? The liquid was likely not cold enough, or the pudding mix was old. Ensure your almond milk is ice-cold. If it’s still runny, let the entire dessert chill for an extra 2 hours; sometimes, it just needs more time to set.
- Can I use fresh homemade whipped cream? You can, but it must be stabilized first. Whip the heavy cream with the sweetener and then fold in 1 teaspoon of cream cheese or a tiny pinch of xanthan gum. Unstabilized cream tends to weep moisture over time, which can ruin the layers.
This Keto Chocolate Layered Delight is guaranteed to be a new staple in your kitchen—effortless, delicious, and perfectly keto-friendly. Enjoy!
Don’t forget to Pin this irresistible no-bake keto dessert recipe and share your favorite low-carb topping in the comments below!

Sugar Free No-Bake Keto Chocolate Layered Delight
Equipment
- mixing bowl
- hand mixer or stand mixer
- 8×8 inch baking dish
- spatula
- refrigerator
Ingredients
- 1 cup almond flour
- 4 tbsp unsalted butter, melted
- 2 tbsp erythritol or monk fruit sweetener
- 1/2 tsp vanilla extract
- 8 oz cream cheese, softened
- 1 cup heavy whipping cream
- 1/3 cup powdered sugar substitute
- 1 tsp gelatin (optional)
- 1 tsp vanilla extract
- 1 cup heavy whipping cream (for topping)
- 1 tbsp sugar-free sweetener (optional)
- unsweetened cocoa powder or sugar-free garnish (optional)
Instructions
- In a bowl, combine almond flour, melted butter, sweetener, and vanilla until crumbly. Press evenly into an 8×8-inch dish.
- Chill crust in the refrigerator while preparing the filling.
- Beat softened cream cheese with sweetener and vanilla until smooth. Add heavy cream and whip to stiff peaks.
- If using gelatin, bloom in a small amount of water, melt, and mix into the cream cheese mixture.
- Spread the cream cheese layer over the chilled crust and smooth the top evenly.
- Whip the second cup of heavy cream with sweetener to soft peaks. Spread or pipe over the cream cheese layer.
- Cover and refrigerate for 3–4 hours or overnight to fully set.
- Slice into servings with a sharp knife, wiping between cuts for clean layers.
- Garnish with cocoa powder, berries, or sugar-free chocolate shavings. Serve chilled.
- Store covered in the refrigerator for up to 5 days, or freeze individual portions for up to 2 months.