
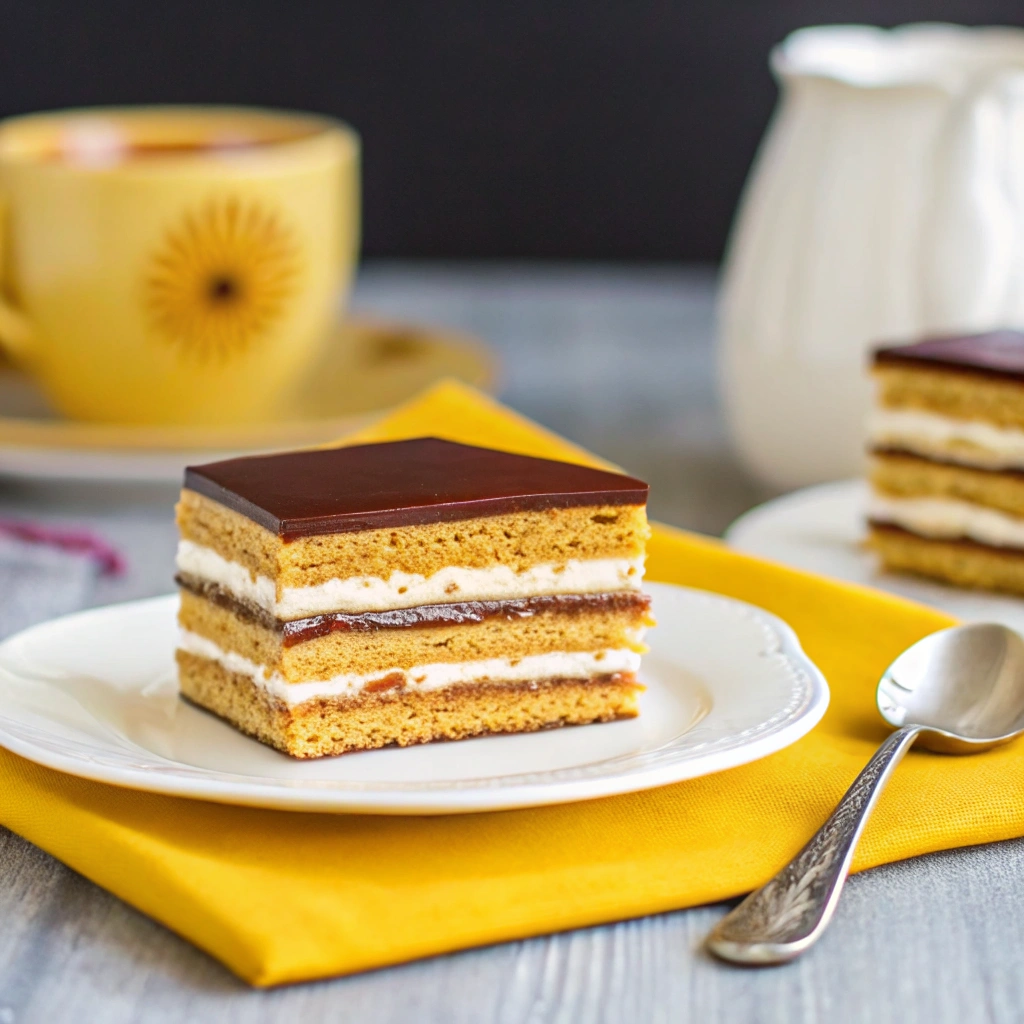
Few desserts embody Eastern European holiday tradition quite like Medovník, the iconic honey cake. This Classic Slovakian Honey Cake transforms simple ingredients—honey, butter, and warm spices—into a magnificent, layered confection. It is famous for its thin, firm, cookie-like honey layers that miraculously soften overnight when paired with a simple, yet decadent custard cream filling.
This recipe requires patience, as the final step—a minimum of 12 to 24 hours of chilling—is the secret ingredient. During this time, the moisture from the filling permeates the thin honey layers, turning them into a tender, cake-like delight. The resulting cake is rich, beautifully spiced, and cuts perfectly into elegant petit fours, making it the ultimate make-ahead centerpiece for your Christmas or special occasion dessert table.
Get ready to bake a stunning, nostalgic favorite. This recipe for Slovakian Honey Cake Slices is guaranteed to impress your guests with its deep flavor and elegant presentation.
Why the Medovník Technique is So Magical
The charm of Medovník lies in its transformation from hard components into a soft, layered cake. Understanding the unique steps ensures guaranteed success:
- The Thin Layers (The Secret): The dough is rolled and baked into paper-thin layers (often 6 to 8 layers). Baking them thin allows the cake to cook quickly without burning the honey and ensures the moisture from the filling can penetrate through the whole layer during the resting period.
- Baking with Honey: Honey is a humectant (it retains moisture) and a sugar. Because of the high sugar content, the dough layers must be watched closely; they bake quickly and can burn easily, turning bitter.
- The Custard Filling: This recipe uses a traditional semolina-based or flour-based cooked custard that is then whipped into butter. This creates a dense, stable cream that is rich enough to bind the layers but holds enough moisture to soften the honey cake.
- The Overnight Rest (Non-Negotiable): This is the most crucial step. The cake must rest for at least 12–24 hours, giving the filling time to fully hydrate the honey-flour layers. If you cut the cake early, the layers will be tough and chewy.
Ingredients
While the process is layered, the ingredients are straightforward, focusing on pure, high-quality honey and butter.
For the Honey Cake Layers (Makes 6-8 Layers)
- 1/2 cup (1 stick) unsalted butter
- 1/2 cup pure honey (liquid honey is best)
- 1/2 cup granulated sugar
- 2 large eggs
- 1 teaspoon baking soda
- 1 teaspoon white vinegar (activates the baking soda)
- 3 cups all-purpose flour, spooned and leveled
- 1 teaspoon ground cinnamon
- 1/2 teaspoon ground nutmeg
- 1/4 teaspoon ground cloves
For the Cream Filling (Semolina/Custard Base)
- 2 cups whole milk
- 1/4 cup granulated sugar
- 3 tablespoons semolina (fine wheat farina/cream of wheat) OR all-purpose flour
- 1 teaspoon vanilla extract
- 1 cup (2 sticks) unsalted butter, softened
- 1/2 cup confectioners’ sugar (powdered sugar)
For the Topping and Garnish
- 1/2 cup walnuts or pecans, finely chopped and toasted
- 2 tablespoons honey
- Powdered sugar for dusting
Step-by-Step Instructions: Dough, Layers, Cream, and Assembly
Precision in rolling and an accurate oven temperature are key to this recipe’s success.
Part 1: Making the Honey Dough (20 Minutes)
- Prepare the Mixture: In a large heatproof bowl set over a pot of simmering water (a double boiler/bain-marie), combine the butter, honey, and granulated sugar. Stir until the butter is melted and the sugar is dissolved.
- Add Eggs: Remove the bowl from the heat. Allow the mixture to cool slightly (it should be warm to the touch, not hot). Whisk in the two eggs until well combined.
- Activate Baking Soda: In a small cup, mix the baking soda and vinegar. The mixture will foam rapidly. Stir this foaming mixture into the honey mixture. It will foam again and turn lighter in color.
- Add Dry Ingredients: Gradually stir in the flour, cinnamon, nutmeg, and cloves until a thick, shaggy dough forms.
- Knead and Chill: Turn the dough out onto a lightly floured surface. Knead briefly until smooth. Divide the dough into 6 or 8 equal portions (depending on desired thickness). Wrap each portion tightly in plastic wrap and chill for at least 30 minutes.
Part 2: Baking the Thin Layers (45 Minutes)
- Prep Oven: Preheat your oven to 350∘F (175∘C).
- Roll the Dough: Take one dough ball. On a sheet of parchment paper lightly dusted with flour, roll the dough out into an approximate 10×12 inch rectangle. Roll it as thin as possible without tearing.
- Bake: Slide the parchment paper onto a baking sheet. Bake for 5–7 minutes. The layer should be golden brown and look firm.
- Trim and Cool (Crucial!): Immediately upon removing the layer from the oven, use a sharp knife and a ruler (or the base of your chosen cake pan) to trim the edges into a neat, perfect 9×11 inch rectangle. This must be done while the cake is hot; once it cools, it becomes brittle. Reserve the scraps—we need them later!
- Repeat: Repeat steps 2-4 with the remaining dough portions. Stack the cooled, trimmed layers carefully.
Part 3: Preparing the Cream Filling (25 Minutes)
- Make the Semolina Custard: In a saucepan, whisk together the milk, sugar, and semolina (or flour). Bring the mixture to a simmer over medium heat, whisking constantly. Continue to cook for 3–5 minutes until the mixture is very thick, like pudding.
- Cool Completely: Remove from heat, stir in the vanilla extract. Pour the custard into a bowl, press plastic wrap directly onto the surface (to prevent a skin from forming), and let it cool completely to room temperature.
- Whip Butter: In a large bowl, beat the softened butter and confectioners’ sugar until light and fluffy (about 3 minutes).
- Combine: Beat the cooled semolina custard into the whipped butter mixture, 1 tablespoon at a time, until the cream is homogenous, light, and fluffy.
Part 4: Assembly, Pressing, and Cutting (Overnight Rest)
- Crumb Topping Prep: Take the reserved dough scraps from Part 2 and either pulse them in a food processor or crush them by hand until they resemble fine breadcrumbs. Stir in the toasted, chopped walnuts/pecans. Set aside.
- Layer the Cake: Place the first honey cake layer on your serving platter. Spread 1/6 of the cream filling evenly over the top. Top with the next cake layer. Repeat this process until all the layers are used, ending with a final layer of cream on top.
- Final Coat and Press: Spread the remaining cream around the sides of the cake. Gently press the reserved crumb mixture onto the top and sides of the cake.
- The Overnight Rest (Essential): Cover the cake loosely and refrigerate for a minimum of 12 hours, and preferably 24 hours. This resting time is non-negotiable for the layers to soften.
- Slice and Serve: Use a very sharp, long knife to trim the edges and then cut the cake into small, neat slices or squares (petit fours). Serve chilled or at room temperature.
Pro Tips for Perfect Medovník

Success with this traditional layer cake relies entirely on precision and patience.
- Mind the Temperature: The dough layers must be handled quickly, and the custard must be completely cool before mixing it into the butter. If the custard is warm, it will melt the butter, resulting in a runny, unusable filling.
- Don’t Over-Bake the Layers: Over-baking makes the layers brittle and dry, and they will struggle to soften even with a full 24-hour rest. Look for a light golden-brown color, and remove them promptly.
- The Power of Parchment: Rolling the dough directly on parchment paper means you can transfer it straight to the baking sheet without trying to lift the thin dough, which would cause tears.
- Even Layers are Crucial: Use a rolling pin with thickness guides if you have one, or a ruler, to ensure every layer is uniformly thin. Uneven layers will absorb moisture at different rates, leading to an inconsistent texture.
- Use the Scraps: Do not discard the trimmed edges! These scraps are crucial. They are crushed to form the traditional, flavorful crumb coating for the sides and top.
Serving Suggestions and Creative Variations
The classic Medovník is served chilled and simple, but you can enhance the flavor for a modern twist.
Serving Suggestions
- Coffee Pairing: Serve alongside a strong, traditional European coffee like espresso or a cappuccino, as the cake is very rich and sweet.
- Fruit Accent: Serve the slices with a small dollop of sour cream or crème fraîche and a garnish of tart fresh berries (like raspberries or red currants) to cut through the richness.
- Garnish: A simple dusting of powdered sugar or a garnish of whole candied walnuts is all this elegant cake needs.
Flavor Variations
- Chocolate Swirl: Melt 1/4 cup of dark chocolate and drizzle it over the top of the finished, chilled cake (before cutting) instead of or in addition to the crumb topping.
- Boozy Finish: When assembling the layers, lightly brush each cake layer with a small amount of dark rum or brandy mixed with a touch of milk before adding the cream filling. This adds incredible flavor depth and helps the cake soften even faster.
- Nuts in the Layers: Add 1/4 cup of very finely ground walnuts or almonds to the flour mixture for the cake dough for a more intense nutty aroma.
- Dulce de Leche Filling: For a richer twist, substitute 1/2 cup of the sugar in the cream filling with 1/2 cup of dulce de leche or caramelized sweetened condensed milk.
Frequently Asked Questions (FAQ)
- Why are my cake layers still hard after 24 hours? There are a few reasons:
- Layers were too thick. They must be rolled paper-thin for the moisture to penetrate.
- Layers were over-baked. They became too dry and brittle to absorb the moisture.
- Filling was too dry. Ensure you use the specified amount of milk/semolina to create a moist, creamy filling that acts as the hydrating agent.
- Can I use milk instead of semolina/flour for the filling? No. The semolina or flour is essential for thickening the milk into a stable custard. Without it, the cream will be too runny and will not set properly, resulting in a sloppy filling that runs out when you slice the cake.
- How far in advance can I make this cake? This is the ultimate make-ahead cake! It must be made at least 1 day in advance. The flavor and texture actually improve over 2–3 days. The cake is excellent for up to 5 days in the refrigerator.
- Can I freeze the Medovník? Yes, but freeze it un-sliced. After the cake has rested for 24 hours (fully set and softened), wrap the entire cake tightly in plastic wrap, then foil. Freeze for up to 1 month. Thaw overnight in the refrigerator. Do not try to freeze the freshly baked, hard layers before assembly.
- What is the difference between Russian Medovik and Slovakian Medovník? They are very similar! The Russian Medovik typically uses more layers (up to 12) and often uses sweetened condensed milk in the filling, giving it a caramelized flavor. The Slovakian Medovník uses a thicker, butter-custard filling and usually has fewer, thicker layers (6-8), often topped with walnuts. Both rely on the honey layers and the essential overnight rest.
This Slovakian Honey Cake is a memorable dessert that offers a challenge and a spectacular reward. Enjoy the magical transformation!
Don’t forget to Pin this authentic Medovník recipe and share your favorite holiday cookie or cake tradition in the comments below!

Classic Slovakian Honey Cake Slices
Equipment
- saucepan
- mixing bowls
- whisk or hand mixer
- baking trays
- Rolling Pin
- baking paper
- knife or dough cutter
- refrigerator
- spatula
Ingredients
- 400 g plain flour
- 150 g caster sugar
- 80 g unsalted butter
- 4 tbsp milk
- 2 tbsp honey
- 1 egg (medium)
- 1/2 tsp baking soda
- 1 jar thick jam of choice (apricot or plum preferred)
- 500 ml vanilla pudding, room temperature
- 180 g icing sugar
- 250 g unsalted butter, softened
- 100 g chocolate (dark or semi-sweet)
- 180 ml whipping cream
Instructions
- In a saucepan, combine sugar, butter, milk, honey, and egg. Stir over low heat until melted. Add baking soda and stir until foamy (do not boil). Remove from heat.
- Stir in half of the flour, then transfer the rest to the work surface. Pour the mixture over and knead into a smooth dough. Divide into two equal halves and roll each into thin rectangular sheets to fit your baking tray.
- Place rolled pastry on a lined or greased baking tray. Bake each sheet at 180°C (356°F) for 10 minutes. Let both layers cool completely before assembling.
- For the pudding filling, beat icing sugar and soft butter until creamy. Gradually mix in vanilla pudding (at room temperature) until thick and smooth.
- Place the first baked layer on a tray. Spread pudding filling evenly over it. Top with the second layer and cut in half crosswise. Spread jam generously over one half and remaining filling on top if desired. Place the other half on top, press lightly, cover with parchment, and refrigerate overnight with a weight on top.
- For the chocolate glaze, heat whipping cream to a boil, pour over chopped chocolate, rest for 2 minutes, then stir until smooth. Spread over the chilled cake and refrigerate to set. Trim edges and slice into petit fours to serve.