
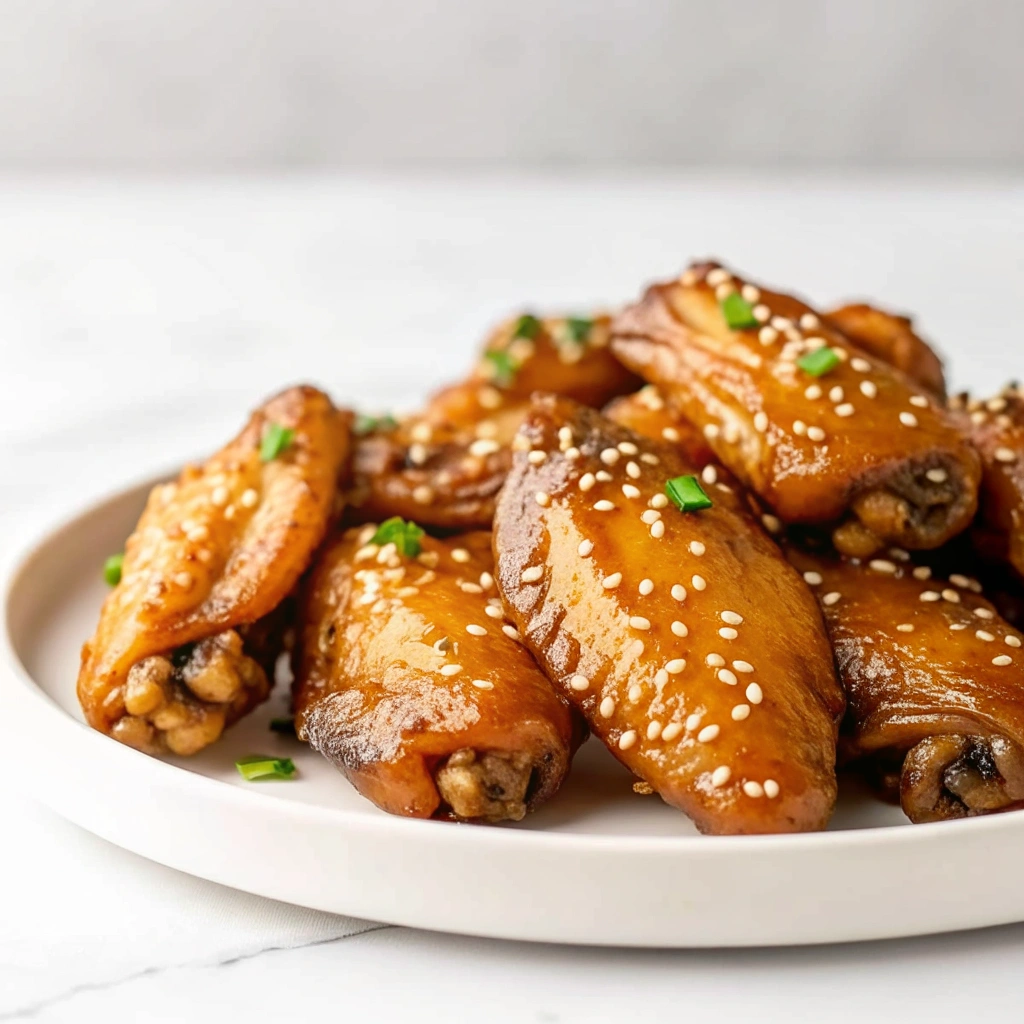
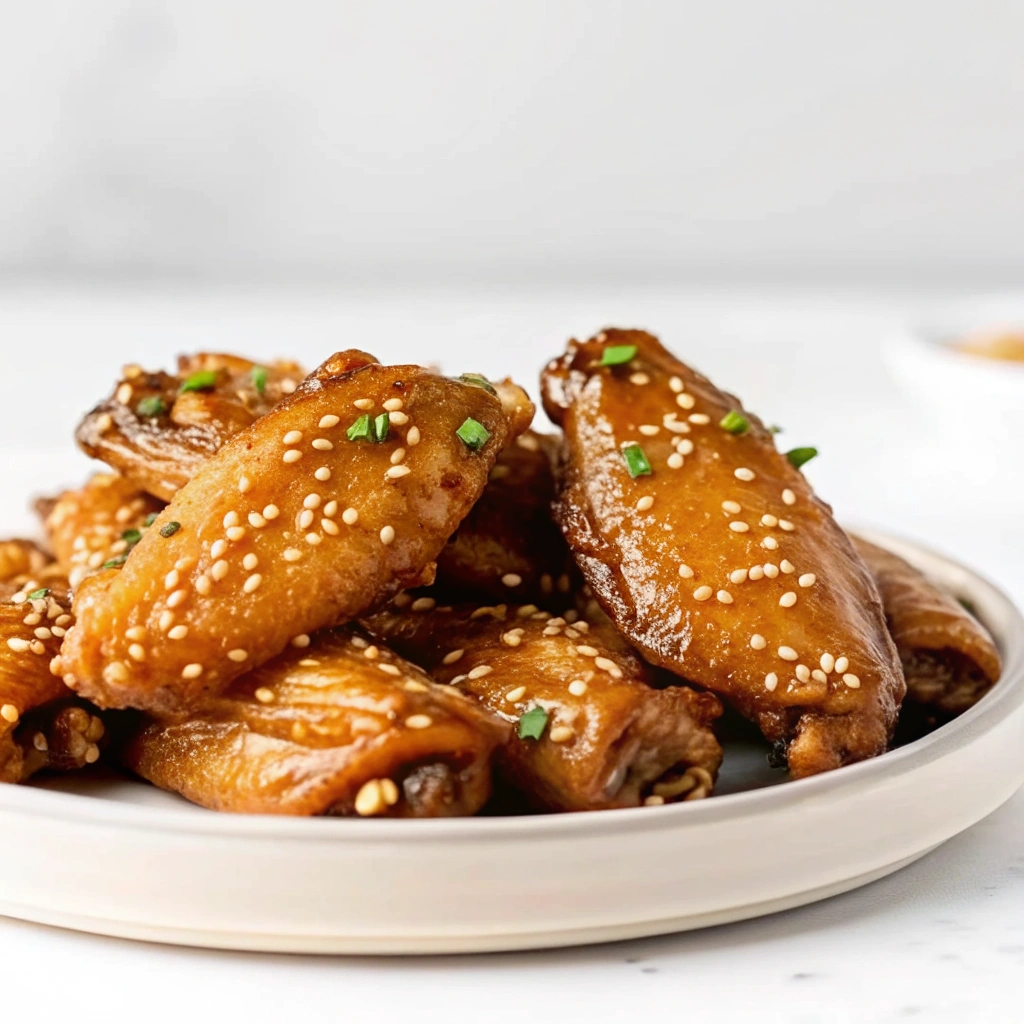
When it comes to appetizers that disappear the fastest, Honey Garlic Chicken Wings reign supreme. They deliver the ultimate combination of sticky sweetness, savory soy, and pungent garlic, wrapped around tender meat. But the real magic of this recipe is the golden, crackling crispy skin achieved without a drop of deep-fry oil!
If you’ve struggled to get restaurant-quality crispiness from your oven, this recipe is your game-changer. We’re going to reveal the one secret ingredient used by professional chefs to ensure the wings crisp up beautifully. The result is a batch of wings with perfectly rendered fat, a brittle crust, and a thick, glossy honey garlic glaze that clings perfectly to every single wing.
These sticky wings are perfect for game day, holiday parties, or a simple weekend indulgence. They are simple, highly customizable, and guaranteed to be the first dish emptied on the buffet table. Get ready to master the perfect Oven-Baked Chicken Wings and their irresistible glaze!
Why This Recipe Guarantees CRISPY Wings (The Science)
The goal is to achieve the texture of fried wings without the mess. The key to making baked wings truly crispy comes down to three crucial techniques: drying, using a rack, and a secret ingredient.
- The Power of Baking Powder: The ultimate secret is adding a small amount of aluminum-free baking powder to the seasoning mixture. Baking powder is alkaline, and when heated, it raises the pH level on the chicken skin. This helps break down the protein structure in the chicken skin, allowing the skin to dry out much faster and more thoroughly. The result is a skin that cooks up thin, brittle, and incredibly crispy—just like frying.
- The Wire Rack Method: Roasting the wings on a wire rack set inside a rimmed baking sheet is non-negotiable. This simple tool allows the heat to circulate 360 degrees around the wing, ensuring even cooking and, crucially, allowing rendered fat and moisture to drip away. If the wings sit directly on the pan, they will steam in their own juices and end up soggy.
- Glaze After Baking: The honey garlic glaze contains sugar (honey) and water (soy sauce). If you apply the glaze before or during baking, the sugar will burn long before the wings are cooked through, and the moisture will prevent the skin from crisping. We bake the wings until they are shatteringly crispy first, and only then are they tossed in the hot, thickened glaze.
Ingredients
This recipe is divided into the wings (focused on crisping) and the glaze (focused on flavor).
For the Crispy Chicken Wings
- 3 lbs whole chicken wings (or a mix of drumettes and flats), patted dry
- 1 tablespoon aluminum-free baking powder
- 1 teaspoon Kosher salt
- 1/2 teaspoon black pepper
For the Sticky Honey Garlic Glaze
- 1/2 cup honey (local honey works great!)
- 1/4 cup low-sodium soy sauce
- 4 cloves garlic, minced (use fresh, not jarred, for best flavor)
- 1 tablespoon fresh ginger, grated
- 1 tablespoon rice vinegar (or apple cider vinegar)
- 1 teaspoon sesame oil
- 1/4 cup water (or chicken broth)
- 1 teaspoon cornstarch (for thickening)
For Garnishing
- Sesame seeds (white or black)
- Thinly sliced green onions (scallions)
Step-by-Step Instructions: Prep, Crisp, and Glaze
Follow the process precisely—especially the drying and the chilling—to guarantee that restaurant-quality crispy texture.
Part 1: Prepping for Crispiness (15 Minutes + Chill Time)
- Pat Wings Dry (Crucial): Remove the wings from the package and pat them aggressively dry with paper towels. Any surface moisture will prevent crisping.
- Combine Crisping Mix: In a large bowl, whisk together the baking powder, Kosher salt, and black pepper.
- Toss Wings: Add the dried wings to the bowl and toss thoroughly until every single piece is lightly and evenly coated with the baking powder mixture.
- Arrange and Chill: Place the wings on a wire rack set over a rimmed baking sheet. Arrange them in a single layer without any pieces touching. For the absolute best crisp, refrigerate the wings, uncovered, for 4 hours or even overnight. This air-drying step is the second secret weapon for a brittle crust.
Part 2: Baking the Wings (45–55 Minutes)
- Preheat Oven: Preheat your oven to 425∘F (220∘C).
- Bake: Place the baking sheet with the wings into the hot oven. Bake for 20 minutes.
- Flip: Carefully flip each wing piece using tongs.
- Continue Baking: Return the wings to the oven and continue baking for another 25–35 minutes, or until the internal temperature reaches 165∘F (74∘C) and the skin is deeply golden brown and crispy.
Part 3: Making the Sticky Glaze (10 Minutes)
- Mix Thickener: In a small bowl, whisk together the cornstarch and the 1/4 cup of water (or broth) until dissolved. Set aside—this is your cornstarch slurry.
- Simmer Glaze: In a small saucepan, combine the honey, soy sauce, minced garlic, grated ginger, and rice vinegar. Bring the mixture to a simmer over medium heat, stirring occasionally.
- Thicken: Once simmering, slowly whisk in the cornstarch slurry. Continue to simmer and stir for 1–2 minutes until the glaze thickens to a syrupy consistency that will coat the back of a spoon.
- Finish: Remove the glaze from the heat and stir in the sesame oil. Keep warm.
Part 4: Tossing and Serving
- Toss: Once the wings are perfectly crisp from the oven, immediately transfer them to a large, clean bowl. Pour the warm honey garlic glaze over the hot wings.
- Coat: Toss gently with tongs until every wing is evenly coated in the sticky, glossy glaze.
- Garnish: Transfer the glazed wings to a serving platter and immediately garnish with sesame seeds and sliced green onions. Serve hot!
Pro Tips for Maximum Crispy Wing Success
The path to non-fried crispiness is simple, but requires absolute commitment to these techniques:
- Dry, Dry, Dry: I cannot overstate this: the more moisture you remove from the surface of the chicken before adding the baking powder, the crispier the skin will be. Patting dry with paper towels is the baseline; the optional uncovered chill in the fridge is the master-level move.
- Aluminum-Free Baking Powder: Ensure the baking powder you use is labeled “aluminum-free.” Standard baking powder can sometimes leave a slight metallic aftertaste, especially when used in this concentration.
- The Right Rack: Use a small cookie cooling rack if you don’t have a large roasting rack. As long as the wings are elevated above the pan and not touching, air can circulate, and you’ll get crispy skin all around.
- Don’t Substitute the Glaze Thickeners: Cornstarch (or sometimes arrowroot powder) is the best thickener for Asian-inspired glazes. Avoid flour, which tends to clump and leave a cloudy finish.
- Clean the Pan Right Away: The rendered fat and the occasional drip of glaze will cook onto the pan and rack. Soak the pan and rack in very hot, soapy water immediately after removing the wings—it makes cleanup ten times easier.
Serving Suggestions and Creative Variations
The Honey Garlic Chicken Wing is the perfect base for creative flavor additions.
Flavor and Heat Variations
- Spicy Honey Garlic: To add heat, simply whisk in 1–2 teaspoons of Sriracha or chili garlic sauce directly into the glaze mixture before you thicken it with the cornstarch slurry. You can also sprinkle the finished wings with red pepper flakes.
- Orange Zest Brightness: Add the zest of one orange to the glaze along with the ginger. The citrus brightens the entire sauce and adds a subtle, fragrant layer of flavor that complements the garlic.
- Nutty Crunch: Before baking, mix 1/4 cup of crushed peanuts or cashews into the glaze mixture. Once the wings are tossed, this gives them an extra layer of savory crunch.
- Lemon-Butter Finish: After the wings are tossed in the glaze, melt 2 tablespoons of unsalted butter with the juice of 1/2 lemon. Drizzle this quick lemon-butter sauce over the glazed wings just before serving for an extra layer of richness and zest.
Pairing and Platter Ideas
- The Classic Pairing: Serve with a side of ranch or blue cheese dressing, along with crisp celery sticks and carrot sticks to provide a cooling contrast to the richness and flavor of the wings.
- Game Day Platter: Arrange the wings on a platter with other savory favorites like Buffalo Chicken Dip Cups in Tortilla Bowls or Cheese and Charcuterie Pinwheels for the ultimate party spread.
- Dinner Service: These wings can easily be a main course! Serve them over a bed of steamed white rice or brown rice, allowing the extra glaze to soak into the grains, along with a simple side of steamed broccoli or stir-fried cabbage.
- Beverage Pairing: The savory and sweet flavors pair excellently with lighter, slightly hoppy beers (like a Pale Ale) or a chilled glass of Riesling or Pinot Gris.
Frequently Asked Questions
- Can I use frozen chicken wings? Yes, you can, but the thawing process is critical. Thaw the wings fully overnight in the refrigerator, and then you must spend extra time aggressively patting them dry. Frozen wings tend to retain more surface moisture, which you must remove before the baking powder step.
- Can I use the Air Fryer instead of the oven? Absolutely! The air fryer is an excellent tool for achieving ultimate crispiness. Follow Part 1 (patting dry and coating with baking powder/salt). Place the coated wings in a single layer in the air fryer basket (work in batches if necessary). Air fry at 400∘F (200∘C) for 20–25 minutes, flipping halfway through, until golden and crispy. Toss with the glaze immediately after cooking.
- Can I make the honey garlic glaze ahead of time? Yes, the glaze can be made up to 5 days in advance. Follow the instructions through Part 3, Step 3 (making and thickening the glaze). Store it in an airtight container in the refrigerator. When ready to use, gently reheat the glaze in a saucepan over low heat until it is warm and pourable again before tossing with the hot wings.
- How do I reheat leftover wings and keep them crispy? Do not microwave them! Microwaving will turn the crispy skin soggy.
- Preheat your oven or air fryer to 350∘F (175∘C).
- Place the leftover wings in a single layer on a foil-lined tray.
- Reheat for 8–10 minutes in the oven (or 4–5 minutes in the air fryer) until heated through and the skin has re-crisped slightly.
- Why did my glaze seize up or become too thick? This means the cornstarch was over-cooked or you used too much. If the glaze is too thick, simply whisk in an extra tablespoon of water or broth at a time until the desired syrupy consistency is reached. If the glaze is too thin, mix another 1/2 teaspoon of cornstarch with 1 teaspoon of water and whisk the slurry into the simmering glaze.
These Honey Garlic Chicken Wings are guaranteed to be your new favorite recipe—simple prep, amazing texture, and unbelievable flavor! Enjoy the non-fried crispiness!
Don’t forget to Pin this oven-baked wings recipe for your next game day party and share your favorite side dip in the comments below!

Honey Garlic Chicken Wings
Equipment
- baking sheet
- wire rack
- mixing bowl
- saucepan
- tongs
Ingredients
- 2 lb chicken wings, split and tips removed
- 1 tbsp olive oil
- 1/2 tsp salt
- 1/2 tsp black pepper
- 1/4 cup soy sauce
- 1/3 cup honey
- 3 cloves garlic, minced
- 1 tbsp rice vinegar (or apple cider vinegar)
- 1 tsp cornstarch (optional, for thickening)
- 1 tbsp water (for cornstarch slurry)
- optional sesame seeds and chopped green onions, for garnish
Instructions
- Preheat oven to 400°F (200°C). Line a baking sheet with foil and place a wire rack on top. Lightly grease the rack.
- Pat chicken wings dry with paper towels. Toss in a bowl with olive oil, salt, and pepper until evenly coated.
- Arrange wings on the wire rack in a single layer. Bake for 40–45 minutes, flipping halfway through, until golden brown and crisp.
- While wings bake, prepare the sauce: In a saucepan over medium heat, combine soy sauce, honey, minced garlic, and vinegar. Simmer 3–4 minutes.
- If a thicker sauce is desired, stir in cornstarch slurry (cornstarch + water) and cook until slightly thickened.
- Toss baked wings in the honey garlic sauce until fully coated.
- Garnish with sesame seeds and green onions before serving.