
There’s something genuinely delightful about desserts that come in their own edible container. These Shamrock Cookie Cups deliver exactly that kind of charm—individual servings that are as adorable as they are delicious.
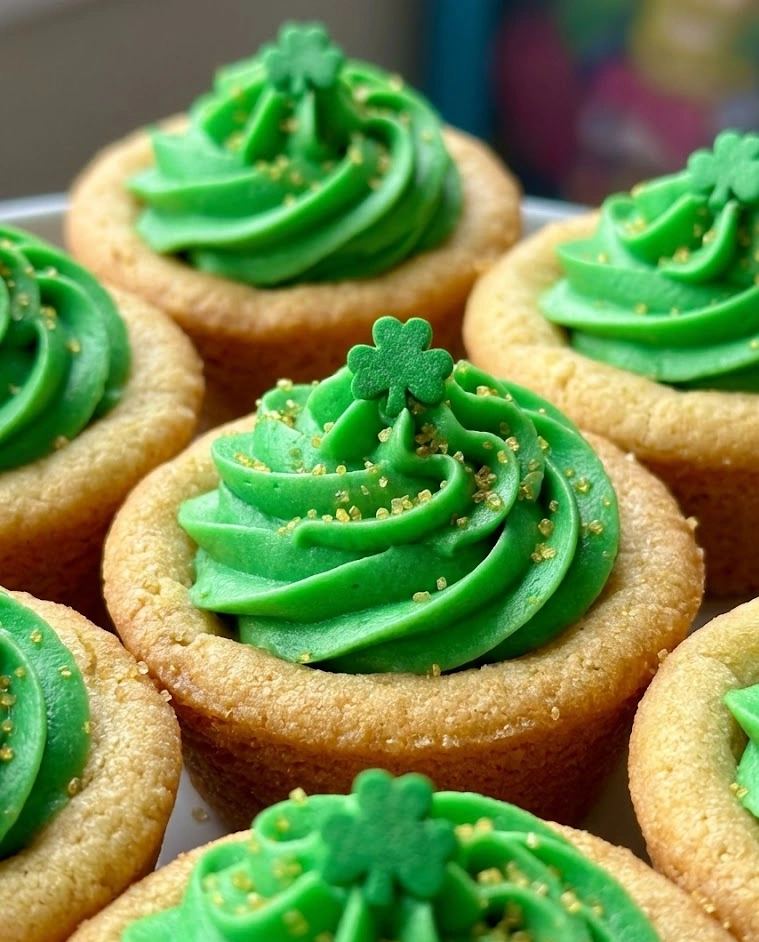
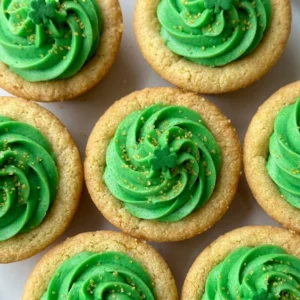
Buttery sugar cookie cups baked in a muffin tin, filled with vibrant green vanilla pudding, topped with a swirl of whipped cream, and finished with festive shamrock sprinkles. They’re one of those St Patrick’s Day treats that looks intricate and bakery-level impressive but actually comes together with simple techniques and familiar ingredients.
Each cookie cup is a complete dessert experience—crunchy-soft cookie exterior giving way to smooth, creamy pudding filling, all topped with pillowy whipped cream. They’re perfectly portioned, completely customizable, and absolutely irresistible.
Why You’ll Love These Shamrock Cookie Cups
Let’s start with the most compelling reason: these are ridiculously cute.
The individual portion format creates instant visual appeal. Instead of a large dessert that needs to be cut and plated, these arrive at the table already portioned and ready to eat. Each cup is a complete, self-contained treat that looks intentional and special. That built-in portion control also makes them perfect for parties where guests want to sample multiple desserts without committing to large slices.
The flavor combination is absolutely stellar. Sweet, buttery sugar cookie forms the base—familiar and comforting. The vanilla pudding filling is smooth, creamy, and just sweet enough without being cloying. The whipped cream topping adds lightness and a touch of richness. Together, these components create a balanced dessert that’s indulgent without being overwhelming.
They’re remarkably versatile in terms of customization. Change the cookie flavor, swap the pudding, use different toppings—these cookie cups adapt to virtually any theme or preference. The basic technique remains the same, but the final product can be entirely different based on your choices.
These travel beautifully. The sturdy cookie cup protects the filling during transport, and the individual format means you’re not trying to move a large, delicate dessert that might shift or collapse. Simply cover each cup loosely and pack them in a sturdy container.
Finally, kids absolutely love these. The individual portion feels special, the bright green color is festive and fun, and the combination of cookie and pudding hits all the right notes for young palates. These are the St Patrick’s Day treats that disappear first from the dessert table.
Key Ingredients: Building Your Edible Containers
Understanding what each component contributes helps you create the most delicious, structurally sound cookie cups possible.
Sugar Cookie Dough: This forms the edible cup that holds everything together. You can use homemade sugar cookie dough or store-bought refrigerated dough—both work beautifully. The key characteristics you need are: dough that’s firm enough to hold a cup shape but tender enough to bite through easily, and sweetness that complements rather than competes with the filling. Homemade gives you more control over flavor and texture; store-bought saves significant time without sacrificing quality.
Butter: If making homemade dough, use real unsalted butter at room temperature. Butter creates the tender, melt-in-your-mouth texture that makes sugar cookies so beloved. It also contributes rich flavor that margarine simply cannot replicate. Room temperature butter creams properly with sugar, creating the light, fluffy base essential for proper cookie texture.
Granulated Sugar: Provides sweetness and helps create those slightly crisp edges on the cookie cups. Sugar also contributes to browning through caramelization, which develops deeper flavor and creates visual appeal.
Eggs: Bind the dough together and add richness. Eggs provide structure that helps the cookie cups hold their shape during and after baking. Room temperature eggs incorporate more easily and create smoother dough.
Flour: All-purpose flour provides structure and body. Measure carefully using the spoon-and-level method to avoid too much flour, which creates tough, dry cookies. The right amount creates cookie cups that are sturdy enough to hold filling but tender enough to bite through easily.
Vanilla Extract: Enhances sweetness and adds aromatic depth. Vanilla makes everything taste more pronounced and developed. Pure vanilla extract is superior to imitation for the cleanest, most authentic flavor.
Baking Powder: Just a small amount provides gentle lift that creates cookies with a tender crumb rather than dense, hard texture. Too much leavening would make the cups puff up too much and lose their cup shape.
Vanilla Pudding Mix: Creates the smooth, creamy filling that’s the heart of these cookie cups. Instant vanilla pudding is perfect here—it sets quickly and maintains stability for hours. Make it with whole milk rather than skim for the richest, most luxurious texture.
Green Food Coloring: Transforms plain vanilla pudding into festive green filling that screams St. Patrick’s Day. Gel food coloring creates more vibrant color with less product and doesn’t thin the pudding the way liquid coloring can. Start with a few drops and adjust until you achieve your desired shade—pale mint or vibrant shamrock both work beautifully.
Heavy Whipping Cream: Forms the topping that finishes each cookie cup. Heavy cream whips into stable peaks that hold their shape for hours. Sweetened with a touch of powdered sugar and vanilla, it adds the perfect light, creamy contrast to the denser cookie and pudding layers.
Shamrock Sprinkles: The final decorative touch that makes these unmistakably festive. Green shamrock-shaped sprinkles, green sanding sugar, or even mini chocolate chips all work as finishing touches. The decoration is what transforms a simple cookie cup into a themed St. Patrick’s Day treat.
How to Make Shamrock Cookie Cups
These cookie cups come together through a series of straightforward steps. Pay attention to the shaping technique and everything else is simple.
Step 1: Preheat your oven to 350°F (175°C). Generously spray a standard 12-cup muffin tin with non-stick cooking spray, making sure to coat the bottom and sides of each cup thoroughly. Proper greasing is essential—these cookie cups need to release cleanly from the pan after baking.
Step 2: If making homemade sugar cookie dough, prepare it now. In a large bowl, cream together room-temperature butter and granulated sugar until light and fluffy, about 3-4 minutes. Add eggs and vanilla, beating until smooth. In a separate bowl, whisk together flour, baking powder, and salt. Gradually add dry ingredients to wet ingredients, mixing just until combined. If using store-bought dough, simply let it sit at room temperature for 10-15 minutes to soften slightly for easier handling.
Step 3: Divide the cookie dough into 12 equal portions. Roll each portion into a smooth ball—this uniformity ensures even baking and consistent cup sizes.
Step 4: Place one dough ball into each prepared muffin cup. Here’s the critical technique: use your fingers or the back of a small spoon to press the dough up the sides and across the bottom of each muffin cup, creating a bowl or cup shape. The dough should line the bottom and sides evenly, creating a well in the center for filling. Aim for walls about ¼-inch thick—thick enough to be sturdy but not so thick they’re doughy and underbaked.
Step 5: The center well should be deep enough to hold a generous amount of filling. Don’t make the walls too thin or they’ll collapse during baking; don’t make them too thick or they’ll be dense and cakey. This balance comes with practice, but even imperfect cookie cups are delicious.
Step 6: Bake for 12-15 minutes, until the edges are lightly golden and the cookie is set. The centers may puff up slightly during baking—that’s normal. They’ll deflate as they cool, creating the perfect well for filling.
Step 7: Remove from the oven and immediately use the back of a small spoon or a tart shaper to gently press down any puffed centers, re-forming the cup shape while the cookies are still hot and pliable. Work carefully but quickly—cookies firm up rapidly as they cool.
Step 8: Let the cookie cups cool in the muffin tin for 10 minutes. This cooling time allows them to set enough to handle without breaking. After 10 minutes, carefully run a butter knife around the edge of each cup to loosen it, then gently lift each cookie cup out of the tin and transfer to a wire rack to cool completely.
Step 9: While cookie cups cool, prepare the green vanilla pudding. In a medium bowl, whisk together instant vanilla pudding mix and cold whole milk according to package directions. Beat vigorously for 2 minutes until the pudding begins to thicken. Add green gel food coloring, starting with 3-4 drops for pale green or 8-10 drops for vibrant shamrock green. Whisk until the color is completely uniform. Cover with plastic wrap pressed directly against the surface and refrigerate for 15-20 minutes to set completely.
Step 10: Prepare the whipped cream topping. In a cold bowl using a hand mixer or in a stand mixer with the whisk attachment, beat cold heavy cream on medium-high speed until it begins to thicken. Add powdered sugar and vanilla extract, then continue beating on high speed until stiff peaks form. The cream should hold its shape and form peaks that stand straight up.
Step 11: Once cookie cups are completely cool, fill each one with the green vanilla pudding. You can spoon it in or use a piping bag for neater filling. Fill each cup generously—the pudding should come nearly to the top of the cookie cup.
Step 12: Top each filled cookie cup with a dollop or swirl of whipped cream. Use a spoon for rustic dollops or a piping bag fitted with a star tip for more elegant swirls. The whipped cream should crown each cup attractively.
Step 13: Finish each cookie cup with shamrock sprinkles, green sanding sugar, or your chosen decoration. Press the decorations gently into the whipped cream so they adhere properly.
Step 14: Refrigerate the filled cookie cups for at least 30 minutes before serving. This chilling time allows the pudding to fully set and the flavors to meld slightly. They’re best served cold.

Variations & Creative Flavor Combinations
The cookie cup technique is so versatile that you can adapt it to virtually any flavor profile or dietary preference.
Chocolate Cookie Cups: Use chocolate sugar cookie dough or add ¼ cup cocoa powder to your homemade dough. Fill with mint chocolate pudding or regular chocolate pudding for a richer, more indulgent variation. Top with whipped cream and crushed Andes mints.
Lemon Shamrock Cups: Add lemon zest to the cookie dough and fill with lemon pudding tinted pale green. The bright citrus flavor is refreshing and perfect for spring celebrations. Top with whipped cream and candied lemon peel.
Irish Cream Filling: For adults-only treats, add 2-3 tablespoons of Bailey’s Irish Cream to the vanilla pudding before it sets. The boozy, creamy flavor is sophisticated and perfect for evening celebrations.
Brownie Cookie Cups: Use brownie batter instead of cookie dough as the base. Press it into muffin cups and bake until just set. The fudgy brownie cups create a richer, more decadent dessert. Fill with mint pudding for classic mint-chocolate combination.
Gluten-Free Adaptation: Use gluten-free sugar cookie dough or a gluten-free baking mix to make the cups. The technique remains identical. Ensure your pudding mix is also gluten-free (most are, but verify).
Vegan Version: Use vegan butter and egg replacer in the cookie dough. Make pudding with non-dairy milk and use coconut whipped cream for topping. The results are surprisingly similar to traditional versions.
Rainbow Filling: Divide the pudding into portions and tint each a different color—green, yellow, orange. Layer the different colored puddings in each cup for a rainbow pot-of-gold effect.
No-Bake Version: Use mini graham cracker crusts as the base instead of cookie cups. Simply fill pre-made crusts with pudding and top with whipped cream. This eliminates the baking step entirely for ultimate simplicity.
Pro Tip: To prevent the cookie cups from getting soggy, brush the inside of each cooled cup with a thin layer of melted white chocolate before filling. Let the chocolate set completely, then fill with pudding. This creates a moisture barrier that keeps the cookie crispy even after hours of contact with the pudding.
Storage & Make-Ahead Strategy
These Shamrock Cookie Cups are excellent for advance preparation with the right approach.
Component Prep: Bake the cookie cups up to 2 days ahead and store them in an airtight container at room temperature. Make the pudding up to 1 day ahead and refrigerate. Whip the cream up to 4 hours ahead and refrigerate. Assemble the cups 2-4 hours before serving for best results.
Assembled Storage: Once filled and topped, store cookie cups in the refrigerator in an airtight container or covered loosely with plastic wrap for up to 24 hours. The cookie cups will soften slightly from the moisture in the pudding—some people prefer this softer texture, others prefer the contrast of crisp cookie against creamy filling. For crispest results, assemble no more than 4 hours before serving.
Freezing Considerations: Unfilled cookie cups freeze beautifully for up to 3 months. Stack them with parchment between layers in a freezer-safe container. Thaw at room temperature for 30 minutes before filling. Do not freeze filled cups—the pudding and whipped cream don’t survive freezing well.
Transporting: These travel remarkably well when handled carefully. Place filled cups in a single layer in a sturdy container with a lid. If you need to stack them, place a layer of parchment between levels and ensure the container is deep enough that the whipped cream doesn’t touch the layer above.
Leftover Strategy: Leftover filled cups keep for 1-2 additional days in the refrigerator, though the cookie will continue to soften. The flavor remains delicious even if the texture changes slightly.
Presentation Ideas That Maximize Impact
How you present these Shamrock Cookie Cups can elevate them from cute treats to the centerpiece of your celebration.
Tiered Display: Arrange cookie cups on a tiered stand or cupcake tower for dramatic height and visual interest. The vertical presentation makes them look more abundant and creates a focal point for your dessert table.
Individual Doilies: Place each cookie cup on a small paper doily on individual dessert plates. This simple touch makes them feel more elegant and special, perfect for sit-down celebrations or plated desserts.
Dessert Platter: Arrange all the cookie cups on a large platter or cake stand, nestled close together. Scatter gold chocolate coins, shamrock confetti, or fresh mint sprigs around the base for extra festive flair.
Gift Boxes: Place 2-3 cookie cups in small bakery boxes lined with tissue paper as hostess gifts or party favors. Tie with green ribbon and add a tag for a personal touch.
Pot of Gold Display: Arrange cookie cups in and around a small decorative pot, creating the illusion they’re treasures overflowing from a leprechaun’s hiding place. Add gold foil-wrapped chocolates to complete the scene.
Color Variation: Make batches with different shades of green pudding—pale mint, shamrock green, deep forest—and arrange them in a gradient pattern on your serving platter. The color variation creates visual interest and sophistication.
Why Cookie Cups Are the Perfect Party Dessert
Among all the St Patrick’s Day treats you could make, cookie cups occupy a special category because they solve multiple practical challenges while delivering impressive results.
The individual portion format eliminates serving complications. No cutting, no plating decisions, no worrying about portion sizes. Each guest simply takes a cup and enjoys. That simplicity is invaluable when serving crowds or managing self-service dessert tables.
They’re inherently impressive without requiring advanced skills. The cup shape creates visual interest and suggests complexity, but the actual technique is straightforward enough for beginners. You get maximum impact for your effort.
The edible container means no dishes to wash or dispose of. Everything is completely edible, which reduces waste and cleanup. For large gatherings where dishwashing capacity is limited, this advantage matters significantly.
They’re customizable to an almost infinite degree. Change any component—cookie flavor, filling type, topping choice—and you have an entirely different dessert using the same basic technique. That versatility means you can make these for any holiday or occasion simply by adjusting the details.
Most importantly, they’re genuinely delicious. This isn’t just a pretty presentation—the combination of buttery cookie, creamy pudding, and fluffy whipped cream creates balanced flavor and satisfying texture that makes people genuinely happy.
Make These and Watch Them Disappear
These Shamrock Cookie Cups prove that impressive St Patrick’s Day treats don’t require professional equipment, expensive ingredients, or years of baking experience. Sometimes the most memorable desserts are the ones that combine simple techniques with creative presentation.
When you arrange a platter of these adorable green-filled cookie cups at your celebration, prepare for enthusiastic responses. They’ll disappear quickly—partly because they’re delicious, partly because the individual portion format makes it easy to grab one (or three), and partly because they’re so darn cute that people can’t resist.
So grab your muffin tin, roll out that dough, and get ready to create the most charming St. Patrick’s Day treats your celebration has ever seen. Your shamrock cookie cups—and the smiles they create—are waiting.
Happy baking, and may your cookie cups be ever adorable, ever delicious, and ever lucky!
Shamrock Cookie Cups
Equipment
- 12-cup muffin tin
- mixing bowls
- hand or stand mixer
- wire cooling rack
- spoon or tart shaper
Ingredients
- 1 roll (16.5 oz) refrigerated sugar cookie dough (or homemade equivalent)
- 1 box (3.4 oz) instant vanilla pudding mix
- 2 cups cold whole milk
- 3-6 drops green gel food coloring
- 1 cup heavy whipping cream
- 2 tbsp powdered sugar
- 1/2 tsp vanilla extract
- 2-3 tbsp shamrock sprinkles or green sanding sugar
Instructions
- Preheat oven to 350°F (175°C) and generously grease a 12-cup muffin tin.
- Divide sugar cookie dough into 12 equal portions and roll into balls.
- Place each dough ball into a muffin cup and press evenly along the bottom and up the sides to form a cup shape.
- Bake 12–15 minutes until edges are lightly golden. Immediately press centers gently with the back of a spoon to maintain the well shape.
- Cool in pan for 10 minutes, then carefully remove and cool completely on a wire rack.
- Whisk pudding mix and cold milk for 2 minutes until thickened. Add green food coloring and mix until evenly tinted. Chill 15–20 minutes.
- Beat heavy cream until slightly thickened. Add powdered sugar and vanilla; beat until stiff peaks form.
- Fill each cooled cookie cup with green pudding, spooning or piping evenly.
- Top with whipped cream and decorate with shamrock sprinkles.
- Refrigerate at least 30 minutes before serving.