
There are desserts that taste good, and then there are desserts that make people stop mid-conversation and say “Wait, you made that?” This Brownie Mint Trifle is firmly, gloriously in the second category.
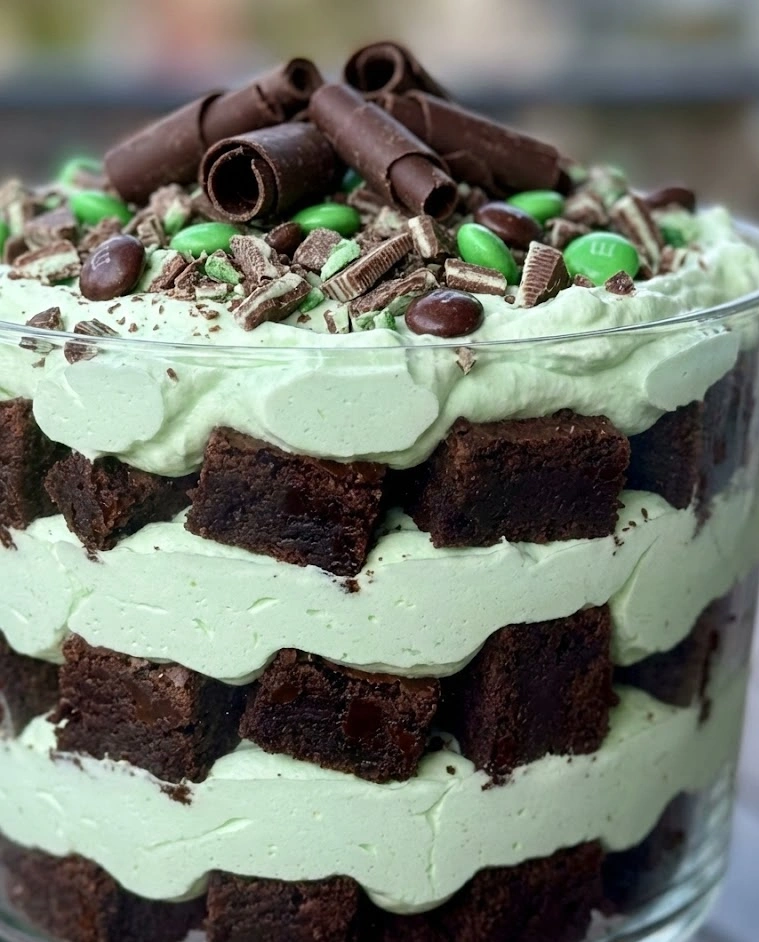
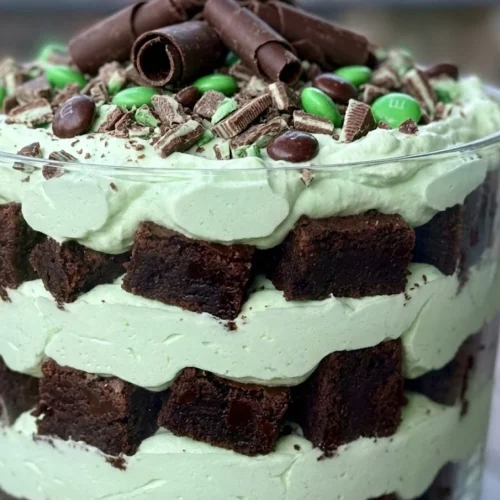
Layers upon layers of pure indulgence stacked in a clear glass trifle bowl that showcases every gorgeous component. Fudgy chocolate brownies broken into rustic chunks. Silky chocolate pudding rich enough to make your eyes close. Pillowy mint-infused whipped cream that’s both refreshing and decadent. Crushed Andes mints adding that signature green-and-chocolate color combination that screams St. Patrick’s Day sophistication.
This is one of those St Patrick’s Day treats that looks like it came from a professional bakery but assembles in less than thirty minutes. And once you taste it—that perfect balance of chocolate richness and refreshing mint—you’ll understand why trifles have been showstopping desserts for generations.
Why You’ll Love This Brownie Mint Trifle
Let’s start with the most obvious reason: this dessert is absolutely stunning.
The layered presentation in a clear trifle bowl creates visual drama that’s impossible to ignore. Every layer is visible through the glass—dark chocolate brownies, creamy white mint whipped cream, rich chocolate pudding, bright green Andes mints. The repetition of these layers creates a pattern that’s both orderly and organic, elegant and approachable. This is the dessert that becomes the centerpiece of your table without even trying.
The flavor combination is absolutely perfect. Chocolate and mint is one of the classic dessert pairings for a reason—the cool refreshment of mint cuts through the richness of chocolate in a way that makes each element taste better than it would alone. Every spoonful delivers that contrast, keeping the dessert interesting from first bite to last.
It’s remarkably easy to assemble. Despite looking elaborate and time-consuming, this trifle uses simple components that come together quickly. Boxed brownie mix, instant pudding, and whipped cream with peppermint extract—nothing complicated or intimidating. The assembly is literally just layering. If you can stack, you can make this trifle.
This dessert serves a crowd beautifully. A standard trifle bowl holds 12-16 generous servings, making it ideal for parties, potlucks, or large family gatherings. Unlike individual desserts that require precise portioning and plating, you simply scoop from the bowl and serve. That efficiency matters when you’re feeding a crowd.
Finally, it must be made ahead. This isn’t just an option—it’s a requirement. The dessert needs several hours or overnight for the flavors to meld and the brownies to soften slightly from absorbing the surrounding creams. That mandatory make-ahead quality is perfect for party preparation when you need one less thing to do on the actual day of celebration.
Key Ingredients: Building Blocks of Layered Perfection
Understanding what each component contributes helps you build the most delicious, visually stunning trifle possible.
Fudgy Brownies: These form the structural foundation of your trifle. Use a boxed mix for convenience (nothing wrong with that—box mixes are engineered for consistent results) or your favorite from-scratch brownie recipe. The key is that they should be fudgy, not cakey. Fudgy brownies have a dense, moist texture that softens beautifully when layered with pudding and cream. Cakey brownies become dry and don’t integrate well with the other components. Underbake them slightly—by about 2-3 minutes—for maximum fudginess.
Chocolate Pudding: Instant chocolate pudding creates the rich, creamy layer that binds everything together. The pudding adds moisture, chocolate intensity, and a silky texture that contrasts beautifully with both the brownies and the whipped cream. Make it with whole milk rather than skim for the richest, most luxurious texture. Some recipes use homemade pudding, but instant is perfectly acceptable and significantly faster.
Heavy Whipping Cream: This is your base for the mint whipped cream layers. Heavy cream (at least 36% fat) whips into stiff, stable peaks that hold their shape for days. Half-and-half or light cream won’t work—they don’t contain enough fat to whip properly. The cream should be very cold—refrigerator-cold at minimum, or even chill your mixing bowl and beaters for 10 minutes before whipping for best results.
Peppermint Extract: This transforms plain whipped cream into refreshing mint cream that defines this dessert. Start with ½ teaspoon and taste—peppermint extract is potent, and a little goes a long way. You want noticeable mint flavor that’s refreshing without being toothpaste-like. Pure peppermint extract is superior to imitation for the cleanest, most authentic mint flavor.
Powdered Sugar: Added to the whipped cream for sweetness and stability. Powdered sugar dissolves instantly in cream and contains a small amount of cornstarch that helps stabilize the whipped cream, making it hold up better over time. Granulated sugar doesn’t dissolve as readily and can make whipped cream feel grainy.
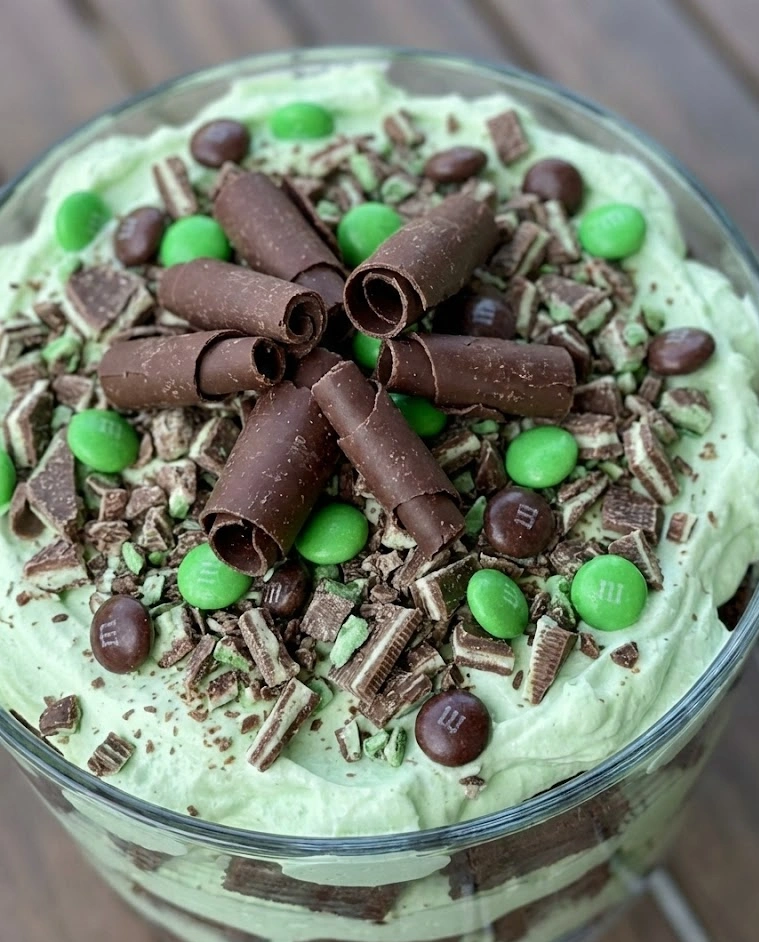
Andes Mints: These iconic green-and-chocolate mints are perfect for this trifle. They provide that signature St. Patrick’s Day color, they’re already the right flavor profile, and they’re widely available. Crush them coarsely—you want recognizable pieces, not dust. The crunch of the mint pieces adds textural interest that makes every bite more dynamic.
Green Food Coloring (Optional): A few drops added to the whipped cream creates a pale green tint that enhances the St. Patrick’s Day theming. This is purely aesthetic—the dessert tastes identical with or without it—but the visual impact of alternating white and pale green cream layers is undeniably beautiful.
Vanilla Extract: Added to both the pudding and the whipped cream, vanilla enhances and rounds out all the other flavors. It makes chocolate taste more chocolatey and mint taste brighter. Never skip the vanilla—it’s doing important flavor work even if you can’t taste it distinctly.
How to Make Brownie Mint Trifle
This dessert comes together in distinct stages. Take your time with each component and the assembly will be effortless.
Step 1: Bake your brownies according to package directions in a 9×13-inch pan, but remove them from the oven 2-3 minutes before the recommended time. Insert a toothpick into the center—it should come out with moist crumbs, not completely clean. These slightly underbaked brownies will be fudgy and perfect for the trifle. Let them cool completely in the pan on a wire rack. This takes about 1-2 hours, or you can refrigerate them for 30 minutes to speed cooling.
Step 2: While brownies cool, make your chocolate pudding. In a large bowl, whisk together instant chocolate pudding mix and cold whole milk according to package directions. Whisk vigorously for 2 minutes until the pudding begins to thicken. Cover with plastic wrap pressed directly against the surface to prevent skin formation, and refrigerate for at least 15-20 minutes to set completely.
Step 3: Make your mint whipped cream. In a large, cold bowl using a hand mixer or in a stand mixer with the whisk attachment, beat cold heavy cream on medium-high speed until it begins to thicken, about 1-2 minutes. Add powdered sugar, peppermint extract, vanilla extract, and a drop or two of green food coloring if using. Continue beating on high speed until stiff peaks form, 2-3 more minutes. The whipped cream should hold its shape when you lift the beaters and form peaks that stand straight up rather than curling over. Don’t overbeat—overbeaten cream becomes grainy and eventually turns to butter.
Step 4: Taste the whipped cream and adjust. Need more mint flavor? Add another drop or two of peppermint extract and whisk briefly to incorporate. Want it sweeter? Add more powdered sugar. This is your chance to customize to your exact preferences.
Step 5: Crush your Andes mints. Place them in a zip-top bag and use a rolling pin or the bottom of a heavy glass to crush them into coarse pieces. You want a variety of sizes—some fine pieces, some larger chunks. The texture variation is part of what makes the trifle interesting.
Step 6: Once brownies are completely cool, cut them into 1-inch cubes or break them into rustic, irregular chunks. Either approach works—cubes are more uniform, chunks are more organic and casual. Choose based on your aesthetic preference.
Step 7: Now comes the fun part: assembly. Start with a layer of brownie chunks covering the bottom of your trifle bowl. You’ll use about one-third of the brownies for this first layer. Press them gently to create a relatively even surface.
Step 8: Spread about one-third of the chocolate pudding over the brownie layer. Use the back of a spoon or an offset spatula to spread it evenly to the edges of the bowl so it’s visible through the glass. Visual continuity matters in a trifle.
Step 9: Add about one-third of the mint whipped cream on top of the pudding layer. Again, spread evenly to the edges. The contrast between the dark chocolate pudding and the white or pale green whipped cream should be visible through the glass—this is what creates that beautiful layered effect.
Step 10: Sprinkle about one-third of the crushed Andes mints over the whipped cream layer. The green pieces should be visible through the glass, creating pops of festive color throughout the dessert.
Step 11: Repeat the entire layering process two more times: brownies, pudding, whipped cream, Andes mints. Each layer should reach slightly higher than the last, creating a graduated, dome-like effect at the top.
Step 12: For the final top layer, get creative with your presentation. Create decorative swirls in the whipped cream using the back of a spoon. Arrange Andes mint pieces in a pattern—a spiral from center outward, a border around the edge, or random but intentional placement. You can also add chocolate shavings, additional whipped cream rosettes piped with a pastry bag, or even fresh mint leaves for color.
Step 13: Cover the trifle bowl tightly with plastic wrap and refrigerate for at least 4 hours, or preferably overnight. This resting time is essential—it allows the brownies to absorb moisture from the pudding and cream, creating a cohesive dessert where the layers meld together rather than remaining distinctly separate.
Step 14: When ready to serve, remove the plastic wrap and present the entire trifle bowl at the table. Use a large serving spoon to scoop portions that include all the layers, serving into individual bowls or plates.
Variations & Creative Customizations
This Brownie Mint Trifle is wonderfully adaptable to different flavor preferences and dietary needs.
Mint Oreo Addition: Layer crushed mint Oreos between the other layers for extra crunch and intensified mint-chocolate flavor. The cookies soften slightly but maintain enough structure to add textural interest.
Irish Cream Version: Replace the peppermint extract with 2-3 tablespoons of Bailey’s Irish Cream in the whipped cream for an adults-only variation that’s sophisticated and deeply flavorful. The Bailey’s-chocolate combination is classic for a reason.
Dark Chocolate Upgrade: Use dark chocolate brownies and dark chocolate pudding for a richer, less sweet version that adults often prefer. The bittersweet chocolate balances beautifully against the sweet mint cream.
Grasshopper Pie Trifle: Add a layer of chocolate cookie crumbs (crushed Oreos with filling removed) between each layer to mimic the classic grasshopper pie. The cookie layer adds textural contrast and visual interest.
Gluten-Free Adaptation: Use gluten-free brownie mix and ensure your pudding mix is gluten-free (most instant puddings are, but verify). The rest of the components are naturally gluten-free. The result is indistinguishable from the traditional version.
Lighter Version: Use sugar-free pudding mix and replace some of the whipped cream with whipped Greek yogurt for a lighter dessert that’s still indulgent. You can also use low-fat milk for the pudding, though the texture will be slightly less rich.
Peppermint Bark Topping: Instead of crushed Andes mints, top with homemade or store-bought peppermint bark broken into shards and inserted vertically into the top layer. The dramatic height and sparkle create stunning visual impact.
Individual Trifles: Instead of one large trifle, layer the components in individual glass cups or mason jars. These work beautifully for plated desserts, gifts, or portion-controlled servings. The layering is more visible in small containers, which some people prefer aesthetically.
Pro Tip: When layering, use a pastry bag or large zip-top bag with the corner cut off to pipe the pudding and whipped cream layers rather than spooning them. This creates cleaner, more distinct layers that look more professional through the glass. It’s a small technique upgrade that makes a noticeable visual difference.
Storage & Make-Ahead Strategy
This Brownie Mint Trifle not only can be made ahead—it should be. Here’s how to handle it for best results.
Refrigerator Storage: The assembled trifle keeps beautifully in the refrigerator for up to 3 days. Cover tightly with plastic wrap to prevent the whipped cream from absorbing refrigerator odors and to keep the surface from drying out. The dessert actually improves over the first 24 hours as flavors meld and the brownies soften to perfect texture.
Make-Ahead Timeline: Bake brownies up to 2 days ahead and store at room temperature wrapped tightly. Make pudding up to 1 day ahead and refrigerate. Whip the cream and assemble the trifle 4-24 hours before serving. The longer resting time (up to 24 hours) creates the most cohesive, integrated flavors where the layers taste unified rather than distinct.
Freezing Considerations: This trifle doesn’t freeze well due to the whipped cream, which separates and becomes watery upon thawing. However, you can freeze the baked brownies for up to 3 months, then thaw and assemble when needed.
Serving from Cold: Trifle is best served cold, directly from the refrigerator. The whipped cream layers need to stay chilled to maintain their structure. If your event is outdoors or in a warm environment, place the trifle bowl in a larger bowl filled with ice to keep it cold during serving.
Leftover Storage: Cover leftover trifle tightly and refrigerate for up to 2 additional days. The whipped cream may deflate slightly over time, and the brownies will continue to soften, but the flavor remains delicious.
Presentation & Serving Tips
The trifle bowl itself is part of the presentation, so maximizing visual impact matters.
Choose the Right Bowl: A clear glass trifle bowl with straight or slightly flared sides shows off the layers best. The bowl should hold at least 3 quarts (12 cups) for a standard recipe. If you don’t own a trifle bowl, a large clear glass mixing bowl works perfectly—the important thing is that the glass is clear so layers are visible.
Layer Visibility: Always spread each layer completely to the edges of the bowl so it’s visible through the glass. Gaps or irregular edges look unfinished and diminish the visual impact. Take an extra thirty seconds per layer to spread carefully and you’ll be rewarded with a stunning presentation.
Garnish Thoughtfully: The top layer is what guests see first, so make it count. Arrange Andes mint pieces decoratively, add chocolate curls or shavings, pipe whipped cream rosettes, or even add a few fresh mint sprigs for color. The garnish should look intentional but not overly fussy.
Serve Generously: Use a large serving spoon and dig deep to ensure each portion includes all the layers. The beauty of trifle is getting a bit of everything in each bite—don’t rob your guests of that experience by serving from the top only.
Table Placement: Position the trifle as a centerpiece on your dessert table. The visual drama of the layered glass bowl deserves prominence. Surround it with small plates, dessert forks, and napkins for easy self-service.
Why Trifles Are the Ultimate Party Dessert
Among all the St Patrick’s Day treats you could make, trifles occupy a special category because they solve so many practical problems while delivering stunning results.
They’re impressively beautiful without requiring professional skills. The layers create the visual impact—you don’t need piping expertise, cake decorating knowledge, or artistic talent. You just need to layer thoughtfully and the trifle bowl does the rest.
They serve crowds effortlessly. One trifle feeds 12-16 people generously, and making multiples requires no additional technique or skill—just more ingredients and more bowls. That scalability is invaluable for large gatherings.
They must be made ahead, which eliminates last-minute stress. You can’t rush a trifle—it needs time to set and meld. That requirement becomes an advantage when you’re juggling multiple dishes and decorating responsibilities on the day of your event.
The flavor is genuinely spectacular. This isn’t just a pretty dessert—it tastes incredible. The combination of fudgy brownies, silky pudding, refreshing mint cream, and crunchy mints creates complexity and satisfaction that keeps people coming back for seconds.
Most importantly, trifles create moments. When you carry that gorgeous glass bowl to the table and set it down, people react. They lean in. They take pictures. They ask how you made it. That kind of engagement and appreciation is what makes cooking for others so rewarding.
Make This and Become a Trifle Convert
This Brownie Mint Trifle proves that impressive desserts don’t require professional training, expensive ingredients, or hours of labor. Sometimes the most memorable treats are the ones that combine simple components in beautiful, delicious ways.
When you serve this at your St. Patrick’s Day celebration, prepare for enthusiastic responses. The visual impact alone will draw people in, but it’s the first taste—that perfect chocolate-mint combination, that interplay of textures—that will make them true believers.
So grab your trifle bowl, bake those brownies, and get ready to assemble the most showstopping St. Patrick’s Day dessert your celebration has ever seen. Your layers of deliciousness are waiting, and they’re about to make you the star of the party.
Happy layering, and may your trifle be ever beautiful, ever delicious, and ever impressive!
Brownie Mint Trifle
Equipment
- 9×13-inch baking pan
- large mixing bowls
- hand or stand mixer
- trifle bowl (3-quart or larger)
- spatula or offset spatula
Ingredients
- 1 box (9×13 size) fudgy brownie mix, baked and cooled
- 2 boxes (3.9 oz each) instant chocolate pudding mix
- 4 cups cold whole milk
- 3 cups heavy whipping cream
- 3/4 cup powdered sugar
- 1/2-1 tsp peppermint extract
- 1 tsp vanilla extract
- 1 1/2 cups Andes mints, crushed
- 2-3 drops green food coloring (optional)
Instructions
- Bake brownies according to package directions in a 9×13-inch pan, slightly underbaking for extra fudginess. Cool completely, then cut into cubes or rustic chunks.
- Whisk together instant pudding mix and cold milk for 2 minutes until thickened. Refrigerate 15–20 minutes to fully set.
- Beat cold heavy cream until slightly thickened. Add powdered sugar, peppermint extract, vanilla extract, and optional green food coloring. Beat until stiff peaks form.
- Crush Andes mints into coarse pieces using a zip-top bag and rolling pin.
- Layer one-third of brownie pieces into the bottom of a clear trifle bowl.
- Spread one-third of the chocolate pudding evenly over the brownies, reaching the edges.
- Spread one-third of the mint whipped cream over the pudding layer.
- Sprinkle one-third of the crushed Andes mints over the whipped cream.
- Repeat layers two more times, finishing with whipped cream and decorative mint pieces on top.
- Cover tightly and refrigerate at least 4 hours or overnight before serving.